
 Software Tutorial
Computer Software
How to exit Lite Mode in BandiZip? How to exit the streamlined mode of BandiZip
Software Tutorial
Computer Software
How to exit Lite Mode in BandiZip? How to exit the streamlined mode of BandiZip
How to exit Lite Mode in BandiZip? How to exit the streamlined mode of BandiZip

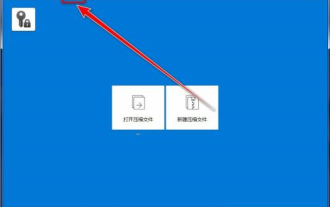
php Editor Banana Introduction: BandiZip is a powerful compression software, but sometimes users may need to exit the streamlined mode to obtain more functions. To exit BandiZip's Lite Mode, just click the "Options" menu in the software interface, then select the "Advanced" tab, find the "Lite Mode" option and uncheck it. With a few simple steps, you can easily exit BandiZip's streamlined mode and enjoy more practical functions.
How to exit BandiZip’s streamlined mode:
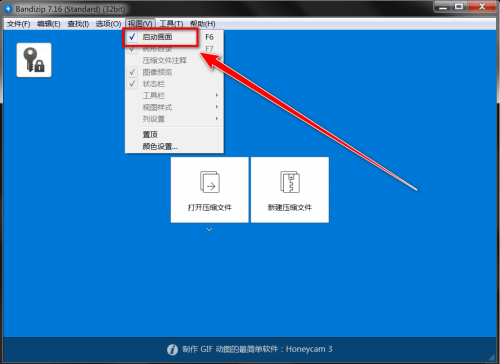
1. Open the software and click the "View" option in the upper toolbar.

2. In the options menu below, uncheck the checkbox on the left side of "Startup Screen".
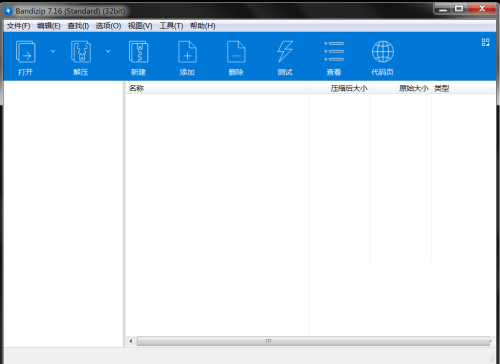
3. In this way, Bandizip will display the complete interface.
The above is the detailed content of How to exit Lite Mode in BandiZip? How to exit the streamlined mode of BandiZip. For more information, please follow other related articles on the PHP Chinese website!

Hot AI Tools

Undresser.AI Undress
AI-powered app for creating realistic nude photos

AI Clothes Remover
Online AI tool for removing clothes from photos.

Undress AI Tool
Undress images for free

Clothoff.io
AI clothes remover

AI Hentai Generator
Generate AI Hentai for free.

Hot Article
Hot Tools

Notepad++7.3.1
Easy-to-use and free code editor

SublimeText3 Chinese version
Chinese version, very easy to use

Zend Studio 13.0.1
Powerful PHP integrated development environment

Dreamweaver CS6
Visual web development tools

SublimeText3 Mac version
God-level code editing software (SublimeText3)
Hot Topics


 How to clear history with BandiZip - How to clear history with BandiZip
Mar 04, 2024 pm 01:43 PM
How to clear history with BandiZip - How to clear history with BandiZip
Mar 04, 2024 pm 01:43 PM
Recently, some friends have asked the editor BandiZip how to clear the history? The following is a method for clearing the history of BandiZip. Friends in need can come and learn more. 1. In the Bandizip window, click "View" on the menu bar (as shown in the picture). 2. In the drop-down menu, remove the check mark in front of "Startup Screen" (as shown in the picture). 3. In the toolbar, click the "arrow" icon to the right of "Open" (as shown in the picture). 4. In the drop-down menu, click "Clear History" (as shown in the picture).
 How to change the theme color in BandiZip-How to change the theme color in BandiZip
Mar 04, 2024 pm 03:46 PM
How to change the theme color in BandiZip-How to change the theme color in BandiZip
Mar 04, 2024 pm 03:46 PM
Recently, some friends have asked the editor how to change the theme color of BandiZip? The following is a method for changing the theme color of BandiZip. Friends who need it can come and learn more. 1. Open the "Bandizip" software (as shown in the picture). 2. Enter the main interface of Bandizip and click View (as shown in the picture). 3. In the expanded options, click Color Settings (as shown in the picture). 4. In the settings, click on the color you like (as shown in the picture). 5. After selecting the theme color, click OK to save the settings (as shown in the picture).
 How to use Bandizip to package files into zip format?
Mar 14, 2024 am 09:34 AM
How to use Bandizip to package files into zip format?
Mar 14, 2024 am 09:34 AM
How to use Bandizip to package files into zip format? Many users have this compression software installed on their computers. When some friends package files, what comes out is other files instead of zip. So how to operate the compressed package in zip format? Regarding this issue, In this issue, the editor will share the specific operation methods with the majority of users. I hope that the content of today’s software tutorial can be helpful to the majority of users. Steps for Bandizip to package files into zip format: 1. Select the file to be packaged, right-click and select "Add to compressed file (Bandizip)" in the option list. 2. Select “Compression Format&rd” in the window
 How to set font color in BandiZip-How to set font color in BandiZip
Mar 05, 2024 pm 03:20 PM
How to set font color in BandiZip-How to set font color in BandiZip
Mar 05, 2024 pm 03:20 PM
Many people don’t know how to set the font color in BandiZip? The article brought to you today is about how to set the font color in BandiZip. If you still don’t know, let’s learn it with the editor. Step 1: First open Bandizip, click Settings under Options, as shown in the picture: Step 2: In the settings page that opens, click View on the left, as shown in the picture: Step 3: In the font color position, set it to black, such as Figure: Step 4: After the settings are completed, click OK below, as shown in the figure:
 How does Bandizip encrypt decompressed files? Bandizip compressed file encryption method
Mar 14, 2024 am 08:40 AM
How does Bandizip encrypt decompressed files? Bandizip compressed file encryption method
Mar 14, 2024 am 08:40 AM
When we use Bandizip software to package files, many people take the next step directly. Some compressed packages contain important content and need to be encrypted. However, many users do not know how Bandizip encrypts decompressed files. To address this problem , this software tutorial will share the setting method. Friends in need are welcome to view the complete operation steps. Introduction to Bandizip compressed file encryption method: 1. Double-click to enter the software and click the "New Compressed File" option on the homepage. 2. In the new window, click the "Add" button and select the files that need to be compressed. 3. Then click "Browse"
 How to enable encryption algorithm in BandiZip - How to enable encryption algorithm in BandiZip
Mar 04, 2024 pm 02:04 PM
How to enable encryption algorithm in BandiZip - How to enable encryption algorithm in BandiZip
Mar 04, 2024 pm 02:04 PM
Friends, do you know how to enable the encryption algorithm in BandiZip? Today I will explain how to enable the encryption algorithm in BandiZip. If you are interested, come and take a look with me. I hope it can help you. 1. First open the BandiZip software, click Options in the upper menu bar, and click Settings in the drop-down options (as shown in the picture). 2. Find and click the View option in the new page that pops up (as shown in the picture). 3. Finally, on the right side of the menu bar under column settings, find and check the encryption algorithm (as shown in the picture).
 How to open a temporary folder in BandiZip - How to open a temporary folder in BandiZip
Mar 05, 2024 pm 05:28 PM
How to open a temporary folder in BandiZip - How to open a temporary folder in BandiZip
Mar 05, 2024 pm 05:28 PM
Many people don’t know how to open a temporary folder in BandiZip? The article brought to you today is how to open a temporary folder in BandiZip. If you still don’t know, let’s learn it with the editor. 1. Open [Bandizip] and find [Settings] under [Options] in the menu bar (as shown in the picture). 2. At this time, you can see the [Advanced] attribute and click it (as shown in the picture). 3. Finally, you can see the [Temporary Folder] check box and turn it on (as shown in the picture).
 How BandiZip associates file types - BandiZip associates file types
Mar 04, 2024 pm 10:22 PM
How BandiZip associates file types - BandiZip associates file types
Mar 04, 2024 pm 10:22 PM
Friends, do you know how BandiZip associates file types? Today I will explain how BandiZip associates file types. If you are interested, come and take a look with me. I hope it can help you. 1. Open Bandizip and click "Options" on the menu bar (as shown in the picture). 2. In the drop-down menu, click "Settings" (as shown in the picture). 3. In the settings window, click "File Association" (as shown in the figure). 4. In the "File Association" option, click "Select All" (as shown in the figure). 5. Click the "OK" button to associate the selected file type (as shown in the figure).
