curl -LO https://github.com/k8sgpt-ai/k8sgpt/releases/download/v0.3.6/k8sgpt_amd64.rpmsudo rpm -ivh -i k8sgpt_amd64.rpm
curl -LO https://github.com/k8sgpt-ai/k8sgpt/releases/download/v0.3.6/k8sgpt_386.debsudo dpkg -i k8sgpt_386.deb
curl -LO https://github.com/k8sgpt-ai/k8sgpt/releases/download/v0.3.6/k8sgpt_amd64.debsudo dpkg -i k8sgpt_amd64.deb
Troubleshooting is too annoying, try the super power of GPT
When using Kubernetes, you will inevitably encounter problems in the cluster, which need to be debugged and repaired to ensure that Pods and services can run normally. Whether you are a beginner or an expert in dealing with complex environments, debugging processes within a cluster is not always easy and can become time-consuming and tedious. In Kubernetes, the key to diagnosing problems is understanding the relationships between components and how they interact with each other. Logging and monitoring tools are key to problem solving and can help you quickly locate and resolve faults. In addition, an in-depth understanding of Kubernetes resource configuration and scheduling mechanism is also an important part of solving problems. When faced with a problem, first make sure your cluster and application are configured correctly. Then, locate the source of the problem by viewing logs, monitoring indicators, and events. Sometimes the problem may involve network configuration, storage issues or bugs in the application itself, which need to be carefully considered. In a cloud native environment, there are a variety of debugging solutions to choose from, which can help you easily access the cluster. Information. However, it is important to note that most solutions do not provide complete contextual information.
In this blog post, I’ll introduce you to K8sGPT, a project that aims to make the superpowers of Kubernetes available to everyone.
Application scenarios of K8sGPT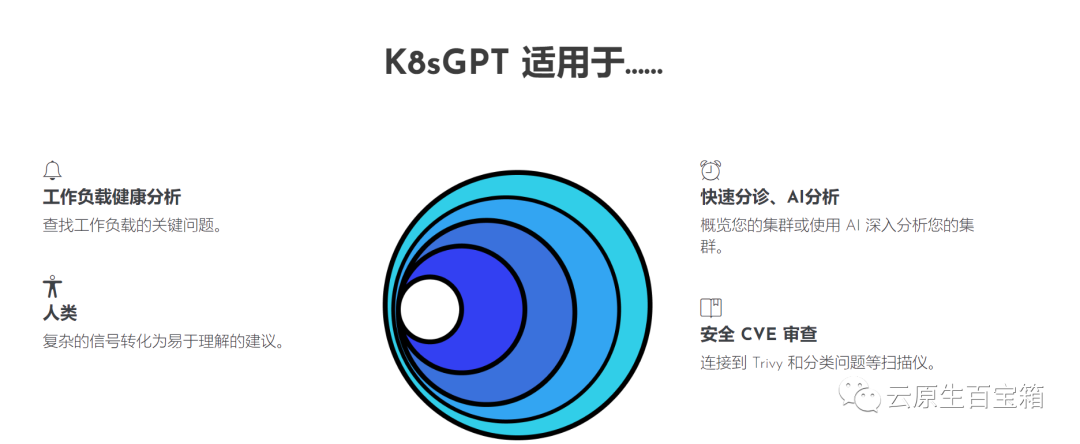 Overview
K8sGPT is a completely open source project developed by a group of experienced cloud native ecosystem experts Engineers launched in April 2023. The core idea of the project is to use artificial intelligence models to provide detailed and contextual explanations for Kubernetes error messages and cluster insights.
Picture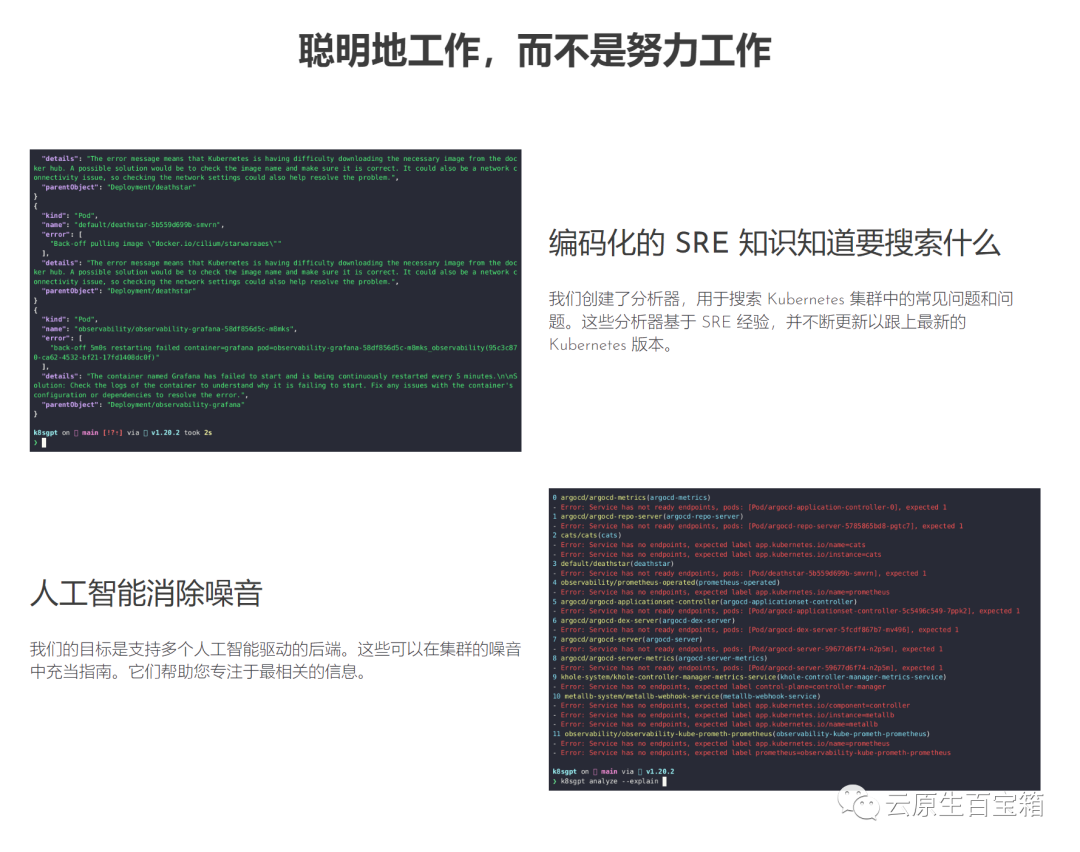 This project has been adopted by two organizations and applied to become a CNCF sandbox project. The vision of this project is to build task-oriented machine learning models for Kubernetes.
The project already supports multiple installation options and different artificial intelligence backends. In this article, I'll show you how to install and start using K8sGPT, the CLI tools and Operators, and how K8sGPT supports other integrations.
Installation
There are various installation options available depending on your preference and operating system. You can find different options in the installation section of the K8sGPT documentation.
The prerequisite for installing K8sGPT as described below is to install Homebrew on a Mac or WSL on a Windows computer.
Next, you can run the following command:
1 |
|
RPM-based installation (RedHat/CentOS/Fedora)
32-bit:
1
curl -LO https://github.com/k8sgpt-ai/k8sgpt/releases/download/v0.3.6/k8sgpt_386.rpmsudo rpm -ivh k8sgpt_386.rpm
Copy after login
1 |
|
1
curl -LO https://github.com/k8sgpt-ai/k8sgpt/releases/download/v0.3.6/k8sgpt_amd64.rpmsudo rpm -ivh -i k8sgpt_amd64.rpm
Copy after login
1 |
|
32 bit:
1
curl -LO https://github.com/k8sgpt-ai/k8sgpt/releases/download/v0.3.6/k8sgpt_386.debsudo dpkg -i k8sgpt_386.deb
Copy after login
1 |
|
1
curl -LO https://github.com/k8sgpt-ai/k8sgpt/releases/download/v0.3.6/k8sgpt_amd64.debsudo dpkg -i k8sgpt_amd64.deb
Copy after login
1 |
|
1 |
|
To see all the commands provided by K8sGPT, use the --help flag:
1 |
|
Prerequisites
The prerequisites for following the next section are having an OpneAI account and a running Kubernetes cluster such as microk8s or minikube which is enough.
After you have an OpneAI account, you need to visit this address https://platform.openai.com/account/api-keys to generate a new API key
Or, you can run the following command , K8sGPT will open the same address in the default browser:
1 |
|
1 |
|
1 |
|
1 |
|
1 |
|
Picture If we look at the events for one of the pods, but we don’t know the specific Cause of the problem:
1 |
|
1 |
|
1 |
|
1 |
|
附加功能
根据你的集群大小和 K8sGPT 在集群中识别的问题数量,你还可以按特定命名空间和工作负载类型进行过滤。
此外,如果你或你的组织担心 OpenAI 或其他后端接收有关你的工作负载的敏感信息,你可以使用--anonymize规避应用的敏感信息。
与其他工具的集成
云原生生态系统中大多数工具的价值源于它们与其他工具的集成程度。
在撰写本文时,K8sGPT 提供了与 Gafana 和 Prometheus 等可观察性工具的轻松集成。此外,还可以为 K8sGPT 编写插件。维护者提供的第一个插件是Trivy,一个一体化的云原生安全扫描器。
你可以使用以下命令列出所有可用的集成:
1 |
|
接下来,我们要激活 Trivy 集成:
1 |
|
这将在集群内安装 Trivy Operator(如果尚未安装):
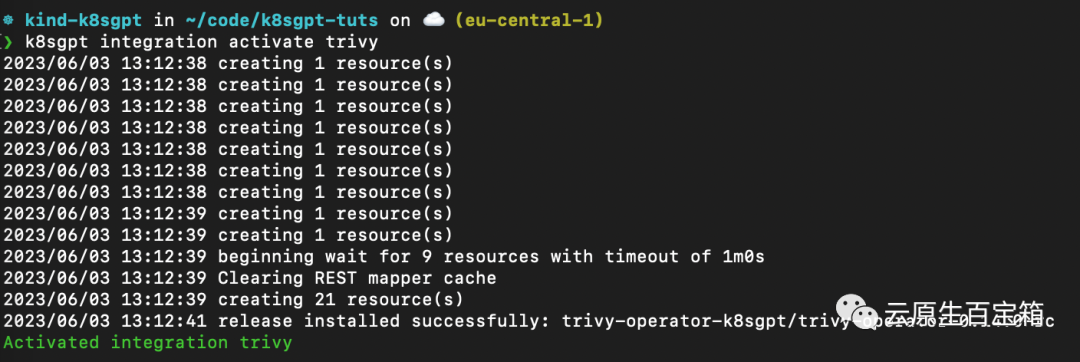 图片
图片
激活集成后,我们可以通过 k8sgpt 过滤器,使用 Trivy 创建的漏洞报告作为 K8sGPT 分析的一部分:
1 |
|
过滤器对应于 k8sgpt 代码中的特定分析器。分析器仅查看相关信息,例如最关键的漏洞。
要使用 VulnerabilityReport 过滤器,请使用以下命令:
1 |
|
(FIXME)与之前类似,我们也可以要求 K8sGPT 对扫描提供进一步的解释:
1 |
|
K8sGPT Operator
虽然 CLI 工具为集群管理员提供了对其基础设施和工作负载执行即席扫描的功能,但 K8sGPT Operator 在集群中全天候 (24/7) 运行。它是 Kubernetes 原生的,这意味着它作为 Kubernetes 自定义资源运行,并生成作为 YAML 清单存储在集群中的报告。
要安装 Operator,请按照以下命令进行操作:
1 |
|
如果你想将 K8sGPT 与 Prometheus 和 Grafana 集成,你可以通过向上面的安装提供values.yaml 清单来使用略有不同的安装:
1 |
|
然后安装 Operator 或更新现有安装:
1 |
|
在本例中,我们告诉 K8sGPT 还安装一个 ServiceMonitor,它将扫描报告中的指标发送到 Prometheus,并为 K8sGPT 创建一个仪表板。如果你使用了此安装,则还需要安装 kube-prometheus-stack Helm Chart 才能访问 Grafana 和 Prometheus。这可以通过以下命令来完成:
1 |
|
此时,你应该在集群内运行 K8sGPT Operator 和 Prometheus Stack Helm Chart(也是 Kubernetes Operator)。
与我们需要向 CLI 提供 OpenAI API 密钥的方式类似,我们需要使用 API 密钥创建 Kubernetes 密钥。为此,请使用与之前相同的密钥,或者在你的 OpenAI 帐户上生成一个新密钥。
要生成 Kubernetes 密钥,请将你的 OpenAI 密钥粘贴到以下命令中:
1 |
|
然后,我们需要配置 K8sGPT Operator 以了解要使用哪个版本的 K8sGPT 以及哪个 AI 后端:
1 |
|
现在,我们需要将此文件应用到我们的 K8sGPT 集群命名空间:
1 |
|
几秒钟内,Operator 将创建新结果:
1 |
|
以下是不同命令的屏幕截图,你可以按照这些命令从 K8sGPT Operator 查看结果报告:
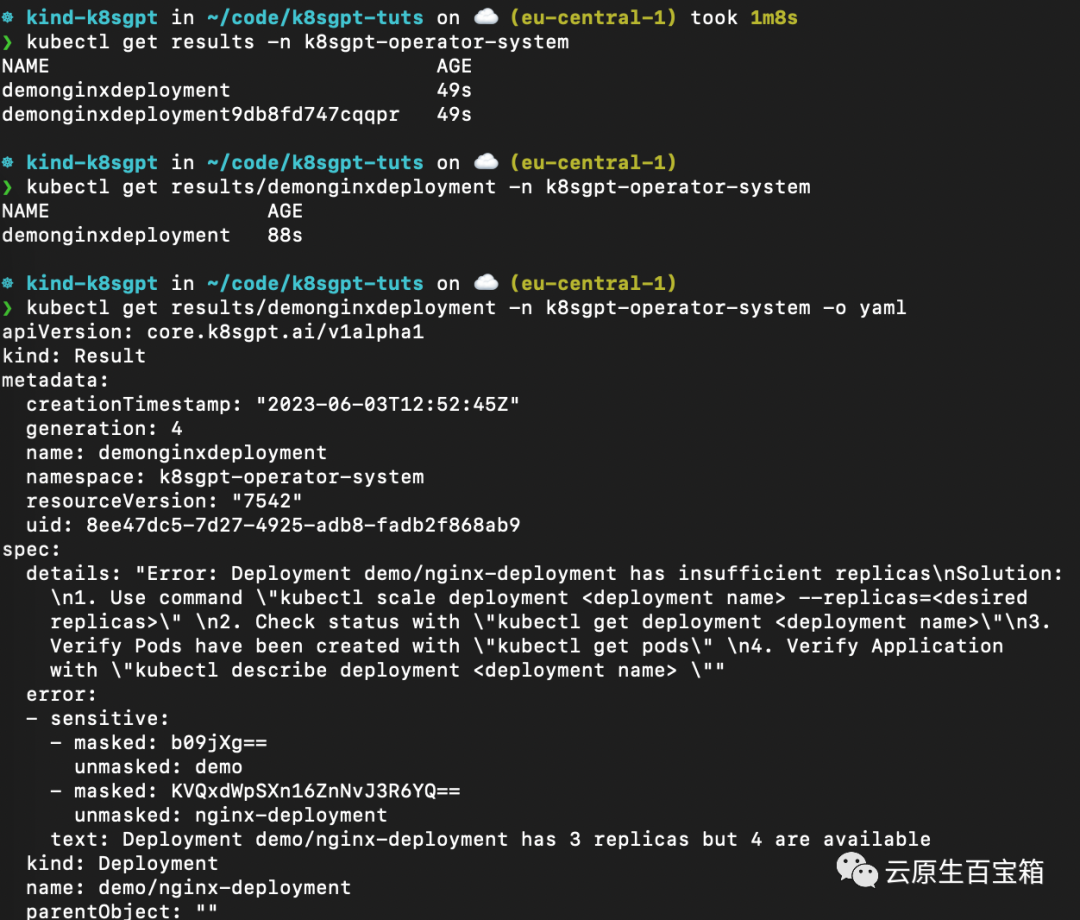 从 K8sGPT Operator 查看结果报告
最后,我们将看一下 Grafana 仪表板。端口转发 Grafana 服务以通过 localhost 访问它:
1 |
|
打开 localhost:3000,然后导航到 Dashboards>K8sGPT Overview,然后你将看到包含结果的仪表板:
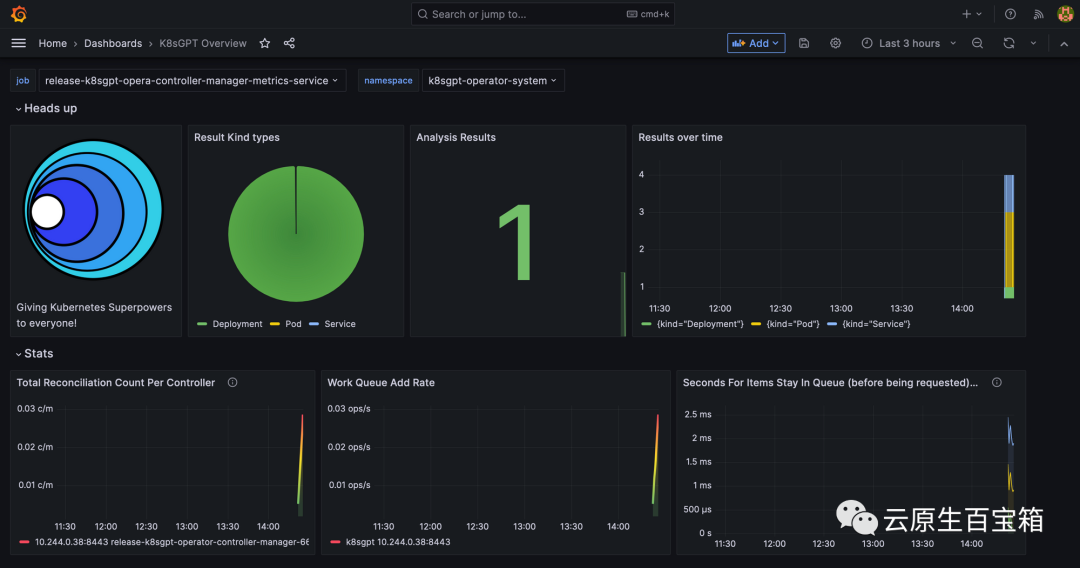 Grafana 中的 K8sGPT 仪表板
参考
- 1. https://k8sgpt.ai/
- 2. https://docs.k8sgpt.ai/
- 3. https://github.com/k8sgpt-ai
The above is the detailed content of Troubleshooting is too annoying, try the super power of GPT. For more information, please follow other related articles on the PHP Chinese website!

Hot AI Tools

Undresser.AI Undress
AI-powered app for creating realistic nude photos

AI Clothes Remover
Online AI tool for removing clothes from photos.

Undress AI Tool
Undress images for free

Clothoff.io
AI clothes remover

AI Hentai Generator
Generate AI Hentai for free.

Hot Article

Hot Tools

Notepad++7.3.1
Easy-to-use and free code editor

SublimeText3 Chinese version
Chinese version, very easy to use

Zend Studio 13.0.1
Powerful PHP integrated development environment

Dreamweaver CS6
Visual web development tools

SublimeText3 Mac version
God-level code editing software (SublimeText3)

Hot Topics
 1376
1376
 52
52
 Should I choose MBR or GPT as the hard disk format for win7?
Jan 03, 2024 pm 08:09 PM
When we use the win7 operating system, sometimes we may encounter situations where we need to reinstall the system and partition the hard disk. Regarding the issue of whether win7 hard disk format requires mbr or gpt, the editor thinks that you still have to make a choice based on the details of your own system and hardware configuration. In terms of compatibility, it is best to choose the mbr format. For more details, let’s take a look at how the editor did it~ Win7 hard disk format requires mbr or gpt1. If the system is installed with Win7, it is recommended to use MBR, which has good compatibility. 2. If it exceeds 3T or install win8, you can use GPT. 3. Although GPT is indeed more advanced than MBR, MBR is definitely invincible in terms of compatibility. GPT and MBR areas
 In-depth understanding of Win10 partition format: GPT and MBR comparison
Dec 22, 2023 am 11:58 AM
When partitioning their own systems, due to the different hard drives used by users, many users do not know whether the win10 partition format is gpt or mbr. For this reason, we have brought you a detailed introduction to help you understand the difference between the two. Win10 partition format gpt or mbr: Answer: If you are using a hard drive exceeding 3 TB, you can use gpt. gpt is more advanced than mbr, but mbr is still better in terms of compatibility. Of course, this can also be chosen according to the user's preferences. The difference between gpt and mbr: 1. Number of supported partitions: 1. MBR supports up to 4 primary partitions. 2. GPT is not limited by the number of partitions. 2. Supported hard drive size: 1. MBR only supports up to 2TB
 The ultimate weapon for Kubernetes debugging: K8sGPT
Feb 26, 2024 am 11:40 AM
As artificial intelligence and machine learning technologies continue to develop, companies and organizations have begun to actively explore innovative strategies to leverage these technologies to enhance competitiveness. K8sGPT[2] is one of the most powerful tools in this field. It is a GPT model based on k8s, which combines the advantages of k8s orchestration with the excellent natural language processing capabilities of the GPT model. What is K8sGPT? Let’s look at an example first: According to the K8sGPT official website: K8sgpt is a tool designed for scanning, diagnosing and classifying kubernetes cluster problems. It integrates SRE experience into its analysis engine to provide the most relevant information. Through the application of artificial intelligence technology, K8sgpt continues to enrich its content and help users understand more quickly and accurately.
 How to determine whether the computer hard drive uses GPT or MBR partitioning method
Dec 25, 2023 pm 10:57 PM
How to check whether a computer hard disk is a GPT partition or an MBR partition? When we use a computer hard disk, we need to distinguish between GPT and MBR. In fact, this checking method is very simple. Let's take a look with me. How to check whether the computer hard disk is GPT or MBR 1. Right-click 'Computer' on the desktop and click "Manage" 2. Find "Disk Management" in "Management" 3. Enter Disk Management to see the general status of our hard disk, then How to check the partition mode of my hard disk, right-click "Disk 0" and select "Properties" 4. Switch to the "Volume" tab in "Properties", then we can see the "Disk Partition Form" and you can see it as Problems related to MBR partition win10 disk How to convert MBR partition to GPT partition >
 How many of the three major flaws of LLM do you know?
Nov 26, 2023 am 11:26 AM
Science: Far from being an eternally benevolent and beneficial entity, the sentient general AI of the future is likely to be a manipulative sociopath that eats up all your personal data and then collapses when it is needed most. Translated from 3WaysLLMsCanLetYouDown, author JoabJackson. OpenAI is about to release GPT-5, and the outside world has high hopes for it. The most optimistic predictions even believe that it will achieve general artificial intelligence. But at the same time, CEO Sam Altman and his team face a number of serious obstacles in bringing it to market, something he acknowledged earlier this month. There are some recently published research papers that may provide clues to Altman's challenge. Summary of these papers
 GPT large language model Alpaca-lora localization deployment practice
Jun 01, 2023 pm 09:04 PM
Model introduction: The Alpaca model is an LLM (Large Language Model, large language) open source model developed by Stanford University. It is fine-tuned from the LLaMA7B (7B open source by Meta company) model on 52K instructions. It has 7 billion model parameters (the larger the model parameters, the larger the model parameters). , the stronger the model's reasoning ability, of course, the higher the cost of training the model). LoRA, the full English name is Low-RankAdaptation of Large Language Models, literally translated as low-level adaptation of large language models. This is a technology developed by Microsoft researchers to solve the fine-tuning of large language models. If you want a pre-trained large language model to be able to perform a specific domain
 How has the GPT technology chosen by Bill Gates evolved, and whose life has it revolutionized?
May 28, 2023 pm 03:13 PM
Xi Xiaoyao Science and Technology Talks Original Author | IQ has dropped completely, Python What will happen if machines can understand and communicate in a way similar to humans? This has been a topic of great concern in the academic community, and thanks to a series of breakthroughs in natural language processing in recent years, we may be closer than ever to achieving this goal. At the forefront of this breakthrough is Generative Pre-trained Transformer (GPT) - a deep neural network model specifically designed for natural language processing tasks. Its outstanding performance and ability to conduct effective conversations have made it one of the most widely used and effective models in the field, attracting considerable attention from research and industry. In a recent detailed
 Build cloud-native applications from scratch using Docker and Spring Boot
Oct 20, 2023 pm 02:16 PM
Build cloud-native applications from scratch using Docker and SpringBoot Summary: Cloud-native applications have become a trend in modern software development. By using container technology and microservice architecture, rapid deployment and scaling can be achieved, and the reliability and maintainability of applications can be improved. . This article will introduce how to use Docker and SpringBoot to build cloud native applications and provide specific code examples. 1. Background introduction Cloud native application (CloudNativeApplication) refers to


