

How to set up multiple audio outputs on your Mac

In most cases, audio devices are designed to operate alone, so only you are listening to songs or enjoying movies. But what if you want to listen to a song on multiple audio devices? In the early days, you might have come across audio splitters that easily routed audio to two separate headphones. These may not be of any use right now since we're dealing with wireless audio devices.
So, how do you connect multiple speakers or headphones to your Mac without using additional accessories? This is what we will explain in this article.
Prerequisites
Before you can set up your speakers and headphones as a single output, you need to connect them all to your Mac. Here are some configurations you can use to connect the audio devices you own to your Mac:
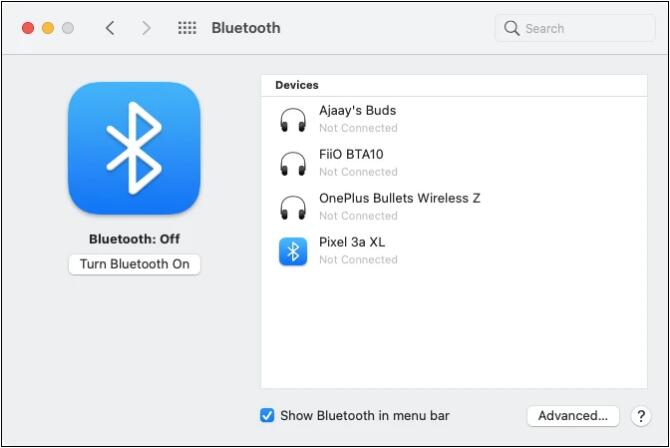
1. Use Bluetooth to connect multiple wireless headphones or speakers
macOS lets you connect to multiple Bluetooth devices at the same time. You can add and configure Bluetooth devices on your Mac by going to System Preferences > Bluetooth. Here you can turn on Bluetooth, add new devices, connect to them, and add a Bluetooth toggle to the top menu bar for easy access.
2. Use the audio jack to plug in one wired audio device and connect the rest via Bluetooth
If you have wired speakers or headphones, you can plug them in with 3.5mm audio jack (if your Mac has one). Unfortunately, you can only plug one of the wired devices into your Mac and then connect the other audio devices via Bluetooth, just like you did in the steps above.
How to Set Up Multiple Audio Outputs on Mac
Once you decide which method you want to take, you can go ahead and set up all your speakers and headphones together.
 You should now see the Audio Devices window on your screen. Here, click on the icon in the lower left corner and select the "Create multiple output device" option when the menu appears.
  You will now see the Multiple Output Device options listed in the left sidebar. You can now connect all the devices you want to add to your multi-output setup. When you do this, they will start to appear in the right pane within the Audio Devices window. To add a device to your multi-output setup, select the checkbox under "Use" next to the device name in this list. If you have wired headphones or speakers connected to your Mac, you must check the "Built-in output" box to add them to your setup. Next, click on the drop-down menu next to Primary Devices at the top. Now, select the audio output you want to use as your master device from the Master device drop-down menu. This is the device that has all the control over playback and volume adjustment. Once done, select your auxiliary device under "Drift Correction." This ensures that the audio on all other devices does not get out of sync due to different sample rates. After that, right-click or Control-click on the “Multiple Output Devices” option on the left sidebar. Now, click on “Use this device for sound output” to enable it. If you wish, you can also enable alerts and sound effects to be played through this device in the same way. After doing this, the new multi-device setting will now be enabled on your Mac. You can now close the audio device window. To make sure this setting is enabled, open System Preferences on your Mac from the Dock, Launchpad, or menu bar (Apple logo > System Preferences). In System Preferences, click Sound. In the Sound window, click the Output tab at the top and make sure the newly configured multi-output device is selected. If not, click to select the Multiple Output Devices option.
 Your multi-output audio is now set up. You can try playing a song or video on your Mac to see if you can hear its audio on all connected devices.
When and why do you want to set up multiple audio outputs?
If you are wondering why you need to use multiple audio devices as output on your Mac. While you can do most of your daily work with a single speaker or headset, in some cases, setting up multiple audio outputs can be a blessing.
That’s all you need to know to set up multiple audio outputs on your Mac.
The above is the detailed content of How to set up multiple audio outputs on your Mac. For more information, please follow other related articles on the PHP Chinese website!

Hot AI Tools

Undresser.AI Undress
AI-powered app for creating realistic nude photos

AI Clothes Remover
Online AI tool for removing clothes from photos.

Undress AI Tool
Undress images for free

Clothoff.io
AI clothes remover

AI Hentai Generator
Generate AI Hentai for free.

Hot Article
Hot Tools

Notepad++7.3.1
Easy-to-use and free code editor

SublimeText3 Chinese version
Chinese version, very easy to use

Zend Studio 13.0.1
Powerful PHP integrated development environment

Dreamweaver CS6
Visual web development tools

SublimeText3 Mac version
God-level code editing software (SublimeText3)
Hot Topics
 1376
1376
 52
52

 How to Fix 'Encryption Credentials Expired” When Printing on Apple Mac
Feb 05, 2024 pm 06:42 PM
How to Fix 'Encryption Credentials Expired” When Printing on Apple Mac
Feb 05, 2024 pm 06:42 PM
Have you ever encountered the "Printer encryption credentials have expired" error message on your Apple Mac computer when trying to print a document? Don't worry! In this tutorial, I will share how to fix expired printer encryption credentials on Apple computers. Let’s get started without further ado. Have you ever encountered the "Printer encryption credentials have expired" error message on your Mac when trying to print a document? Don't worry! In this tutorial, I will share how to fix expired printer encryption credentials on Mac. Let’s get started without further ado. What does it mean if printer encryption credentials expired on Mac? How to Fix Expired Printer Encryption Credentials on Mac Additional Tips and Precautions What Does Expired Printer Encryption Credentials on Mac Mean? Printer encryption credentials on Mac
 How to set the screen of an Apple computer to always be on, and how to make the Mac never sleep
Feb 05, 2024 pm 05:33 PM
How to set the screen of an Apple computer to always be on, and how to make the Mac never sleep
Feb 05, 2024 pm 05:33 PM
Want to stop your Apple Macbook from going to sleep? These are all your options. Apple designed macOS for maximum energy efficiency. Therefore, by default, Apple Mac computers will try to save power as much as possible to extend battery life. Therefore, when you stop using your Mac temporarily, it automatically goes to sleep to save energy. You probably don't want your Mac to go to sleep when you're working on an important task. This guide will show you how to prevent your Mac from going to sleep and keep it awake. How to turn off sleep mode on your Mac macOS lets you control how and when your Mac goes to sleep. However, with the arrival of system settings in macOS Ventura, you may be saving energy
 How to check the battery level of a connected Bluetooth device on your Mac
Feb 05, 2024 pm 01:45 PM
How to check the battery level of a connected Bluetooth device on your Mac
Feb 05, 2024 pm 01:45 PM
Bluetooth accessories such as mice and keyboards are very convenient for your Apple Mac computer. However, these devices have a limited battery life, so checking their battery life regularly ensures you're not caught off guard by sudden disconnections. Who wouldn’t want to check the battery level of a Bluetooth accessory with just a few clicks? Fortunately, your Mac offers several easy ways to check the battery level of Bluetooth devices connected to your Apple Mac computer. Let’s explore these simple options. 1. Check from the Menu Bar on Mac In a Mac, the menu bar is one of the easiest areas to view. Just swipe your cursor to display the menu bar. And, you can make the menu bar always visible in full-screen mode. If you don't see the Bluetooth icon in the menu bar, you need to manually
 How to adjust sleep time on your Mac (set up hibernation)
Feb 05, 2024 pm 02:10 PM
How to adjust sleep time on your Mac (set up hibernation)
Feb 05, 2024 pm 02:10 PM
Do you find that when you don't use your Mac for more than a minute, you constantly need to wake it up? Or do you have the opposite problem, where you leave your Mac alone for a few hours, only to find that when you return it's still awake with the screen on? On your Mac, you can control exactly how long you spend inactive before your display and other components go to sleep. Here's how to adjust your Mac's sleep time. How to set sleep time on Mac In Mac system settings, you can choose how long the display waits before going to sleep. You can choose anywhere from one minute to three hours, or you can choose to have the display never sleep unless you manually put it to sleep. The steps are slightly different depending on which version of macOS you are running.
 Will my work be interrupted if my Mac goes into Sleep Mode while copying a large number of files?
May 08, 2023 pm 08:58 PM
Will my work be interrupted if my Mac goes into Sleep Mode while copying a large number of files?
May 08, 2023 pm 08:58 PM
For example, copying several GB of data to an external hard drive may take several hours. Then the Mac will not be doing any work during the process, and the screen will automatically turn off. Sometimes we even forget that the file copy has not been completed, but the MacBook "Screen" command has been turned off. Mac enters SleepMode, but will file transfers be interrupted? Entering SleepMode will not interrupt file transfer. If the user's MacBook or Mac is always connected to the power supply, and the Mac enters SleepMode, will file transfer be interrupted? You copy hundreds of GB of files from your MacBook to an external hard drive, and close the MacBook screen during the process, causing the Mac to enter SleepMode, but the file
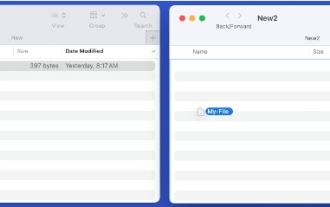 How to move files and folders on Mac computer? 4 ways to explain!
Feb 05, 2024 pm 06:48 PM
How to move files and folders on Mac computer? 4 ways to explain!
Feb 05, 2024 pm 06:48 PM
If you want to organize the files and folders on your Apple Mac computer, you may consider moving some content. By moving items, you can create a more organized file structure to work more efficiently or find what you need faster. We'll show you how to move files and folders on macOS using drag and drop, shortcuts or right-click menus, Terminal, and more so you can use the method that makes more sense or that you're most comfortable with. Method 1: Use Drag and Drop on Mac The easiest way to move files and folders on Apple Mac computers is through drag and drop. Whether you're rearranging icons, widgets, and shortcuts on your desktop, or moving items to other locations on macOS, this method is very convenient and easy to use. 1.Open in two
 2 Ways to Lock Photos on Mac
Mar 22, 2024 am 09:06 AM
2 Ways to Lock Photos on Mac
Mar 22, 2024 am 09:06 AM
When you store photos on your Mac, you sometimes include some private photos. To ensure their privacy, you may consider locking them. This prevents others from viewing the photos without permission. This article will explain how to lock photos on Mac to ensure that only you can access them when you need them. How to Lock Photos on Mac [2 Methods] You can lock photos on Mac in two ways – using the Photos app or the Disk Utility app. Method 1: Use the Photos app You can use the Photos app to lock your photos if they are stored in the app. If your photos are stored elsewhere, you'll need to lock them by moving them to the Photos app. Step 1: Add the picture
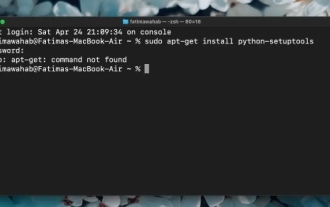 (Fixed) apt-get command not found on Mac – full tutorial
Feb 05, 2024 am 11:51 AM
(Fixed) apt-get command not found on Mac – full tutorial
Feb 05, 2024 am 11:51 AM
If you have ever used a Linux system, you may be familiar with the Apt-get command. It is a command used to install applications or software packages on Linux systems. Although macOS and Linux have some similarities, only a very small number of Linux packages can be installed on macOS. Especially older versions of macOS are more likely to be unable to run Linux applications. Can't find apt-get command? When users try to install Linux applications on macOS, they may receive an "Apt-get command not found" message. Actually, there is nothing wrong with the Apt-get command itself, but it doesn't work on macOS. This is because macOS doesn't have a built-in
