

How to connect Dell laptop to wifi


Dell computer shows no internet when connected to wifi, how to connect Dell computer to wireless network wifi
1. The network connection is disabled. Solution: (1) Click "Control Panel" on the desktop to enter the control panel page. (2) On the "Control Panel" page, click "View Network Status and Tasks". (3) After entering the "View Network Status and Tasks" page, click Change Adapter Settings.
2. First open our computer, and then click Start; see the picture below. In the pop-up interface, we click Settings; see the picture below. In the pop-up interface, we click Network and Internet; see the picture below. Then we slide the mobile hotspot switch to the right; see the picture below.
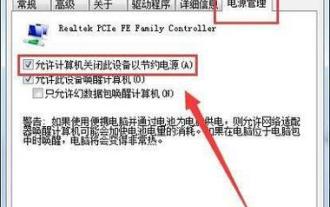
3. If your Dell laptop cannot connect to Wi-Fi, you can try the following solutions: Make sure the Wi-Fi switch is turned on and available. Some laptops have physical switches or function keys to control the wireless connection. Check if your laptop's Wi-Fi driver is working properly.
4. Why does Dell laptop have no network access when connected to wifi? First. Can connect to the wireless network, but cannot connect to the inter. The key lies in the setting of the ip address. Under normal circumstances, after connecting to the wireless, the router automatically assigns an IP address. This function is set on the router (DHCP).
5. The desktop computer comes with a wireless network card module: then turning on wifi is very simple. The steps are as follows: first press Windows i to enter the system settings; then click network and internet, and then click the switch next to WLAN. Open (usually open by default).
6. The default is 20MHz, change it to 2040 MHz. Open the Network and Sharing Center-upper left corner-Manage Wireless Networks. After the relevant icons pop up, right-click the previous wireless network-Delete Network. After deletion, reconnect to the wireless router, enter the username and password, and in the window that pops up, be sure to select the public network.
How to connect Dell laptop to wifi
1. First turn on our computer, and then click Start; see the picture below. In the pop-up interface, we click Settings; see the picture below. In the pop-up interface, we click Network and Internet; see the picture below. Then we slide the mobile hotspot switch to the right; see the picture below.
2. Method: 1. Turn on the wireless switch on the notebook (for Dell computers, press and hold FN and click F2 to turn on the wireless switch); 2. Click the signal icon in the lower right corner; 3. Select the name of your wireless network and click Connect , after entering the password, the connection will be successful. Dell notebook is a notebook computer produced by Dell.
3. The steps are as follows: Turn on the wireless switch of the notebook; click the signal icon in the lower right corner; select your own wireless network, click Connect, enter the password, and the connection will be successful. Wi-Fi is a technology that allows electronic devices to connect to a wireless local area network (WLAN), typically using the 4G UHF or 5G SHF ISM radio frequency bands.
4. How to connect a Dell laptop to the WiFi of the router. First, make sure the laptop has a wireless network card and the driver is normal. Click the network icon in the lower right corner of the desktop; after entering, the network card starts to search for wireless signals and find the wireless you want to connect to. Click Connect and enter your password. Open the browser to verify whether you can access the Internet.
5. How to turn on the wireless network on a Dell laptop: There are shortcut keys on the keyboard. Use the hotkey function FN F2 to turn on the wireless network card. If you try pressing the FN F2 keys and it doesn't work.
6. The desktop computer comes with a wireless network card module: then turning on wifi is very simple. The steps are as follows: first press Windows i to enter the system settings; then click network and internet, and then click the switch next to WLAN. Open (usually open by default).
How to connect a laptop to wireless network wifi
1. Turn on the laptop and start the WIFI signal receiving function. Generally, press the WIFI button. The following takes the win7 system as an example. After the WIFI indicator light is normal, set the wifi name, password and other options according to the wireless routing manual, and write down the password. There is a connection icon in the lower right corner of the screen, click on it.
2. Steps for connecting a laptop to a wireless network: First, make sure the laptop's hardware configuration is normal, such as whether the wireless network card driver is installed.
3. How to connect a laptop to wireless network wifi. Open the menu bar in the lower left corner of the computer, find the "Settings" option and open it, and then open the network and Internet. After entering the Network and Internet page, click the "WLAN" option.
4. The method for connecting a laptop to wireless network wifi is as follows: Computer: MacBook System: OSX9 Open the menu bar in the lower left corner of the computer, find the "Settings" option and open it, then open Network and Internet, enter Network and Internet After entering the page, click on the “WLAN” option.
How to connect Dell inspiron computer to wifi
First turn on our computer, and then click Start; see the picture below. In the pop-up interface, we click Settings; see the picture below. In the pop-up interface, we click Network and Internet; see the picture below. Then we slide the mobile hotspot switch to the right; see the picture below.
Confirm whether the wireless network you want to use can access the Internet normally. You can test it by connecting to the wireless network through your mobile phone. After confirmation, the Dell notebook turns on the shortcut key combination (Fn F5 turns on and off the wireless transmission device). Check whether the wireless network indicator light is normal.
The steps are as follows: Turn on the wireless switch on the notebook; click the signal icon in the lower right corner; select your own wireless network, click Connect, and enter the password to connect successfully.
, turn on the wireless switch on the notebook (for Dell computers, press and hold FN and click F2 to turn on the wireless switch); 2. Click the signal icon in the lower right corner; 3. Select the name of your wireless network, click Connect, and enter the password. The connection is successful. Dell notebook is a notebook computer produced by Dell.
Turn on the wireless network function of your computer. Normally, the wireless network function of a laptop can be turned on or off by pressing the Fn F2 key combination on the keyboard. Select Wireless Networks from the network icon on the taskbar, and then select the name of the wireless network you want to connect to.
Computer computer disassembly recommendations
1. The CPU on the computer motherboard is pressed under the big fan in the chassis, so if you want to remove the CPU from the motherboard, you must first remove it. Remove the fan first. The way to remove the fan is to twist the fixing pin pointed by the arrow in the picture below.
2. First: Unplug all the wires at the back of the machine. Second: Disassemble the case. Third: Unplug the various data cables and power cables on the motherboard. Fourth: Remove the memory, graphics card, network card, CPU fan, and CPU on the motherboard.
3. The method of disassembling the casing of a computer monitor is as follows: Prepare these tools: a slotted screwdriver, a pick knife, a Phillips screwdriver, a hexagonal screwdriver, and a brush. And boxes for screws, and then tidy up the desktop. Prevent the screen from being scratched. Then first remove the base of the monitor. Square display. There are only three screws on the base.
4. Side Guyer. You thought you were turning on your TV. It's annoying to open the side cover of the original machine, and there are some hidden mechanisms. It is very easy to open the side cover of a general case. Loosen the screws on the rear panel to basically open the side cover. The computer does not have a back cover.
5. It is best not to disassemble and assemble it yourself. Check to see if your computer is still under warranty. If it is still there, do not disassemble it, otherwise there will be no warranty.
How to connect Dell notebook to wifi
1. Turn on the wireless switch on the notebook (hold FN on Dell computer and click F2 to turn on the wireless switch); 2. Click the signal icon in the lower right corner; 3. Select Name your own wireless network, click Connect, enter the password, and the connection will be successful. Dell notebook is a notebook computer produced by Dell.
2. Confirm whether the wireless network you want to use can access the Internet normally. You can test it by connecting to the wireless network through your mobile phone. After confirmation, the Dell notebook turns on the shortcut key combination (Fn F5 turns on and off the wireless transmission device). Check whether the wireless network indicator light is normal.
3. The steps are as follows: Turn on the wireless switch of the notebook; click the signal icon in the lower right corner; select your own wireless network, click Connect, enter the password, and the connection will be successful. Wi-Fi is a technology that allows electronic devices to connect to a wireless local area network (WLAN), typically using the 4G UHF or 5G SHF ISM radio frequency bands.
4. To connect to a wireless network, you can follow the steps below: Turn on the wireless network function of your computer. Normally, the wireless network function of a laptop can be turned on or off by pressing the Fn F2 key combination on the keyboard.
The above is the detailed content of How to connect Dell laptop to wifi. For more information, please follow other related articles on the PHP Chinese website!

Hot AI Tools

Undresser.AI Undress
AI-powered app for creating realistic nude photos

AI Clothes Remover
Online AI tool for removing clothes from photos.

Undress AI Tool
Undress images for free

Clothoff.io
AI clothes remover

Video Face Swap
Swap faces in any video effortlessly with our completely free AI face swap tool!

Hot Article
Hot Tools

Notepad++7.3.1
Easy-to-use and free code editor

SublimeText3 Chinese version
Chinese version, very easy to use

Zend Studio 13.0.1
Powerful PHP integrated development environment

Dreamweaver CS6
Visual web development tools

SublimeText3 Mac version
God-level code editing software (SublimeText3)
Hot Topics
 1389
1389
 52
52

 How to install WinNTSetup into Win11 system_How to install WinNTSetup into Win11 system
May 08, 2024 am 11:19 AM
How to install WinNTSetup into Win11 system_How to install WinNTSetup into Win11 system
May 08, 2024 am 11:19 AM
First download the latest Win11 system ISO image, and then in Win10 system, you can directly right-click on the downloaded ISO image file and select [Load]; if it is under WinPE, WinXP, or Win7 system, you need to use the virtual optical drive tool to load the ISO Image; or you can directly decompress the ISO image file without using a virtual optical drive. Then run WinNTSetup. The software interface is as shown in the figure: First locate the location of the install.wim file. You can find the install.wim file in the sources directory of the Win11 ISO image loaded or decompressed by the virtual optical drive. Then set the location of the boot disk and installation disk. Generally, you are going to put W
 When I turn on the computer, it always stops at the motherboard logo screen. Nothing happens when I press anything, and I can't enter the bios?
Apr 23, 2024 am 09:13 AM
When I turn on the computer, it always stops at the motherboard logo screen. Nothing happens when I press anything, and I can't enter the bios?
Apr 23, 2024 am 09:13 AM
When I turn on the computer, it always stops at the motherboard logo screen. Nothing happens when I press anything, and I can't enter the bios? This is usually because the BIOS battery voltage is too low, and the system time has returned to the BIOS preset time, such as 2000.1.1, 00:00. You can use it after pressing F1 to enter the bios and set the time. Do not turn off the AC power after shutting down at night. Generally, the system time will not be lost when you turn on the computer the next day, and you can still enter the system normally. If the AC power is cut off, the battery voltage cannot sustain the power consumption of the bios, and the computer will be in the same state again the next day when it is turned on. Replacing the bios battery is the ultimate solution. Win11 is stuck on the motherboard logo interface when booting? 1. It is a problem with bios settings. We only need to find the corresponding setting items.
 Can I access the Internet by plugging the network cable directly into my computer?
Apr 25, 2024 am 08:30 AM
Can I access the Internet by plugging the network cable directly into my computer?
Apr 25, 2024 am 08:30 AM
Can I access the Internet by plugging the network cable directly into my computer? If it is a desktop, it cannot be used directly. You need to open the computer network sharing center, find the adapter interface, and click on the Ethernet card properties. Then open settings, click the "Configuration" option, select "Advanced" and find the connection speed and duplex mode. Finally, change "Automatic Detection" to "10M Duplex" or "10M Half-Duplex", and click to confirm that there is a router. Connect the computer to the router with a network cable to access the Internet. Use a network cable to connect the LAN interface of the computer and the router. After the connection is completed, you can access the Internet normally. Can you access the Internet after checking that the host is online? Under normal circumstances, the new computer will be able to access the Internet as long as all the hardware drivers are installed, including the network card driver. ,So
 What is the warranty period for Dell laptops?
Apr 26, 2024 am 08:10 AM
What is the warranty period for Dell laptops?
Apr 26, 2024 am 08:10 AM
Dell’s after-sales maintenance warranty period for all three packages of Dell laptops is one year. The warranty time for different hardware is different. Specifically, hardware with a 36-month warranty includes: CPU, memory. Hardware with a 24-month warranty includes: motherboard, graphics card, LCD screen, hard drive, power adapter, keyboard, and mouse module. The warranty period for Dell notebooks is generally one to three years. Different models have different warranty periods. Generally, the entire machine has a one-year warranty, and specific parts have their own warranty periods. The warranty period for important parts is 3 years, such as memory and graphics card. The warranty period for minor components, such as hard drives, is two years. It should be noted that the higher-positioned Precision mobile workstation only supports basic warranty by default, but the warranty period is extended to 3 years. If you want to get professional
 Dell laptop black screen when booting
May 01, 2024 am 09:04 AM
Dell laptop black screen when booting
May 01, 2024 am 09:04 AM
Dell notebook has a black screen when it is turned on 1. If the notebook has a black screen when it is turned on, the indicator light is on, the main screen is black, and there is no wind when you place your hand on the fan of the host computer. Then it is a problem with the power adapter. At this time, it needs to be removed and replaced with a new one. Start switch problem. Black screen when booting, no self-test. Use the meter pin to short-circuit the startup terminal on the motherboard, and it will start normally. 2. Insufficient battery: Connect the power supply. Wait for a while and then restart. Graphics card failure: Replace the graphics card. If the laptop supports an external monitor, find a good monitor and connect it to your laptop. 3. Reason four: Monitor problem. If the power supply is normal, but the screen is still dark, try to connect another monitor to the computer (you can borrow one if necessary) to make sure it is not the monitor.
 How to solve the problem of notebook CPU frequency reduction
Apr 14, 2024 pm 09:04 PM
How to solve the problem of notebook CPU frequency reduction
Apr 14, 2024 pm 09:04 PM
Notebook computer frequency reduction method 1. Open the control panel on the computer desktop. Click Power Options in Control Panel. Change the power plan in Power Options to Energy Saving. After changing to energy saving, you can see in the task manager that the notebook CPU operating frequency has been reduced. 2. The heat dissipation function is realized simply through the physical thermal conduction principle. Place a plastic or metal cooling base on the bottom of your notebook and raise it to promote air circulation and heat radiation, which can achieve cooling effects. Install several cooling fans on the heat dissipation base to improve heat dissipation performance. 3. When no program is running, the CPU automatically reduces the frequency to save power; when the CPU temperature or the operating environment temperature is too high, the CPU automatically reduces the frequency to prevent burning. You can also try the suggestions from friends on the first floor. Please refer to the setting method.
 Win7 network adapter is missing, how to restore it (methods and steps to solve the problem of Win7 network adapter disappearing)
Apr 23, 2024 pm 06:19 PM
Win7 network adapter is missing, how to restore it (methods and steps to solve the problem of Win7 network adapter disappearing)
Apr 23, 2024 pm 06:19 PM
But sometimes users may encounter the problem that the network adapter suddenly disappears. Win7 operating system is a widely used operating system, which brings great troubles to network connection and use. To help users quickly solve network connection problems, this article will introduce the methods and steps on how to restore the Win7 network adapter. 1. Check the network adapter in the device manager 2. Uninstall and reinstall the network adapter driver. Select, right-click the network adapter and "Uninstall Device" and then restart the computer and install the driver automatically, or go to the official website to download the latest driver and install it manually. . 3. Check whether the device is disabled. Search for "Network Connections" in the start menu, open it, right-click the wireless connection or Ethernet connection, and select "Enable" to ensure that the device has not been disabled.
 The laptop is extremely slow when connected to wifi (the laptop is extremely slow when connected to wifi)
Apr 27, 2024 pm 01:07 PM
The laptop is extremely slow when connected to wifi (the laptop is extremely slow when connected to wifi)
Apr 27, 2024 pm 01:07 PM
Laptop WiFi slowness is usually caused by poor network signal quality or computer wireless network card driver issues. Network signal quality: The quality of the network connected to your laptop and mobile phone is not necessarily the same. The first reason is that your broadband line is old or the router is damaged. The second reason is that if your computer shares a network cable with other computers, your computer may be attacked by the ARP virus. The third reason is that there is a program secretly running in the background. A large amount of bandwidth, such as virus Trojans, p2p software (Thunder QQ Tornado, etc.). The signal of the wireless router is poor, causing the computer to be unable to search for wireless networks. The wireless router is faulty or the wireless router settings are not normal. Solution: It is recommended to change the wireless router, but you can also try to restore the router.
