U disk can be used as a multi-system boot disk
php editor Strawberry teaches you how to make a U disk into a multi-system boot disk. This kind of boot disk can help you easily start different operating systems when needed, providing more flexible choices. In just a few simple steps, you can have a powerful multi-system boot disk that is convenient and practical.
Preparation work
U disk or mobile hard disk (you need to confirm that your U disk supports the 3.0 interface)
PE system (choose the one you like, I use Youqitong and WeChat PE, you can choose according to your own needs)
win10 original image
MBROSTool tool
WinNTSetup installation tool (if you need it, PM me and I won’t put it here)
Please do it in the win10 environment Make and close windows defende
Start the installation
1. Generate the .iso file of the PE system (here you use Youqitong and Micro PE For example, other PE methods are similar)
① Micro PE generates iso file
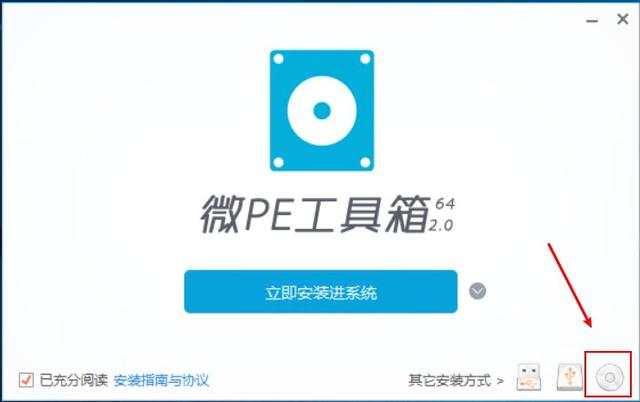
Open the micro PE and click the CD-like icon in the lower right corner
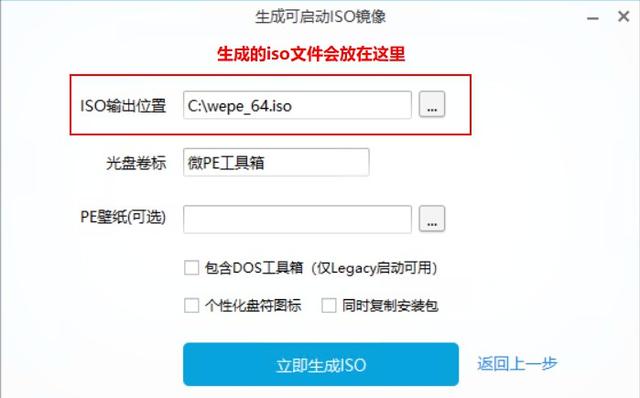
## Select the iso file output location (the rest of the places can be selected according to your own preferences), and then click Generate ISO now
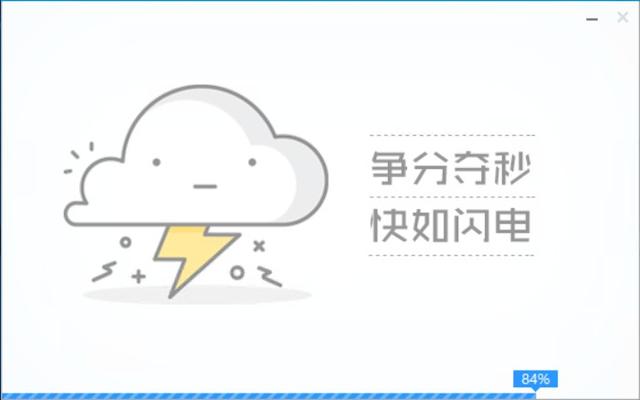
Waiting for the image to be generated
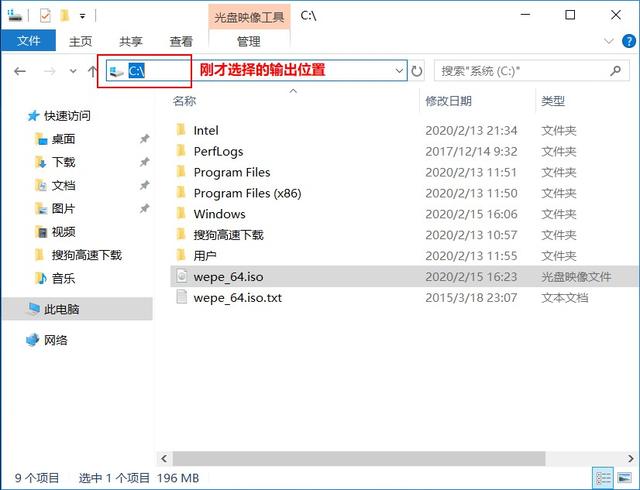
You can find wepe_64.iso in the output location you just selected (this is the iso file we need)
② Youqitong generates iso files
Youqitong is similar to micro PE, select to generate ISO>>Select iso file output location>>Generate ISO
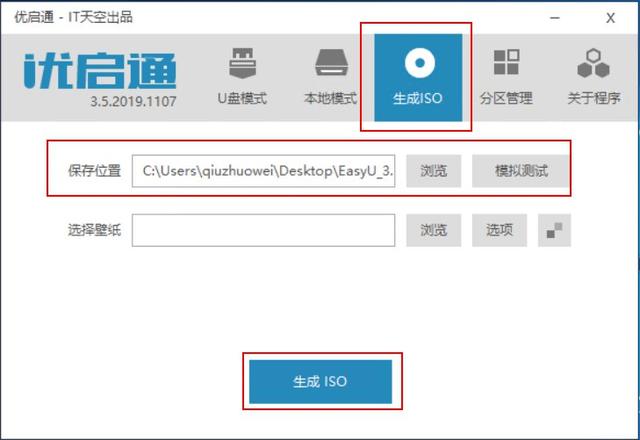
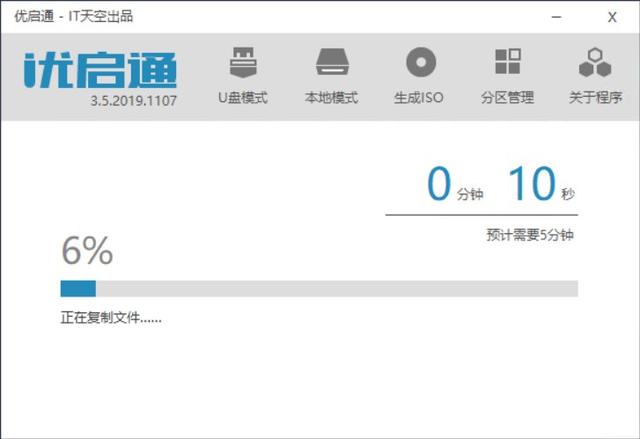
Wait until the generation is completed and then find EasyU_v3.5.iso in the corresponding file output location.
(Other PE systems have similar methods of generating ISO, so I won’t introduce them one by one here)
2. Format the U disk and install the PE system
Insert the U disk (or mobile hard disk) into the computer, and then double-click to run MBROSTool
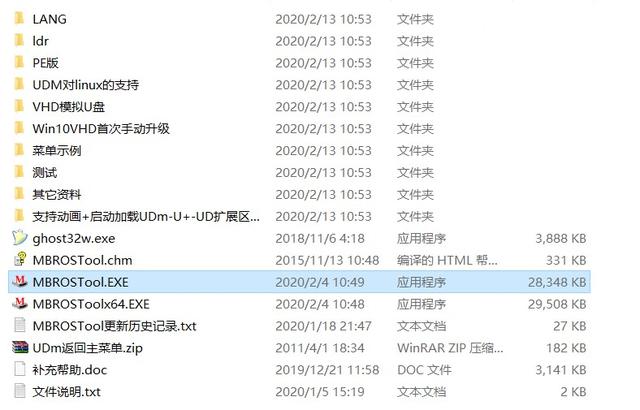
Check [Show all disks] in the [Options] menu
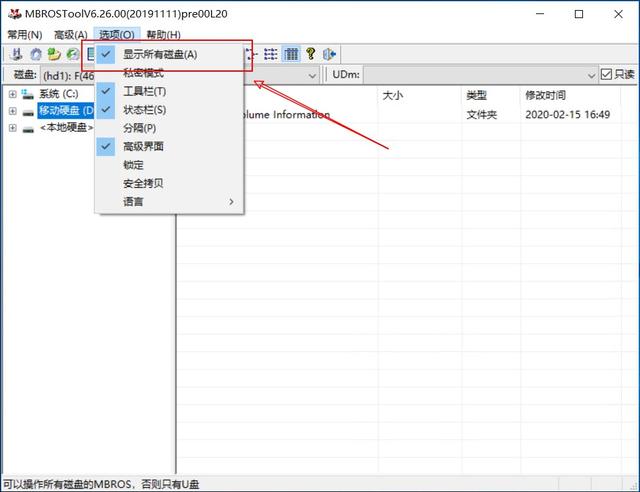 ## Select your U disk (or mobile hard disk) in the disk
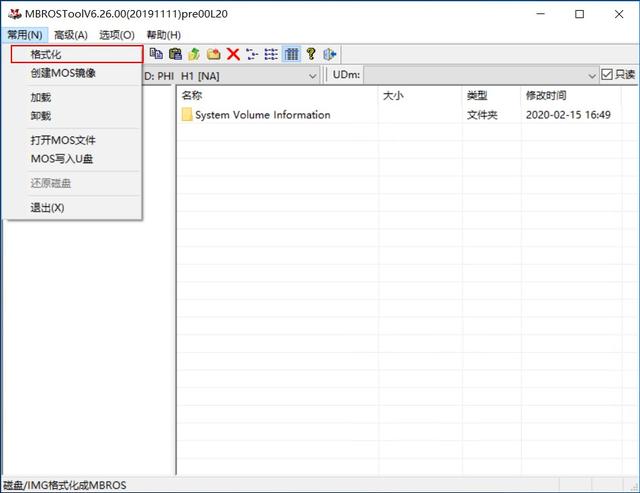
 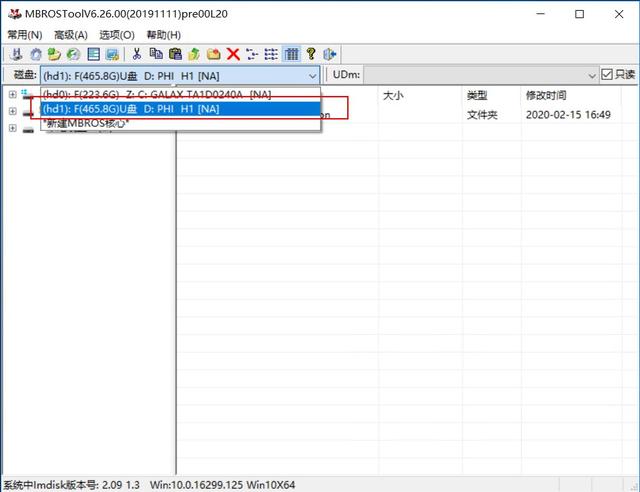 Click [Common] and select [Format]
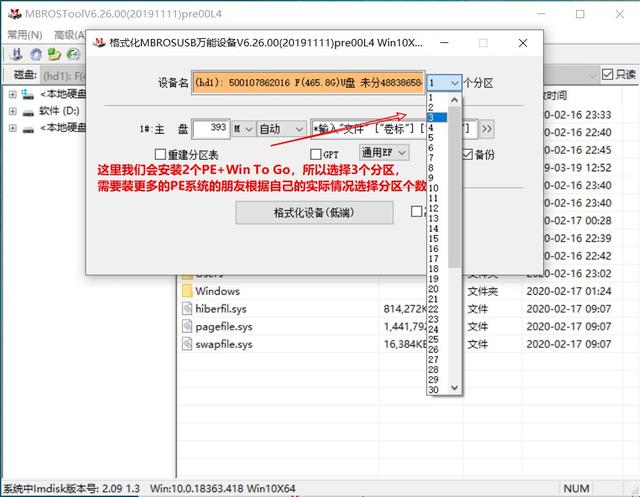
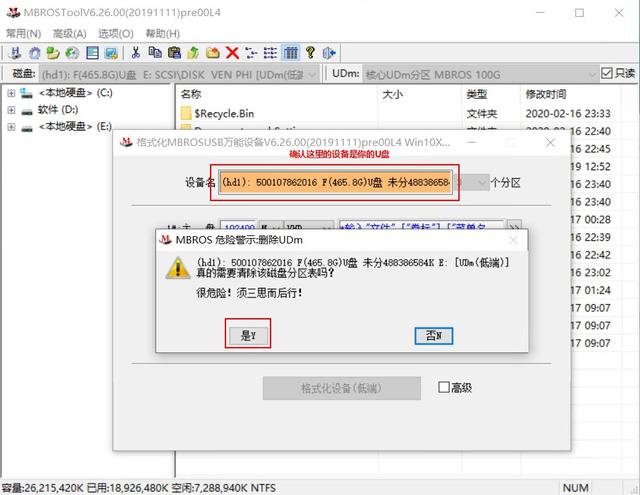
 I want to install 2 PEs and one Win To Go, so I choose 3 partitions. (Be sure to confirm whether what is displayed in the "Device Name" column is your U disk to avoid formatting errors.)
  Select the iso file generated previously , and adjust the partition size and format
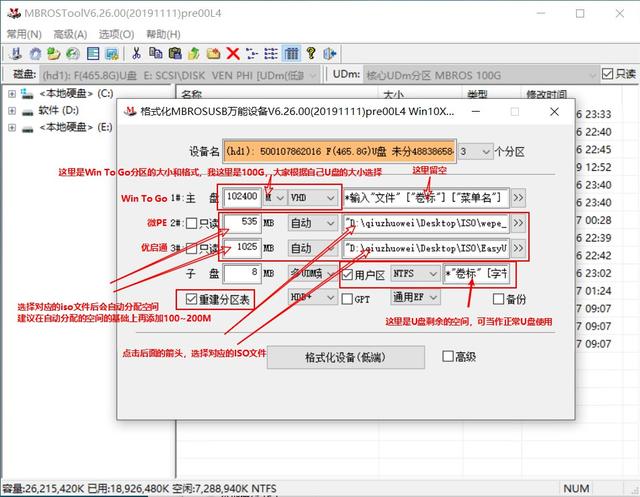
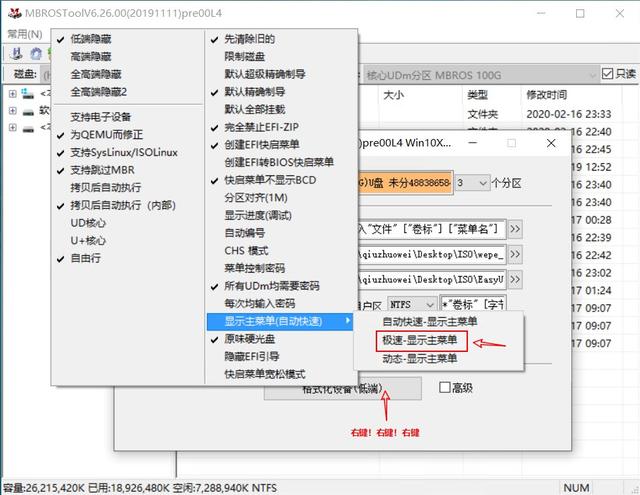
Click [Format Device]. Depending on the speed of the U disk, a USB3.0 U disk usually takes a few minutes.
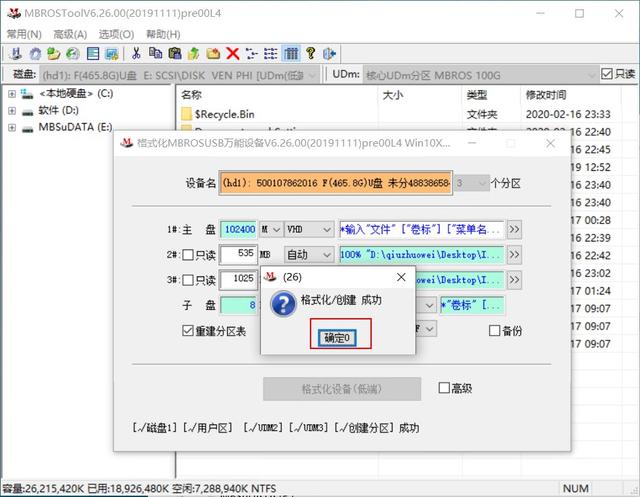
Formatting is successful (only install multiple PE systems, friends who do not install Win To Go. Your U disk is already ready), click [OK]
3. Install Win To Go
① Load the partition of Win To Go system
Select [Load] in [Common]
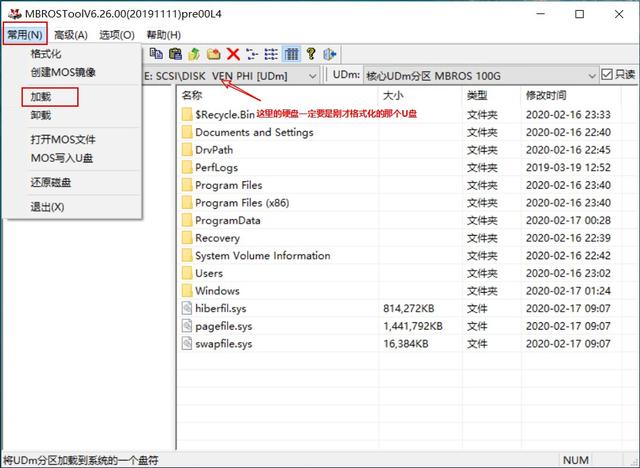
Select the partition where WTG system is to be installed
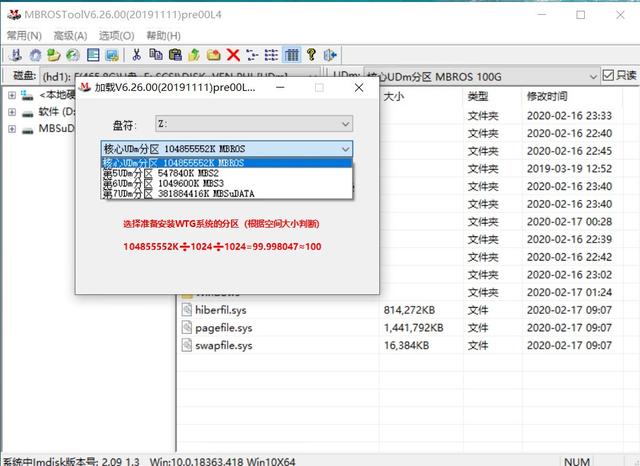
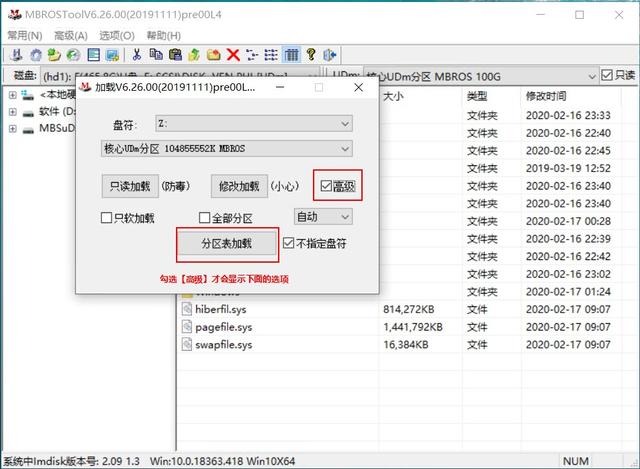
Check [Advanced] and click [Load Partition Table].
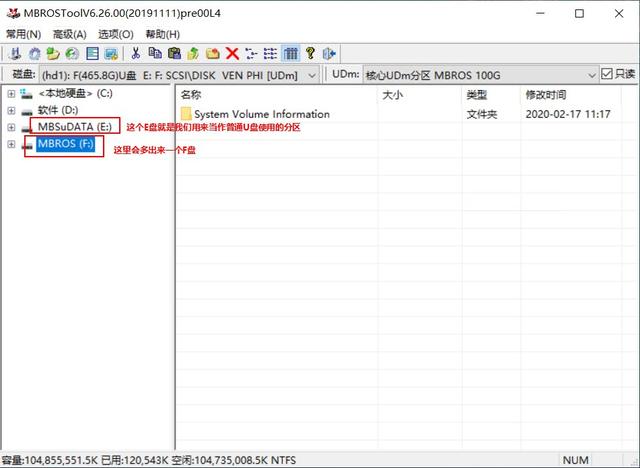
After loading, you will see a partition called MBROS
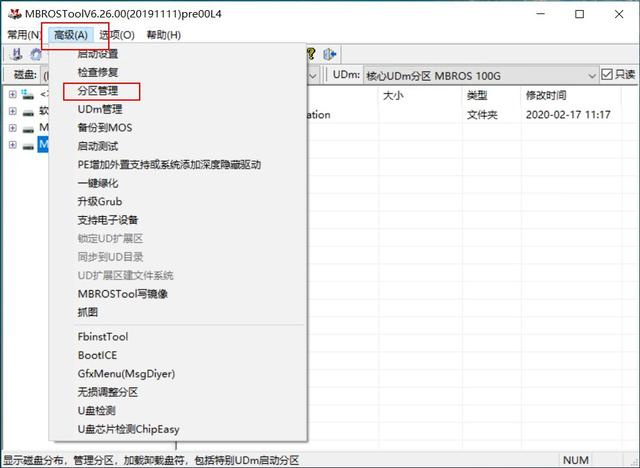
Select [Advanced 】【Partition Management】.
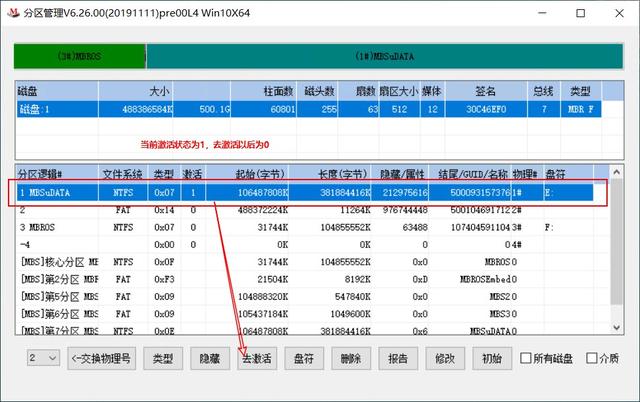
Select the partition named "MBSuDATA" and click the [Deactivate] function to remove the activation status of the storage function partition
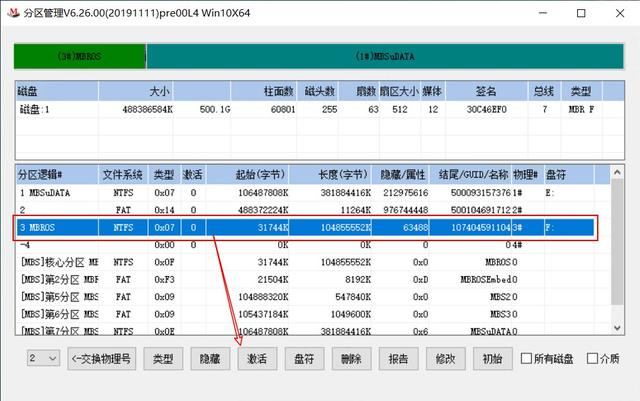
Select the partition where we will install Win To Go, which is the MBROS partition, and click [Activate]
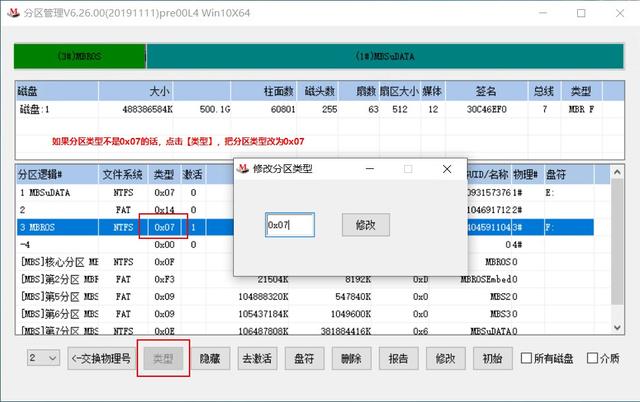
If you install the partition If the type is not 0x07, click [Type] and change the partition type to 0x07
##When you open my computer, you will find an additional partition called MBROS ( If not, please check if there is an error in the above operation)

② Install Win To Go
Open WinNTSetup (select X64 or X86 according to your system)

Select Windows Vista/7/8/10/2008/2012, Windows installation source we choose the original Win10 image downloaded in advance
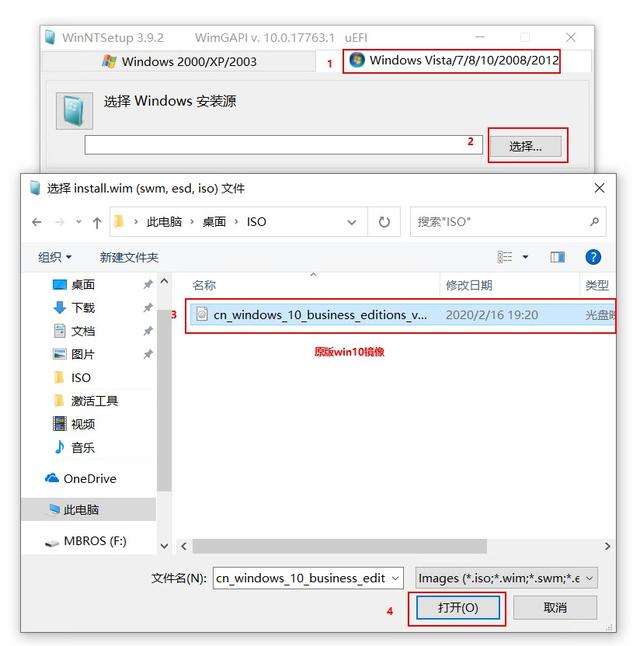
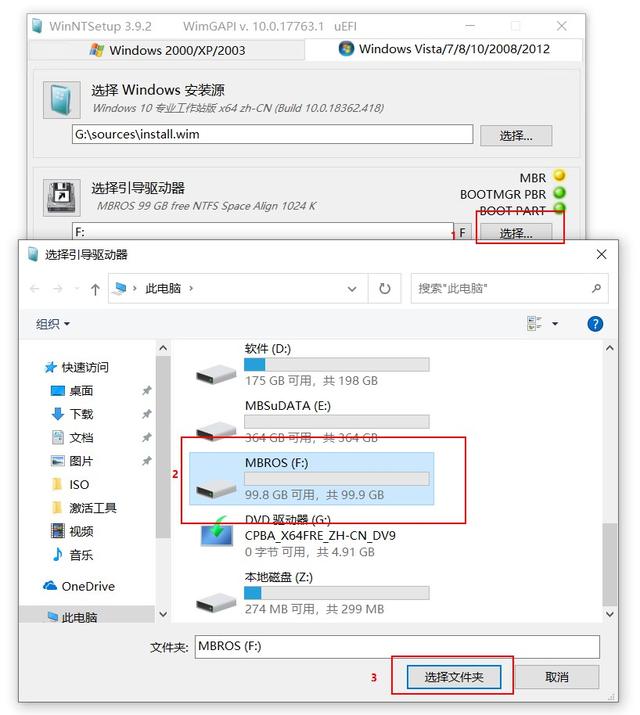
Select the MBROS partition for both the boot drive and the installation drive
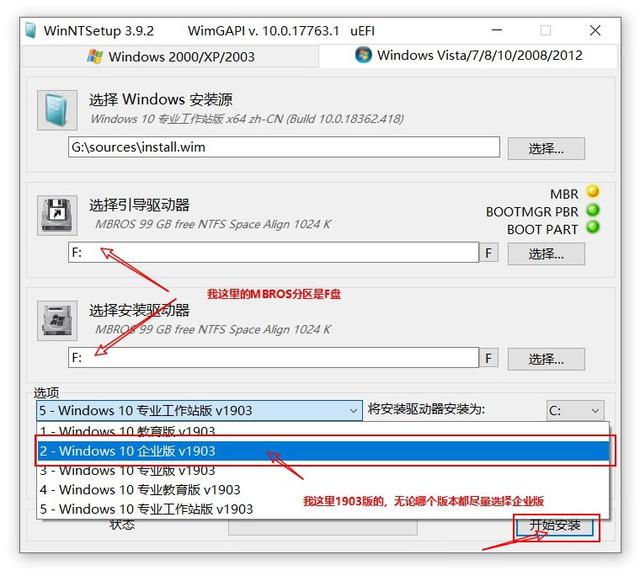
 ##Select the Enterprise Edition and click [Start Installation]
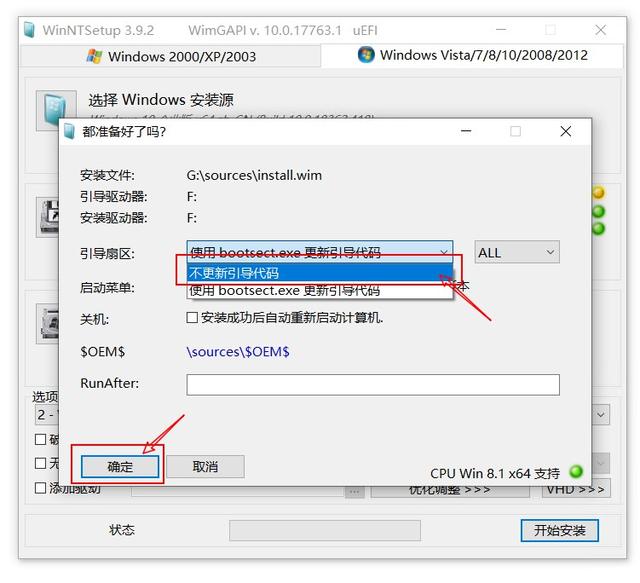
 Finally choose not to update the boot code, and [OK] wait for the installation to complete
  to This Win To Go installation is over, next is the advanced tutorial
Advanced tutorial
1. Hide the Win To Go partition
Go back to the MBROSTool tool and still select our U disk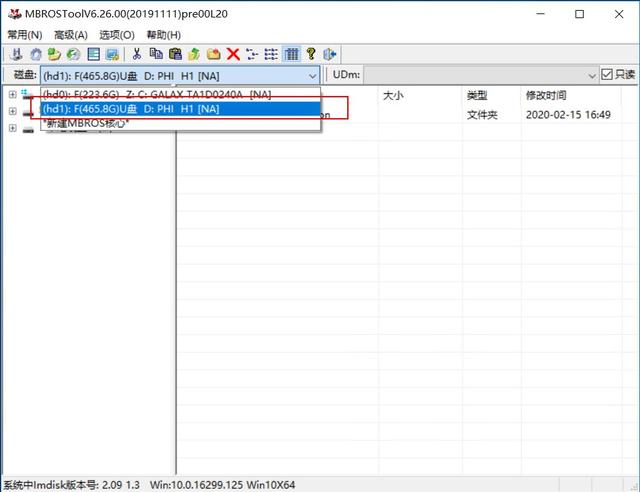
Select [Uninstall] in [Common]
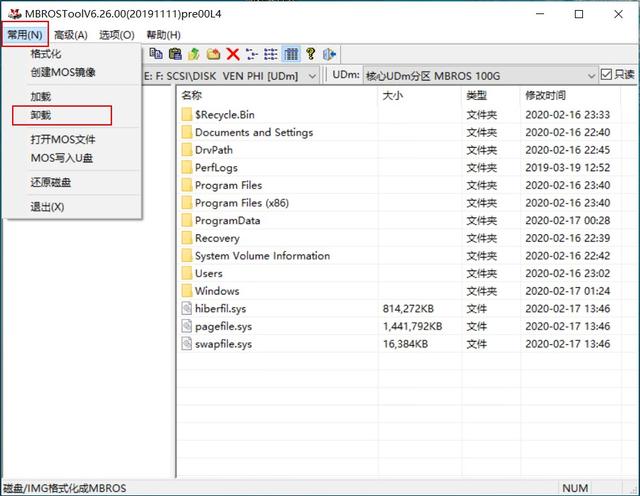
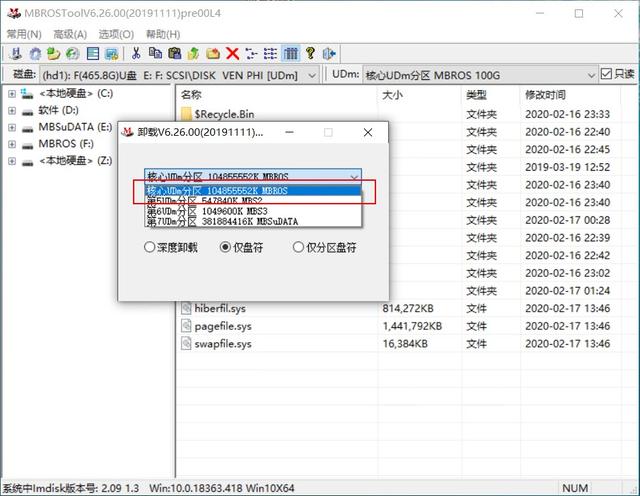
Select the partition where the Win To Go system is installed
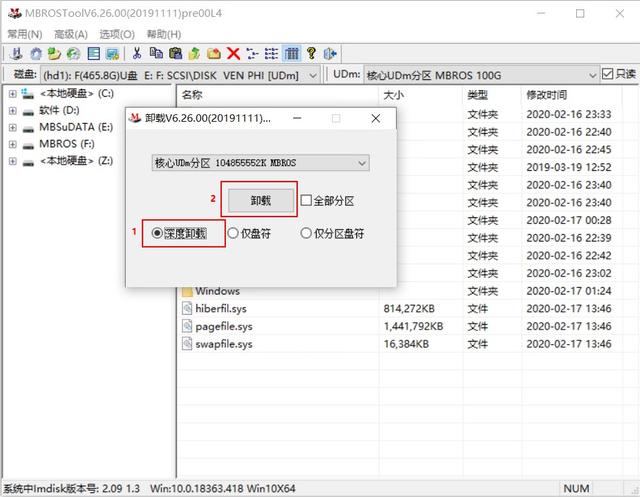
Select deep uninstall and click [Uninstall]
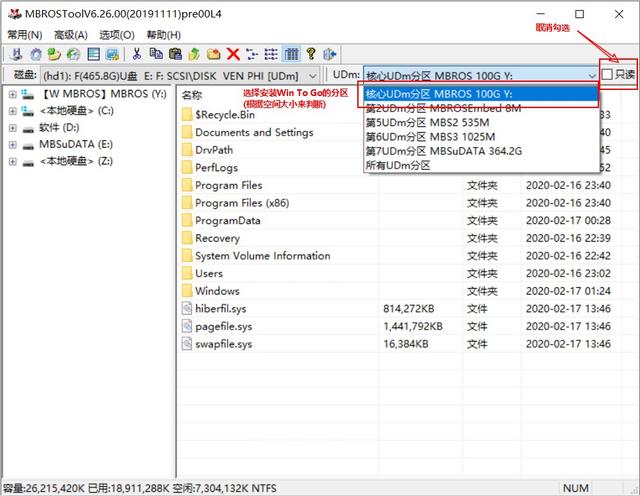
##Uncheck "Read-only" and choose to install Win To Go partition (judge which partition is the partition where Win To Go is installed based on the partition)
Select this partition, "right-click"-select [Quick Start Processing] 】
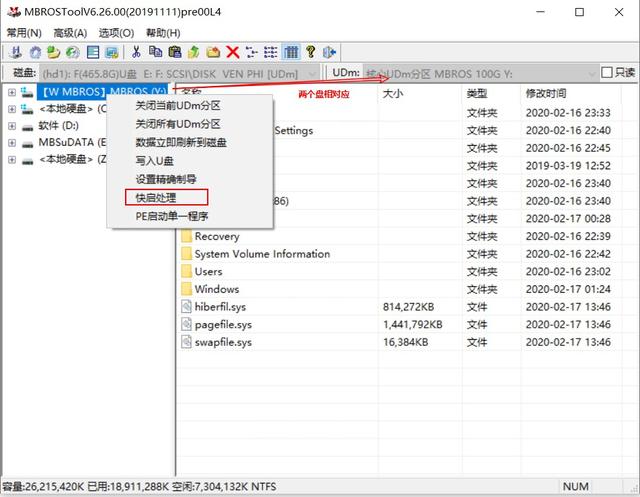
Currently, the deep hiding of the WTG system partition has been implemented and UEFI boot is supported.
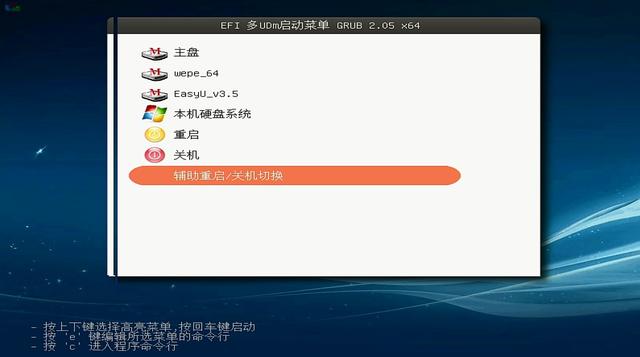
2. Modify the name of the menu
The name of our current startup menu is as shown below. For convenience, we have to make some changes to the menu name
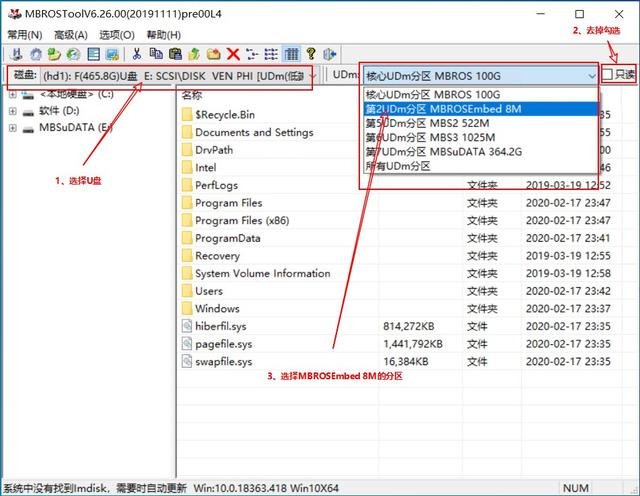
Select the core partition named "MBROSEMbed 8M"
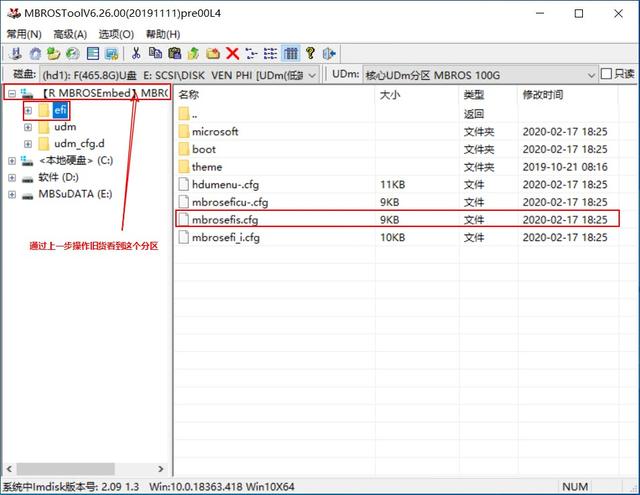
 ##Find the [efi] folder in the newly appeared partition on the left, and double-click it in the file list on the right Open the [mbrosefis.cfg] file for editing
 (What is modified here is the boot menu name for uefi mode startup)
 defudmmenu around line 125 Change the "XXXX" at the back to the name you want. After changing it, go to [File] - [Save] in the upper left corner
 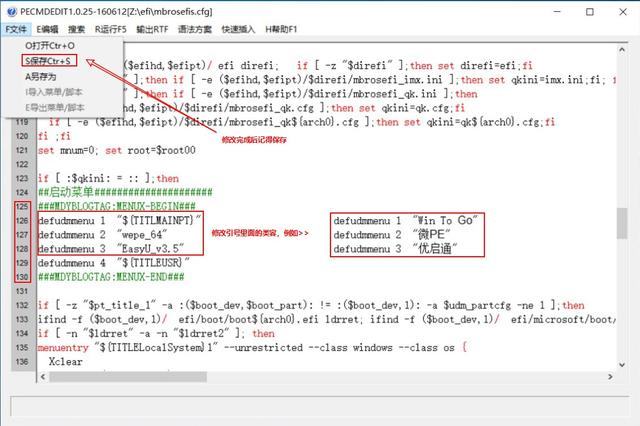 and then find the new one. In the [udm] folder in the partition, double-click to open the [udmsmenu.sh] file in the file list on the right and edit it
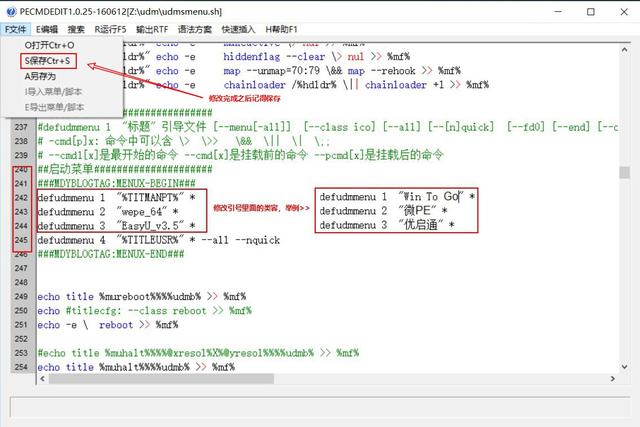
(What is modified here is the startup menu name in legacy mode)
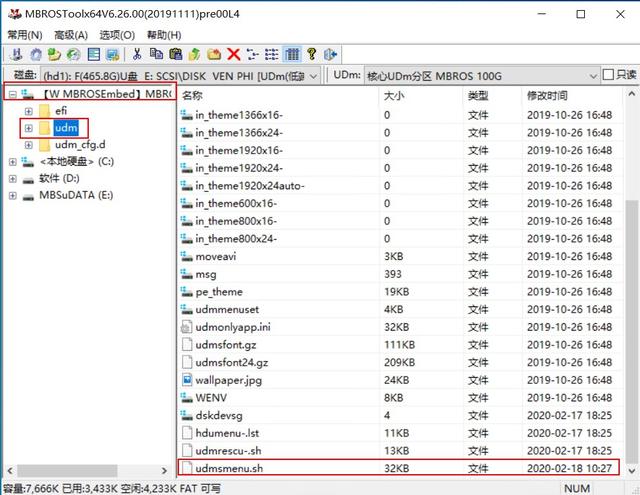 Change the "XXXX" after defudmmenu around line 240 to the name you want. After changing it, go to [File] - [Save] in the upper left corner
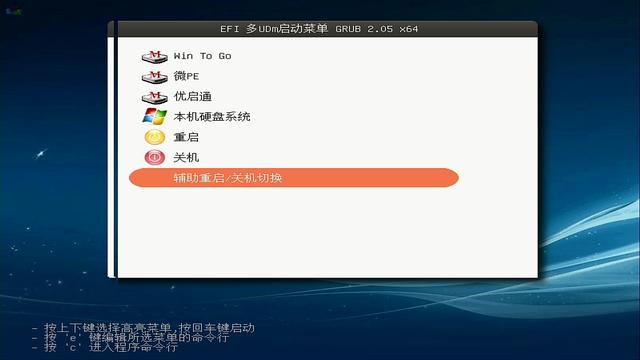
  Interface after modification
##— End
The above is the detailed content of U disk can be used as a multi-system boot disk. For more information, please follow other related articles on the PHP Chinese website!

Hot AI Tools

Undresser.AI Undress
AI-powered app for creating realistic nude photos

AI Clothes Remover
Online AI tool for removing clothes from photos.

Undress AI Tool
Undress images for free

Clothoff.io
AI clothes remover

Video Face Swap
Swap faces in any video effortlessly with our completely free AI face swap tool!

Hot Article

Hot Tools

Notepad++7.3.1
Easy-to-use and free code editor

SublimeText3 Chinese version
Chinese version, very easy to use

Zend Studio 13.0.1
Powerful PHP integrated development environment

Dreamweaver CS6
Visual web development tools

SublimeText3 Mac version
God-level code editing software (SublimeText3)

Hot Topics
 Ventoy secure boot settingsSecure Boot
Jun 18, 2024 pm 09:00 PM
Ventoy is a USB boot tool that can directly boot ISO/WIM/IMG/VHD(x)/EFI and other types of files in the USB flash drive. It is very easy to use. Laptops have secure boot turned on by default. If they are not turned off or cannot be turned off, they cannot be booted from a USB device. Ventoy also supports secure boot. The principle is to inject a GRUB installation certificate into the current computer. As long as your computer After being injected once, any USB disk PE booted based on grub can pass. The official description of Ventoy is a GIF image. The playback speed is too fast and you may not be able to remember it. The editor has divided the GIF image to make it easier to understand. Ventoy secure boot has EnrollKey and Enro
 System Restore prompts that you must enable system protection on this drive
Jun 19, 2024 pm 12:23 PM
The computer has a restore point, and when the system is restored, it prompts "You must enable system protection on this drive." This usually means that the system protection function is not turned on. System protection is a feature provided by the Windows operating system that can create system restore points to back up system files and settings. That way, if something goes wrong, you can revert to a previous state. When the system fails and you cannot enter the desktop to start it, you can only try the following method: Troubleshooting-Advanced Options-Command Prompt Command 1 netstartvssrstrui.exe/offline:C:\windows=active Command 2 cd%windir%\system32 \configrenSYSTEMsy
 What should I do if win10 does not switch users? Win10 login interface does not have the option to switch users. Solution
Jun 25, 2024 pm 05:21 PM
A problem that Windows 10 users may encounter is that they cannot find the switch user option on the login interface. So what should I do if there is no switch user option on the win10 login interface? Let this site give users a detailed explanation of the problem of not switching user options in the win10 login interface. Detailed solution to the problem of switching user options on the Win10 login interface: Check user account settings: First, make sure you have multiple user accounts on your computer and that these accounts are enabled. You can check and enable the account by following these steps: a. Press Win+I keys to open Settings and select "Accounts". b. Select "Family & Others" or &ld in the left navigation bar
 How to permanently turn off real-time protection in win10? How to disable real-time protection function in win10 computer 0
Jun 05, 2024 pm 09:46 PM
Although the comprehensive anti-virus software that comes with Windows 10 system can continuously protect the security of your personal computer, sometimes it may also affect certain downloaded files. For some users, it may be more appropriate to temporarily turn off the real-time protection function. But many users don’t know how to permanently turn off the real-time protection feature on win10 system. 1. First, press the "Win+R" keys to open the run window, enter the "gpedit.msc" command to open the local Group Policy Editor interface; 2. Then, in the opened interface, click "Computer Configuration/Administrative Templates/ Windows Components/MicrosoftDef
 How to restore the default wallpaper in win10? One trick to quickly restore the default wallpaper in Windows 10 system
Jun 02, 2024 pm 02:07 PM
In Windows 10 system, if you want to return to the system default wallpaper, you can follow the following steps: 1. Right-click a blank space on the desktop and select Personalize in the pop-up menu. 2. This will open the Personalization window in Settings. In the left menu, click Background. 3. Under the "Background" settings, find and click the drop-down menu next to "Choosepicture", and then select Windows Default (Windows Default) or directly select a picture that looks like the default wallpaper in the picture preview below ( if there are multiple options). 4. If your system has multiple versions
 Windows cannot start the Windows Audio service Error 0x80070005
Jun 19, 2024 pm 01:08 PM
The guy's computer appears: Windows cannot start the WindowsAudio service (located on the local computer). Error 0x8007005: Access denied. This situation is usually caused by user permissions. You can try the following methods to fix it. Method 1: Modify the registry to add permissions through batch processing, create a new text document on the desktop, save it as .bat, and right-click the administrator to go far. Echo==========================EchoProcessingRegistryPermission.Pleasewait...Echo================== ========subinacl/subkey
 What should I do if Win10 takes a screenshot and crashes? How to solve the problem of Win10 flashing and then disappearing after taking a screenshot?
Jun 02, 2024 pm 12:48 PM
There are many reasons why the screenshot disappears after taking a screenshot in Win10. Users can first check the screenshot save location or adjust the screenshot settings, or check the animation effect to check it. If it really doesn't work, you can also choose to update the driver and operating system to perform the operation. Let this website carefully introduce to users the analysis of the problem of Win10 disappearing after taking a screenshot. Analysis of the problem after win10 takes a picture and it flashes and disappears 1. Check where the screenshot is saved: When you use the Win+PrtSc (PrintScreen) key combination to take a screenshot, the screenshot is usually saved in the C:\Users\YourUsername\Pictures\Screenshots folder. please
 How to turn off popular searches in Windows 10 system? List of methods to close popular searches in Windows 10 system
Jun 03, 2024 pm 08:46 PM
In win10 system, hot search is one of the more practical methods, but sometimes it can cause certain troubles. So how to turn off hot search? Let’s take a look below! Step 1: Open the Settings app First, click on the Windows icon in the lower left corner of the screen and select the Settings app. Step 2: Enter "Personalization" settings In the "Settings" app, click the "Personalization" option. Step 3: Select the “Search” option In the “Personalization” settings, select the “Search” option. Step 4: Turn off popular searches. In the "Search" option, find the option "Show popular searches in search" and turn it off. Professional Tool Recommendation 1. Xiaozhi Soso Xiaozhi Soso—Quick Search and One-Click Positioning—Professional Computer Search Tool


