How to convert Word text into a table
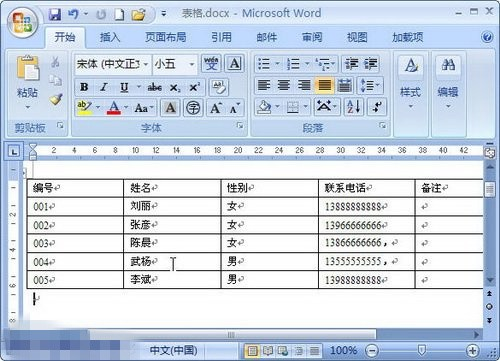
php Xiaobian Youzi teaches you how to quickly convert text in a Word document into a table. Tables can make the layout more neat and clear when editing documents, and improve work efficiency. Through simple operations, you can convert text content into table form for easy review and management. Next, let’s learn about the specific steps!
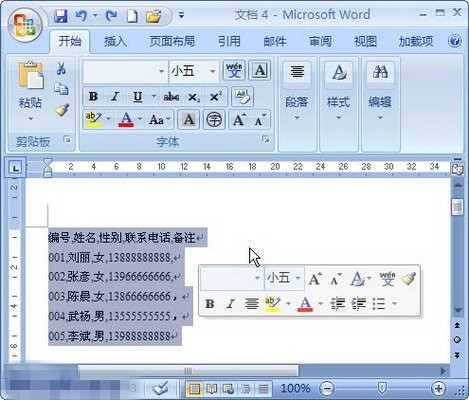
Before preparing to convert a Word2007 document into a table, you need to add paragraph marks and delimiters to the text to be converted. It is recommended to use common commas as delimiters and make sure to use English half-width commas. Next, select all the text that needs to be converted into a table.

Tips: If different paragraphs contain different delimiters, Word2007 will create different columns for different rows based on the number of delimiters.
2. Click the "Table" button in the "Table" group of the "Insert" ribbon, and select the "Convert Text to Table" command in the opened table menu.

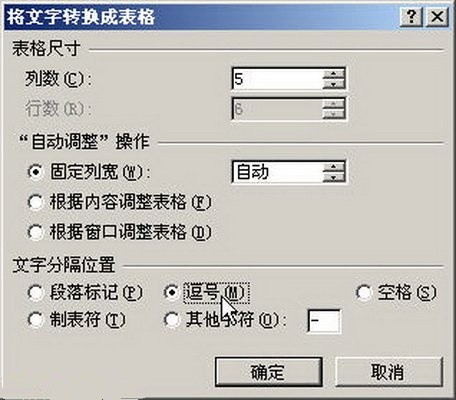
3. Open the "Convert text to table" dialog box. The number of columns of the converted table will appear in the "Number of columns" edit box. If the number of columns is 1 (actually it should be multiple columns), it means that the separator is incorrectly used (Chinese commas may be used), and you need to return to the above Steps to modify the delimiter. In the "Auto-adjust" operation area, you can select the "Fixed column width", "Adjust the table according to the content" or "Adjust the table according to the window" radio button to set the column width of the table generated by the conversion. The delimiter used in the text is automatically selected in the "Text Separation Position" area. If it is incorrect, you can reselect it. After setting, click the "OK" button.


The above is the detailed content of How to convert Word text into a table. For more information, please follow other related articles on the PHP Chinese website!

Hot AI Tools

Undresser.AI Undress
AI-powered app for creating realistic nude photos

AI Clothes Remover
Online AI tool for removing clothes from photos.

Undress AI Tool
Undress images for free

Clothoff.io
AI clothes remover

AI Hentai Generator
Generate AI Hentai for free.

Hot Article

Hot Tools

Notepad++7.3.1
Easy-to-use and free code editor

SublimeText3 Chinese version
Chinese version, very easy to use

Zend Studio 13.0.1
Powerful PHP integrated development environment

Dreamweaver CS6
Visual web development tools

SublimeText3 Mac version
God-level code editing software (SublimeText3)

Hot Topics
 1378
1378
 52
52
 Steps to adjust the format of pictures inserted in PPT tables
Mar 26, 2024 pm 04:16 PM
1. Create a new PPT file and name it [PPT Tips] as an example. 2. Double-click [PPT Tips] to open the PPT file. 3. Insert a table with two rows and two columns as an example. 4. Double-click on the border of the table, and the [Design] option will appear on the upper toolbar. 5. Click the [Shading] option and click [Picture]. 6. Click [Picture] to pop up the fill options dialog box with the picture as the background. 7. Find the tray you want to insert in the directory and click OK to insert the picture. 8. Right-click on the table box to bring up the settings dialog box. 9. Click [Format Cells] and check [Tile images as shading]. 10. Set [Center], [Mirror] and other functions you need, and click OK. Note: The default is for pictures to be filled in the table
 How to make a table for sales forecast
Mar 20, 2024 pm 03:06 PM
Being able to skillfully make forms is not only a necessary skill for accounting, human resources, and finance. For many sales staff, learning to make forms is also very important. Because the data related to sales is very large and complex, and it cannot be simply recorded in a document to explain the problem. In order to enable more sales staff to be proficient in using Excel to make tables, the editor will introduce the table making issues about sales forecasting. Friends in need should not miss it! 1. Open [Sales Forecast and Target Setting], xlsm, to analyze the data stored in each table. 2. Create a new [Blank Worksheet], select [Cell], and enter [Label Information]. [Drag] downward and [Fill] the month. Enter [Other] data and click [
 How to add handwritten signature to word document
Mar 20, 2024 pm 08:56 PM
Word documents are widely used due to their powerful functions. Not only can various formats be inserted into Word, such as pictures and tables, etc., but now for the integrity and authenticity of the files, many files require a manual signature at the end of the document. It sounds like this How to solve complex problems? Today I will teach you how to add a handwritten signature to a word document. Use a scanner, camera or mobile phone to scan or photograph the handwritten signature, and then use PS or other image editing software to perform necessary cropping on the image. 2. Select "Insert - Picture - From File" in the Word document where you want to insert the handwritten signature, and select the cropped handwritten signature. 3. Double-click the handwritten signature picture (or right-click the picture and select "Set Picture Format"), and the "Set Picture Format" pops up.
 Practical tips for converting full-width English letters into half-width form
Mar 26, 2024 am 09:54 AM
Practical tips for converting full-width English letters into half-width forms. In modern life, we often come into contact with English letters, and we often need to input English letters when using computers, mobile phones and other devices. However, sometimes we encounter full-width English letters, and we need to use the half-width form. So, how to convert full-width English letters to half-width form? Here are some practical tips for you. First of all, full-width English letters and numbers refer to characters that occupy a full-width position in the input method, while half-width English letters and numbers occupy a full-width position.
 How to set WPS value to automatically change color according to conditions_Steps to set WPS table value to automatically change color according to condition
Mar 27, 2024 pm 07:30 PM
1. Open the worksheet and find the [Start]-[Conditional Formatting] button. 2. Click Column Selection and select the column to which conditional formatting will be added. 3. Click the [Conditional Formatting] button to bring up the option menu. 4. Select [Highlight conditional rules]-[Between]. 5. Fill in the rules: 20, 24, dark green text with dark fill color. 6. After confirmation, the data in the selected column will be colored with corresponding numbers, text, and cell boxes according to the settings. 7. Conditional rules without conflicts can be added repeatedly, but for conflicting rules WPS will replace the previously established conditional rules with the last added rule. 8. Repeatedly add the cell columns after [Between] rules 20-24 and [Less than] 20. 9. If you need to change the rules, you can just clear the rules and then reset the rules.
 Do you know how to sum a Word table?
Mar 21, 2024 pm 01:10 PM
Sometimes, we often encounter counting problems in Word tables. Generally, when encountering such problems, most students will copy the Word table to Excel for calculation; some students will silently pick up the calculator. Calculate. Is there a quick way to calculate it? Of course there is, in fact the sum can also be calculated in Word. So, do you know how to do it? Today, let’s take a look together! Without further ado, friends in need should quickly collect it! Step details: 1. First, we open the Word software on the computer and open the document that needs to be processed. (As shown in the picture) 2. Next, we position the cursor on the cell where the summed value is located (as shown in the picture); then, we click [Menu Bar
 How to automatically sort word serial numbers
Mar 20, 2024 pm 09:20 PM
When there is a lot of content in word, there will be many chapters. It is impossible for us to write each chapter one by one. In fact, we can use the word serial number to automatically sort. The operation is simple and convenient. Friends who don’t know how to operate, come and learn it. Bar! 1. First, we open the document to be processed on the computer, as shown in the figure below: 2. After opening the document, select the text that needs to be automatically sorted. In this example, select [Chapter 1] and [Chapter 2] and hold down the Ctrl key. To select multiple areas, use the mouse to click the [Start] menu of Word after selection, as shown in the red circle in the figure below: 3. Click the small triangle symbol to the right of the number on the [Paragraph] toolbar, and click in the pop-up menu The serial number type that needs to be selected is as shown below with the red arrow pointing to it.
 Detailed explanation of the implementation method of converting PHP months to English months
Mar 21, 2024 pm 06:45 PM
This article will introduce in detail how to convert months in PHP to English months, and give specific code examples. In PHP development, sometimes we need to convert digital months to English months, which is very practical in some date processing or data display scenarios. The implementation principles, specific code examples and precautions will be explained in detail below. 1. Implementation principle In PHP, you can convert digital months into English months by using the DateTime class and format method. Date


