How to embed fonts in ppt documents
php editor Baicao will give you detailed answers on how to embed fonts in PPT documents. When making PPT, choosing appropriate fonts can improve the overall aesthetics, but if the fonts are not installed on the recipient's computer, it will cause display problems. Therefore, embedding fonts is a solution. First, select "File" - "Options" - "Save", check "Embed Fonts", and save the PPT. When the recipient opens it, the required fonts will be automatically loaded to ensure the display effect.
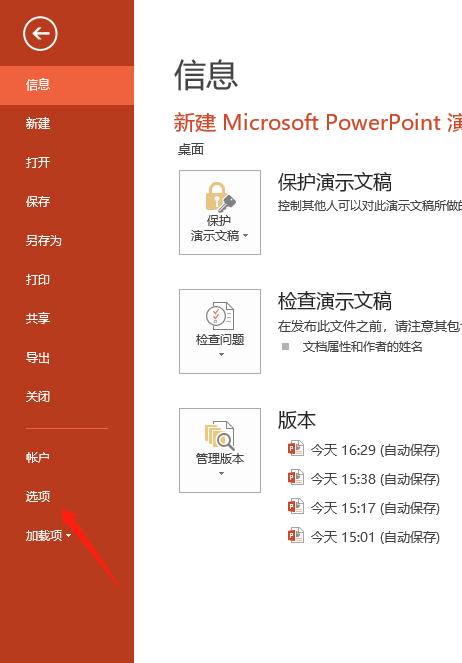
1. We first create and open a PPT file, and then click [File]-[Options] in the upper left corner of the ppt document.

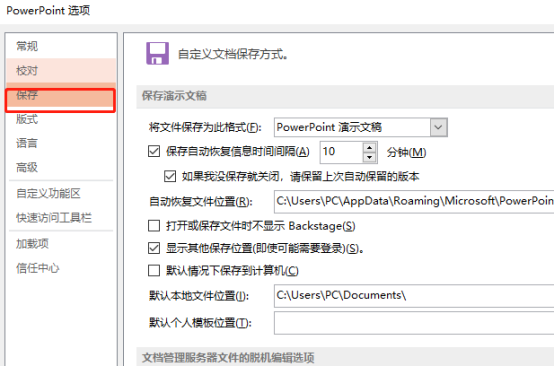
#2. We click the [Options] button, and then the ppt option box pops up. We find the [Save] option among the various options below, and then click to enter.

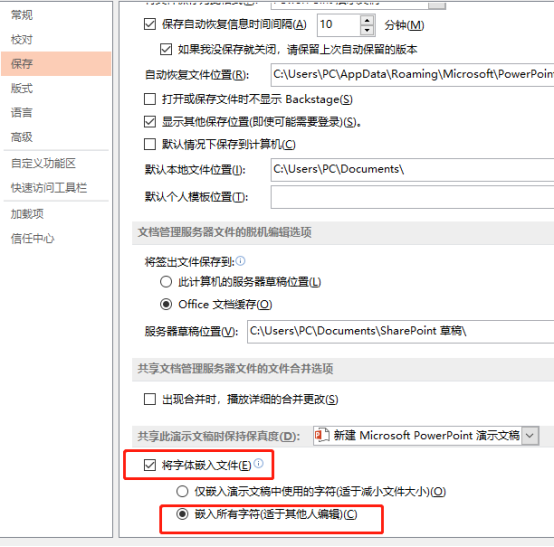
3. We look down one by one and find the [Embed font in file] option. We click the mouse to select the box in front of it, and then a check mark appears to indicate selection. After that, we need to continue to select and click [Embed All Characters] below.

#4. In addition, among the above choices, we can also select [Embed only characters used in the presentation], which can also ensure the complete operation effect of font embedding.
The font embedding setting method for ppt documents is roughly shared here. In order to prevent the situation of being unable to edit when changing computers, I would like to remind everyone that it is best to set up font embedding, so as to ensure that our ppt documents can be edited. Smooth editing and adjustment make our work run more smoothly.
The above is the detailed content of How to embed fonts in ppt documents. For more information, please follow other related articles on the PHP Chinese website!

Hot AI Tools

Undresser.AI Undress
AI-powered app for creating realistic nude photos

AI Clothes Remover
Online AI tool for removing clothes from photos.

Undress AI Tool
Undress images for free

Clothoff.io
AI clothes remover

AI Hentai Generator
Generate AI Hentai for free.

Hot Article

Hot Tools

Notepad++7.3.1
Easy-to-use and free code editor

SublimeText3 Chinese version
Chinese version, very easy to use

Zend Studio 13.0.1
Powerful PHP integrated development environment

Dreamweaver CS6
Visual web development tools

SublimeText3 Mac version
God-level code editing software (SublimeText3)

Hot Topics
 Detailed steps to cancel the red wavy lines under English letters in PPT documents
Mar 26, 2024 pm 08:50 PM
1. Enter [foad] here, and it will have a red wavy line to indicate a spelling error. 2. Click [Review] in the toolbar. 3. Click [Spell Check]. 4. Select [Ignore] in the spell check dialog box that appears, and you will be prompted that the spell check is over. 5. There are no red wavy lines.
 Restricted processing operation method is prompted when embedding fonts in PPT
Mar 26, 2024 pm 08:41 PM
1. Open PowerPoint and edit the PPT document. 2. Find the font that cannot be embedded, select the text box, right-click - Cut/Copy. 3. Right-click the blank space of the slide and select [Paste] - Paste as picture. 4. It is simple and convenient to save the font as a picture, but the font cannot be modified. Method 2: Software FontCreatorProgram 1. Download the FontCreatorProgram software from the Internet, unzip the file, and select the [FCP.EXE] file to install. 2. Open the installed software, click [File] - Open - Installed Fonts in the window menu bar, and select PPT. For fonts that cannot be embedded, click [OK]. 3. Select [
 Tutorial on how to handle the problem of not seeing the image preview when opening a PPT document
Mar 26, 2024 pm 05:21 PM
1. Sometimes the preview image is not visible. 2. Open the file and click the [File] tab. 3. Select [Information] in the pop-up menu. 4. Click Properties on the right and select [Advanced Properties] in the pop-up menu. 5. Select the [Summary] tab in the [Properties] window. 6. Select [Save Preview Image] below it, as shown in the figure, and finally click the [OK] button. 7. At this time we can see the preview image. 8. If you are using office 2003, you can also open this window by clicking [Properties] under the [File] menu.
 How to insert another ppt document into a ppt document
Mar 26, 2024 pm 02:36 PM
1. Open the PPT to which you want to add the file. 2. Turn to the page where you want to insert the ppt document. 3. Select [Insert]-------[Object] in the menu bar. 4. The [Insert Object] dialog box pops up. Operation method one: Select New and select [Microsoft Office PowerPoint Presentation] in the dialog box and click [OK]. Then you can add content to the new blank document box. Operation method two: Select Create from file and click [Browse] in the dialog box. ], find the file that needs to be inserted, and click [OK].
 How to increase the number of undo steps in PPT documents
Mar 26, 2024 pm 02:30 PM
1. Run the PPT software. 2. Click the [File] tab in the upper left corner. 3. Click [Options] on the left side of the File tab. 4. Click [Advanced] on the left side of the PowerPoint options window. 5. In the Advanced tab, enter the number of undo steps you need. 6. Click [OK] after the settings are completed. Now the PowerPoint software will record the number of steps you set for you. Note that different versions of Office have slightly different ways of entering option settings.
 How to embed fonts in ppt documents
Mar 19, 2024 pm 10:16 PM
Sometimes we need to copy documents to different computers for editing. However, sometimes we find that after we change a computer, the ppt document cannot be displayed normally. What is going on? In fact, this was because the computer we used later did not have the fonts we used installed. In order to prevent this situation, we need to embed fonts. Below, let's see how to do it. 1. We first create and open a PPT file, and then click [File]-[Options] in the upper left corner of the ppt document. 2. We click the [Options] button, and then the ppt option box pops up. We find the [Save] option among the various options below, and then click to enter. 3. Let’s go down one by one and find the [Embed font in file] option.
 Detailed method to import excel table into PPT document
Mar 26, 2024 pm 05:06 PM
1. Open PPT and click [Format] → [Slide Layout]. 2. Scroll down to the end of the pop-up slide layout box and select [Title and Chart]. 3. Click [Title and Chart] and double-click [Double-click here to add chart]. 4. Double-click to pop up the style chart and click [Edit] → [Import File]. 5. Select the excel table you want to import. 6. The import is completed.
 Detailed method to insert any type of document into PPT document
Mar 26, 2024 pm 07:20 PM
1. Open PPT, click [Insert]--[Object], and the [Insert Object] dialog box will pop up. 2. Click [Create from file] in the red box. 3. Click [Browse] and select the location of the file to be inserted, and confirm. 4. Click the small box on the right [Show as picture] and click OK. 5. At this time, the file has been inserted into the PPT document and can be opened elsewhere at any time.


