How to draw a table in Word
How to draw tables in Word has always been a concern for many users. When using Word to process documents, tables are a very common element that can make the document clearer and easier to read. PHP editor Yuzai provides you with detailed table drawing methods, including the steps of inserting tables, setting table styles, adjusting cell sizes, etc. By learning these skills, I believe everyone will become more proficient in drawing tables in Word and improve the beauty and practicality of the document.
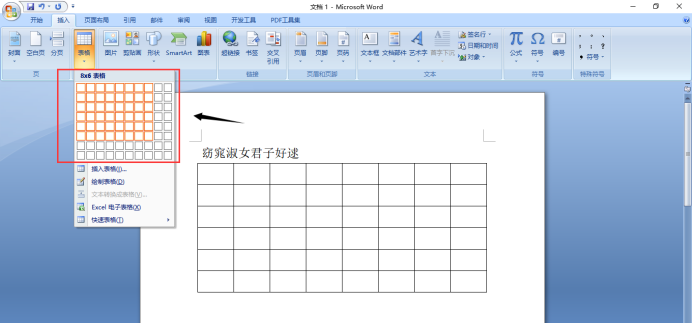
1. Open word, select the place where you want to insert the table, and find the "Insert" option in the upper menu bar.

2. Click the "Table" option, and densely packed small cubes will appear. This is the scaling of the table.

3. Place the mouse on the small cube and move it to cover it. After determining the size of the table to be used, click the left mouse button to confirm. At this time, you can clearly see the table appearing in the word document.

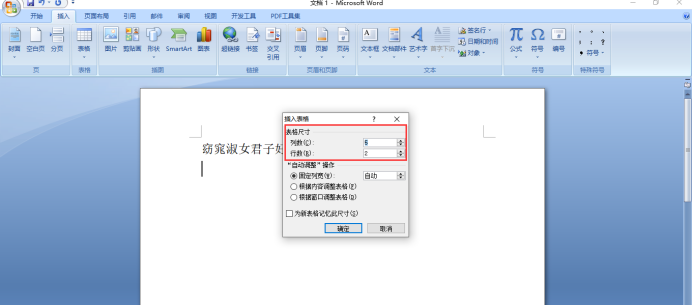
Of course, in addition to using this method, there is also a simple operation method, select "Insert", click "Insert Table" under the small cube, and then a dialog box. You can select the size of the table according to your own needs, enter the size and click OK below.

Friends, is it very easy to draw a table in Word? In fact, a lot of content may seem advanced, but the actual steps are very simple. Learn more and operate more, and you will definitely become a word master.
This article uses the following hardware model: Lenovo Xiaoxin Air15; system version: win10; software version: Microsoft Word 2007.
The above is the detailed content of How to draw a table in Word. For more information, please follow other related articles on the PHP Chinese website!

Hot AI Tools

Undresser.AI Undress
AI-powered app for creating realistic nude photos

AI Clothes Remover
Online AI tool for removing clothes from photos.

Undress AI Tool
Undress images for free

Clothoff.io
AI clothes remover

Video Face Swap
Swap faces in any video effortlessly with our completely free AI face swap tool!

Hot Article

Hot Tools

Notepad++7.3.1
Easy-to-use and free code editor

SublimeText3 Chinese version
Chinese version, very easy to use

Zend Studio 13.0.1
Powerful PHP integrated development environment

Dreamweaver CS6
Visual web development tools

SublimeText3 Mac version
God-level code editing software (SublimeText3)

Hot Topics
 System Restore prompts that you must enable system protection on this drive
Jun 19, 2024 pm 12:23 PM
The computer has a restore point, and when the system is restored, it prompts "You must enable system protection on this drive." This usually means that the system protection function is not turned on. System protection is a feature provided by the Windows operating system that can create system restore points to back up system files and settings. That way, if something goes wrong, you can revert to a previous state. When the system fails and you cannot enter the desktop to start it, you can only try the following method: Troubleshooting-Advanced Options-Command Prompt Command 1 netstartvssrstrui.exe/offline:C:\windows=active Command 2 cd%windir%\system32 \configrenSYSTEMsy
 What should I do if win10 does not switch users? Win10 login interface does not have the option to switch users. Solution
Jun 25, 2024 pm 05:21 PM
A problem that Windows 10 users may encounter is that they cannot find the switch user option on the login interface. So what should I do if there is no switch user option on the win10 login interface? Let this site give users a detailed explanation of the problem of not switching user options in the win10 login interface. Detailed solution to the problem of switching user options on the Win10 login interface: Check user account settings: First, make sure you have multiple user accounts on your computer and that these accounts are enabled. You can check and enable the account by following these steps: a. Press Win+I keys to open Settings and select "Accounts". b. Select "Family & Others" or &ld in the left navigation bar
 Windows cannot start the Windows Audio service Error 0x80070005
Jun 19, 2024 pm 01:08 PM
The guy's computer appears: Windows cannot start the WindowsAudio service (located on the local computer). Error 0x8007005: Access denied. This situation is usually caused by user permissions. You can try the following methods to fix it. Method 1: Modify the registry to add permissions through batch processing, create a new text document on the desktop, save it as .bat, and right-click the administrator to go far. Echo==========================EchoProcessingRegistryPermission.Pleasewait...Echo================== ========subinacl/subkey
 What to do if the Win10 Task Manager crashes? How to fix the Win10 Task Manager crash?
Jun 25, 2024 pm 04:31 PM
Hello everyone, have you ever encountered the situation where the Windows 10 Task Manager keeps crashing? This function helps us a lot, allowing us to quickly see all running tasks, which is very convenient to use, right? However, some friends said that they encountered this problem and didn’t know how to solve it, so let me share with you the specific solution! Solution to Win10 Task Manager crash 1. First, press and hold the "Win" + "R" keys on the keyboard to open Run, enter "regedit" and press the Enter key. 2. Expand the folders and find "HKEY_CURRENT_USERSoftwareMicros
 What should I do if my Win10 password does not meet the password policy requirements? What to do if my computer password does not meet the policy requirements?
Jun 25, 2024 pm 04:59 PM
In the Windows 10 system, the password policy is a set of security rules to ensure that the passwords set by users meet certain strength and complexity requirements. If the system prompts that your password does not meet the password policy requirements, it usually means that your password does not meet the requirements set by Microsoft. standards for complexity, length, or character types, so how can this be avoided? Users can directly find the password policy under the local computer policy to perform operations. Let’s take a look below. Solutions that do not comply with password policy specifications: Change the password length: According to the password policy requirements, we can try to increase the length of the password, such as changing the original 6-digit password to 8-digit or longer. Add special characters: Password policies often require special characters such as @, #, $, etc. I
 Windows privacy optimization, Win10/11 system privacy settings, protect personal information security
Jun 18, 2024 pm 08:55 PM
From the Microsoft official website, create a new text document on the desktop, save it as "Privacy Optimization.reg", right-click and merge. WindowsRegistryEditorVersion5.00;Turn off the activity test of the Windows Network Connectivity Status Indicator[HKEY_LOCAL_MACHINE\SOFTWARE\Policies\Microsoft\Windows\NetworkConnectivityStatusIndicator]"NoActiveProbe"=dword:00000001;Turn off the automatic download and update of map data[HKEY_LOCA
 Windows Security Center opens blank, Defender blank and no display
Jun 18, 2024 pm 08:32 PM
A friend needs to download a certain software, but as soon as it is downloaded, it is checked, killed and isolated by Windows Defender. This kind of green software is actually non-toxic, but it has not been signed and certified by Microsoft, so it will be accidentally damaged by anti-virus software. Open the Windows Defender Security Center to turn off real-time protection, and find that the page is blank after opening it. If you cannot open it, you cannot close Windows Defender, entering an infinite loop. The easiest way is to install third-party anti-virus software. The anti-virus software will automatically close Windows Defender, so you can Perform whitelist settings on third-party antivirus software. However, some friends don’t want to use third-party anti-virus software, so how to solve Windows Defender?
 Where is the win10 user profile? How to set the user profile in Win10
Jun 25, 2024 pm 05:55 PM
Recently, many Win10 system users want to change the user profile, but they don’t know how to do it. This article will show you how to set the user profile in Win10 system! How to set up user profile in Win10 1. First, press the "Win+I" keys to open the settings interface, and click to enter the "System" settings. 2. Then, in the opened interface, click "About" on the left, then find and click "Advanced System Settings". 3. Then, in the pop-up window, switch to the "" option bar and click "User Configuration" below.


