

How to implement SSL passthrough in HAProxy

Maintaining web server load balancing is one of the key measures to prevent downtime. Using a load balancer is a reliable approach, with HAProxy being a highly regarded choice. Using HAProxy, you can accurately configure the load balancing method and support SSL passthrough to ensure the security of communication between the client and the server.
First discusses the importance of implementing SSL passthrough in HAProxy, followed by a detailed discussion of the steps required to implement this feature, and an example is provided for better understanding.
What is SSL pass? Why is it important?
As a load balancer, HAProxy accepts and distributes the load flowing to your web servers, distributing it among the configured servers. The load is distributed across traffic shared between client devices and backend servers. In the process of load balancing, security is crucial, and SSL is the key to ensuring security.
Ideally, SSL passthrough involves forwarding SSL/TLS traffic to your web server and distributing it to configured servers without terminating SSL/TLS at HAProxy or any other load balancer you are using connect. With SSL Passthrough, you'll enjoy better end-to-end encryption, and the client's original IP address will be preserved. Additionally, this is a recommended security measure that creates better backend server flexibility and reduces HAProxy overload.
A step-by-step guide on how to implement SSL tunneling in HAProxy
After understanding the concept of SSL passthrough and its necessity, the next step is to implement it on the HAProxy load balancer by following the prescribed steps. Follow the instructions to quickly enable SSL passthrough on your HAProxy load balancer.
Step 1: Install HAProxy
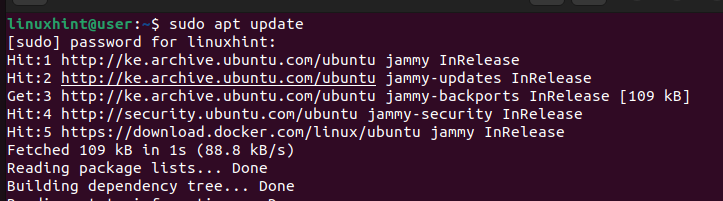
Assuming you do not have HAProxy installed. The first step is to install it before we configure it for SSL passthrough. So start by updating the repository.
$sudo apt update
Next, install HAProxy from the default repository using the following command. Note that we use Ubuntu to handle this situation:
$sudo apt install haproxy

Once you have HAProxy installed, you can achieve SSL passthrough. Read on!
Step 2: Implement SSL passthrough in HAProxy
For this step, we must access the HAProxy configuration file located in "/etc/haproxy" and edit it to specify how we want to achieve SSL passthrough. You can open the configuration file using any text editor. We used Nano in this demo.
$sudo nano/etc/haproxy/haproxy,cfg
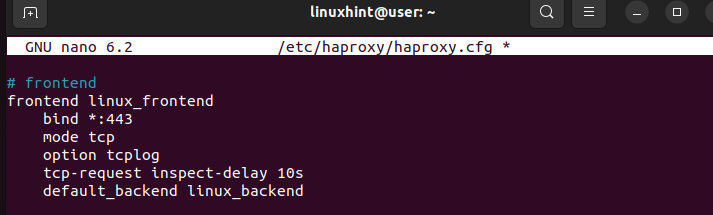
Once you access the configuration file, there are two sections you must create: "Frontend" and "Backend". In the "Front End" you can specify which port to bind to connect to. Likewise, you must specify which protocol to use and which backend server to use to distribute the traffic.
In this case, since we want to protect the traffic, we will bind port 443 for HTTPS connections. Likewise, we specify the TCP modes in which we wish to accept HAProxy operating at the transport layer.
We also added the "tcp_request" line as a rule to specify the duration of checking SSL "hello" messages to verify that we are accepting SSL traffic. Finally, we specify the backend servers for load distribution. Our final "frontend" part looks like this:
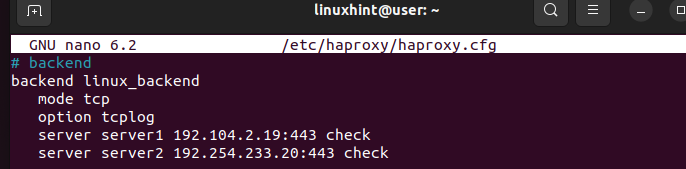
For the "Backend" part, we set the mode to TCP. We then specify the IP address of the server used for load balancing. Make sure you replace these IPs to match your live server's IP and set the connection port to 443.
Add "option tcplog" to allow logging of tcp-related issues in a log file contained in the "global" section of the configuration file.
Step 3: Restart HAProxy and test the configuration
After editing the HAProxy configuration file, save it and exit. Restart the HAProxy service to apply the changes.

that's all! We implemented SSL passthrough in HAProxy. Try sending a stream of traffic to your web server using a command like curl and see how it responds. If SSL passthrough is implemented successfully, you will get an output showing that the connection was established through port 443, and you will be connected to the backend server. Your server will respond with the required details and give a 200 status response.

in conclusion
Implementing SSL passthrough helps create end-to-end encryption and ensures that SSL/TLS connections are maintained when load balancing occurs. To implement SSL passthrough in HAProxy, install HAProxy and edit the configuration file to specify how load balancing occurs. Please refer to this example to better understand the process.
The above is the detailed content of How to implement SSL passthrough in HAProxy. For more information, please follow other related articles on the PHP Chinese website!

Hot AI Tools

Undresser.AI Undress
AI-powered app for creating realistic nude photos

AI Clothes Remover
Online AI tool for removing clothes from photos.

Undress AI Tool
Undress images for free

Clothoff.io
AI clothes remover

Video Face Swap
Swap faces in any video effortlessly with our completely free AI face swap tool!

Hot Article
Hot Tools

Notepad++7.3.1
Easy-to-use and free code editor

SublimeText3 Chinese version
Chinese version, very easy to use

Zend Studio 13.0.1
Powerful PHP integrated development environment

Dreamweaver CS6
Visual web development tools

SublimeText3 Mac version
God-level code editing software (SublimeText3)
Hot Topics
 1386
1386
 52
52

 Can't wait for universal controls? Now share your keyboard and mouse between Mac, PC with Barrier
Apr 14, 2023 pm 12:04 PM
Can't wait for universal controls? Now share your keyboard and mouse between Mac, PC with Barrier
Apr 14, 2023 pm 12:04 PM
How to Share Keyboard and Mouse Between Mac/PC Using Barrier You need to make sure that the computers you want to share your mouse and keyboard with are on the same network, and you'll be switching back and forth between different Macs during the initial setup. Get the latest version of Barrier here (DMG for Mac, exe for Windows) – Download it to each computer you want to be able to use your keyboard and mouse Install Barrier from the DMG (or use the exe to Windows) Copy to the /Applications folder on each Mac you plan to use it on and right-click Barr
 After Java8 (291), TLS1.1 is disabled and JDBC cannot connect to SqlServer2008 using SSL. How to solve the problem?
May 16, 2023 pm 11:55 PM
After Java8 (291), TLS1.1 is disabled and JDBC cannot connect to SqlServer2008 using SSL. How to solve the problem?
May 16, 2023 pm 11:55 PM
After Java8-291, TLS1.1 is disabled, so that JDBC cannot connect to SqlServer2008 using SSL. What should I do? The following is the solution to modify the java.security file 1. Find the java.security file of jre. If it is jre, go to {JAVA_HOME}/jre/ In lib/security, for example????C:\ProgramFiles\Java\jre1.8.0_301\lib\security. If it is the Eclipse green installation-free portable version, search for java.security in the installation folder, such as????xxx\plugins \org
 How to implement SSL passthrough in HAProxy
Mar 20, 2024 am 09:30 AM
How to implement SSL passthrough in HAProxy
Mar 20, 2024 am 09:30 AM
Keeping web servers load balanced is one of the key measures to prevent downtime. Using a load balancer is a reliable approach, with HAProxy being a highly regarded choice. Using HAProxy, you can accurately configure the load balancing method and support SSL passthrough to ensure the security of communication between the client and the server. It starts by exploring the importance of implementing SSL passthrough in HAProxy, followed by a detailed discussion of the steps required to implement this feature and an example for better understanding. What is SSL passthrough? Why is it important? As a load balancer, HAProxy accepts and distributes the load flowing to your web servers across configured servers. Load distribution is targeted to client devices and
 MySQL: Introduction to SSL connection and setup steps
Sep 08, 2023 pm 03:51 PM
MySQL: Introduction to SSL connection and setup steps
Sep 08, 2023 pm 03:51 PM
MySQL: Introduction to SSL connection and summary of setup steps: MySQL provides SSL (SecureSocketsLayer) connection to encrypt the data transmitted between the client and the server. This article will introduce the concept and role of SSL connections, and provide steps and related code examples to set up SSL connections in MySQL. Introduction: As networks and data transmission continue to expand, data security becomes more and more important. By using an SSL connection we can add
 Nginx with SSL: Configure HTTPS to protect your web server
Jun 09, 2023 pm 09:24 PM
Nginx with SSL: Configure HTTPS to protect your web server
Jun 09, 2023 pm 09:24 PM
Nginx is a high-performance web server software and a powerful reverse proxy server and load balancer. With the rapid development of the Internet, more and more websites are beginning to use the SSL protocol to protect sensitive user data, and Nginx also provides powerful SSL support, making the security performance of the web server even further. This article will introduce how to configure Nginx to support the SSL protocol and protect the security performance of the web server. What is SSL protocol? SSL (SecureSocket
 How to analyze Haproxy port reuse
May 29, 2023 am 09:25 AM
How to analyze Haproxy port reuse
May 29, 2023 am 09:25 AM
Author of this article: Spark (Ms08067 intranet security team member) 1. Overview Haproxy is a high-performance load balancing proxy software developed in C language. It provides tcp and http application proxies. It is free, fast and reliable. Similar to frp, it can be run using a configuration file + a server. Advantages: Large-scale business field applications widely support four-layer proxies (transport layer) and seven-layer proxies (application layer). Support ACL (access control list), and can flexibly configure routing windows. It can be run after compiling with cygwin (can be cross-platform) access control list (AccessControlLists, ACL) is a list of commands applied to the router interface. These command lists
 How to configure HAProxy for WebSocket connections
Mar 20, 2024 pm 03:51 PM
How to configure HAProxy for WebSocket connections
Mar 20, 2024 pm 03:51 PM
WebSocket applications enable real-time two-way communication between client and server. Even though WebSocket connections are used, effective traffic management mechanisms are still required to avoid overloading the server, resulting in service interruption and unavailability. HAProxy is a free and reliable load balancer that also works as a reverse proxy. By configuring HAProxy to support WebSocket connections, you can better utilize the real-time data transmission characteristics of WebSockets and reduce the server load. This article will describe the detailed steps to configure HAProxy to support WebSocket connections. Step-by-step guide on how to configure HAProxy for WebSocket connections via WebSoc
 Sharepoint install SSL certificate?
Feb 19, 2024 am 11:27 AM
Sharepoint install SSL certificate?
Feb 19, 2024 am 11:27 AM
Installing an SSL certificate on SharePoint is a critical step in securing your website and providing an encrypted connection. By following the correct installation steps, you can ensure the security of your website data, improve your ranking in search engines, and provide a better user experience for your visitors. Get an SSL Certificate Contact a trusted Certificate Authority (CA) to purchase an SSL certificate. Provide the required authentication and domain ownership verification information. After completing the verification process, you will receive the SSL certificate file. Prepare the Certificate File Open your SSL certificate file using a text editor. Copy the certificate contents to a new text file. Save the file as yourdomain.cer, making sure to change "yourdomain”
