How to fix UFW status showing as inactive in Linux
UFW, also known as Uncomplex Firewall, is adopted by many Linux distributions as their firewall system. UFW is designed to make it easy for novice users to manage firewall settings through both the command line interface and the graphical user interface.
UFW firewall is a system that monitors network traffic according to set rules to protect the network from network sniffing and other attacks. If you have UFW installed on your Linux system but its status shows as inactive, there could be several reasons. In this guide, I will share how to resolve the UFW firewall inactive issue on Linux systems.
- Why UFW shows inactive status on Linux
- Why UFW is not active by default on Linux
- How to check UFW status on Linux
- How to Fix UFW Status Showing Inactive on Linux
- How to know which application needs to be passed in via UFW
- How to use UFW to identify and allow ports
- How to enable UFW for applications that require incoming traffic
- in conclusion
Why UFW shows inactive status on Linux
Some reasons why UFW is inactive are as follows:
- In many Linux distributions, UFW comes pre-installed, but by default, it is inactive.
- If you installed UFW yourself, it will be disabled by default and show inactive status.
Why UFW is not active by default on Linux
By default, UFW is disabled because it can block SSH or HTTP ports, which is very important for server communication and management. It denies all incoming traffic and allows outgoing traffic. As a server administrator, you can send requests and receive responses. However, the firewall blocks all incoming connections.
Incoming traffic is critical for SSH and HTTP communication. Without SSH, you will not be able to access the server remotely. Before enabling UFW, be sure to confirm that these critical ports are open to allow connections.
Note: I used Ubuntu 22.04 to execute the following commands, but the instructions are the same for other distributions.
How to check UFW status on Linux
In Linux, both pre-installed and manually installed UFW are disabled by default. You need to activate it.
To check the UFW status, execute the ufw status command in the terminal:
Sudoku UFW Status

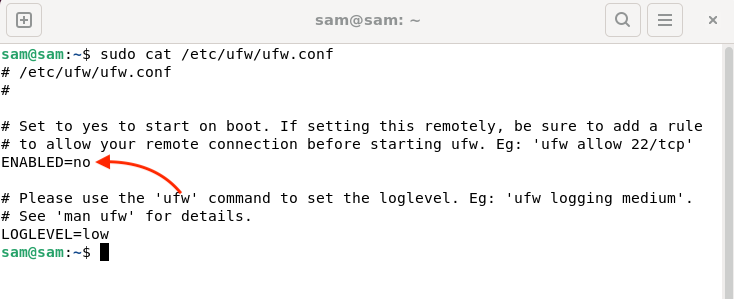
You can also check the UFW status through the UFW configuration file. To access the file, use the command given below:
sudo cat/etc/ufw/ufw. conf
Read the file and check the ENABLED service. If not, it means UFW is disabled.
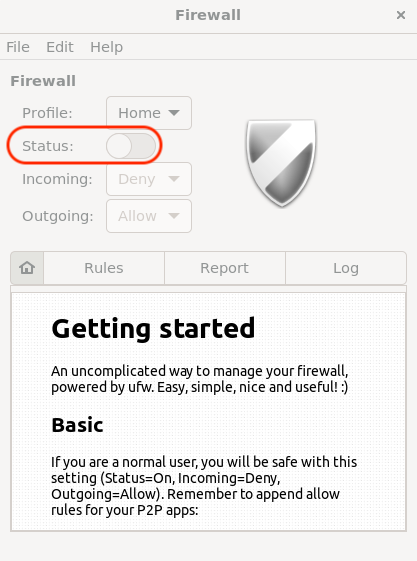
You can also launch the GUI application to check the UFW status.
How to Fix UFW Status Showing Inactive on Linux
The inactivity of UFW can be fixed by enabling it using the command line.
Before enabling UFW, it is best to take a look at the additional rules.
sudo ufw show add

NOTE: By default, UFW denies all incoming traffic.
To enable UFW, launch a terminal and run the UFW Enable command, which will enable UFW even on boot:
sudo ufw enable

To monitor the status, run the following command again:
sudo ufw status details
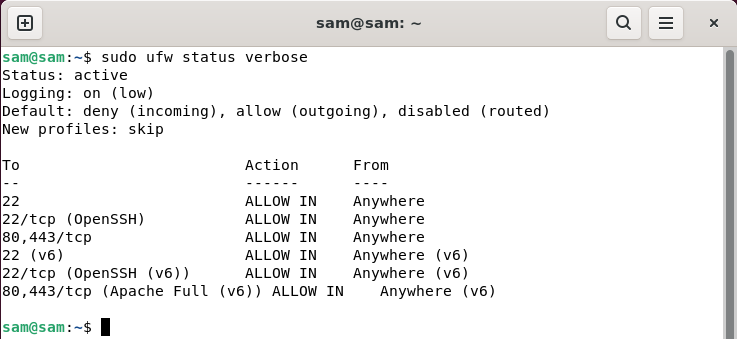
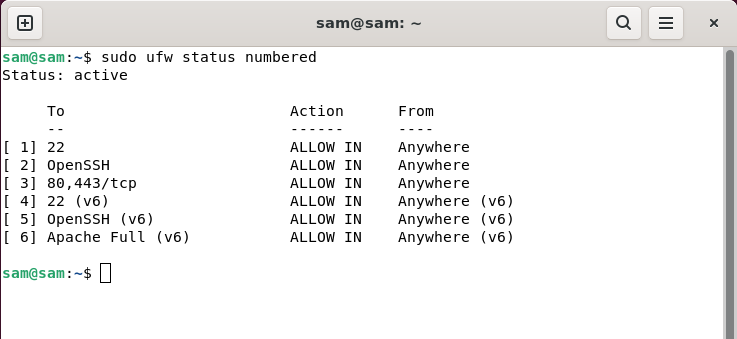
To set the status as a number, use Usage:
sudo ufw status number
You can also enable it using UFW configuration files. Open the UFW configuration file using nano editor:
sudo nano/etc/ufw/ufw. conf
Find ENABLED, change the status from no to yes, and save the file.
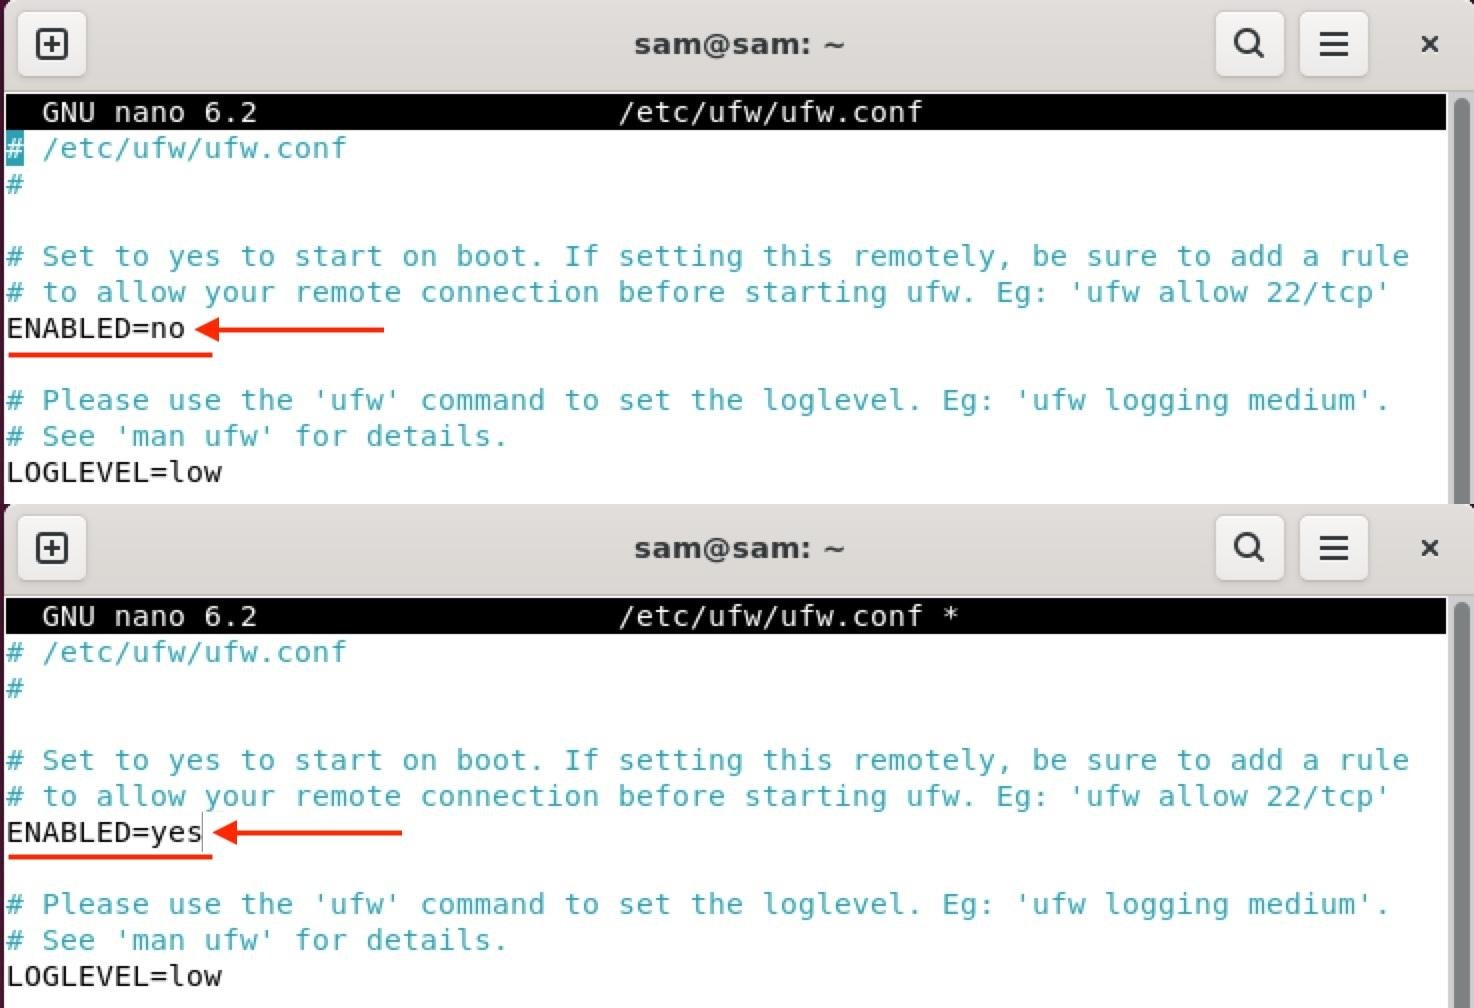
To save the file, press Ctrl X and it will prompt you to make changes, then press Y/y to save the file.
Note: The server must be restarted to enable UFW through the configuration file.
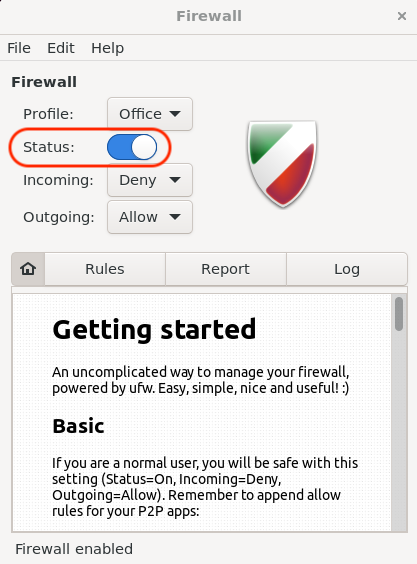
You can also enable UFW using UFW's GUI window. Launch the UFW application and toggle enable.
How to know which application needs to be passed in through UFW
Every port requiring incoming traffic must be allowed through UFW. SSH is crucial because if you enable UFW and don't allow the SSH port, you may lose control of the server.
To see which application must be allowed for incoming traffic, run the ufw app list command:
sudo ufw app list

Alternatively, view the UFW application configuration file:
LS/ETC/UFW/Applications.d

These are applications that need to open ports.
NOTE: Applications that require port enabled have UFW profiles.
How to use UFW to identify and allow ports
To know the port for a specific application, use the command below.
The syntax of this command is:
sudo ufw app info “”
For example, to view the SSH port name, use the following command:
sudo ufw app info “OpenSSH”

OpenSSH requires port 22 to work properly.
To check the Apache Full port, use: Purpose:
Sudoku UFW App Information "Apache Full Function"

Apache requires two ports 80 and 443 to work.
How to enable UFW for applications that require incoming traffic
When UFW is enabled, all incoming traffic will be denied. To avoid yourself being excluded from the server, it's important to add a rule to access the server via SSH before enabling UFW.
To add OpenSSH connection rules, use the following actions: Purpose:
Sudoku UFW allows 22

or usage:
sudo ufw allow “OpenSSH”

To add a rule for the Apache web server, use the following command:
sudo ufw add 80,443/tcp

Ports 80 and 443 are used for HTTP and HTTPS respectively, both of which are required by the Apache web server.
or usage:
sudo ufw allow “Apache Full”

After enabling key ports through UFW, you can use the UFW Enable command to enable UFW.
in conclusion
UFW is the default firewall for various Linux distributions. By default, it is set to inactive as it may block traffic from certain important ports such as 22, 80 or 443. To make it active, there are various programs. UFW can be enabled using commands, UFW configuration files, and through the UFW GUI. UFW disables all incoming traffic, so make sure to add SSH rules before enabling UFW.
The above is the detailed content of How to fix UFW status showing as inactive in Linux. For more information, please follow other related articles on the PHP Chinese website!

Hot AI Tools

Undresser.AI Undress
AI-powered app for creating realistic nude photos

AI Clothes Remover
Online AI tool for removing clothes from photos.

Undress AI Tool
Undress images for free

Clothoff.io
AI clothes remover

AI Hentai Generator
Generate AI Hentai for free.

Hot Article

Hot Tools

Notepad++7.3.1
Easy-to-use and free code editor

SublimeText3 Chinese version
Chinese version, very easy to use

Zend Studio 13.0.1
Powerful PHP integrated development environment

Dreamweaver CS6
Visual web development tools

SublimeText3 Mac version
God-level code editing software (SublimeText3)

Hot Topics
 1378
1378
 52
52
 What is Linux actually good for?
Apr 12, 2025 am 12:20 AM
Linux is suitable for servers, development environments, and embedded systems. 1. As a server operating system, Linux is stable and efficient, and is often used to deploy high-concurrency applications. 2. As a development environment, Linux provides efficient command line tools and package management systems to improve development efficiency. 3. In embedded systems, Linux is lightweight and customizable, suitable for environments with limited resources.
 How to start apache
Apr 13, 2025 pm 01:06 PM
The steps to start Apache are as follows: Install Apache (command: sudo apt-get install apache2 or download it from the official website) Start Apache (Linux: sudo systemctl start apache2; Windows: Right-click the "Apache2.4" service and select "Start") Check whether it has been started (Linux: sudo systemctl status apache2; Windows: Check the status of the "Apache2.4" service in the service manager) Enable boot automatically (optional, Linux: sudo systemctl
 What to do if the apache80 port is occupied
Apr 13, 2025 pm 01:24 PM
When the Apache 80 port is occupied, the solution is as follows: find out the process that occupies the port and close it. Check the firewall settings to make sure Apache is not blocked. If the above method does not work, please reconfigure Apache to use a different port. Restart the Apache service.
 How to monitor Nginx SSL performance on Debian
Apr 12, 2025 pm 10:18 PM
This article describes how to effectively monitor the SSL performance of Nginx servers on Debian systems. We will use NginxExporter to export Nginx status data to Prometheus and then visually display it through Grafana. Step 1: Configuring Nginx First, we need to enable the stub_status module in the Nginx configuration file to obtain the status information of Nginx. Add the following snippet in your Nginx configuration file (usually located in /etc/nginx/nginx.conf or its include file): location/nginx_status{stub_status
 How to start monitoring of oracle
Apr 12, 2025 am 06:00 AM
The steps to start an Oracle listener are as follows: Check the listener status (using the lsnrctl status command) For Windows, start the "TNS Listener" service in Oracle Services Manager For Linux and Unix, use the lsnrctl start command to start the listener run the lsnrctl status command to verify that the listener is started
 How to set up a recycling bin in Debian system
Apr 12, 2025 pm 10:51 PM
This article introduces two methods of configuring a recycling bin in a Debian system: a graphical interface and a command line. Method 1: Use the Nautilus graphical interface to open the file manager: Find and start the Nautilus file manager (usually called "File") in the desktop or application menu. Find the Recycle Bin: Look for the Recycle Bin folder in the left navigation bar. If it is not found, try clicking "Other Location" or "Computer" to search. Configure Recycle Bin properties: Right-click "Recycle Bin" and select "Properties". In the Properties window, you can adjust the following settings: Maximum Size: Limit the disk space available in the Recycle Bin. Retention time: Set the preservation before the file is automatically deleted in the recycling bin
 How to restart the apache server
Apr 13, 2025 pm 01:12 PM
To restart the Apache server, follow these steps: Linux/macOS: Run sudo systemctl restart apache2. Windows: Run net stop Apache2.4 and then net start Apache2.4. Run netstat -a | findstr 80 to check the server status.
 How to optimize the performance of debian readdir
Apr 13, 2025 am 08:48 AM
In Debian systems, readdir system calls are used to read directory contents. If its performance is not good, try the following optimization strategy: Simplify the number of directory files: Split large directories into multiple small directories as much as possible, reducing the number of items processed per readdir call. Enable directory content caching: build a cache mechanism, update the cache regularly or when directory content changes, and reduce frequent calls to readdir. Memory caches (such as Memcached or Redis) or local caches (such as files or databases) can be considered. Adopt efficient data structure: If you implement directory traversal by yourself, select more efficient data structures (such as hash tables instead of linear search) to store and access directory information


