

How to configure HAProxy for WebSocket connections

WebSocket applications enable real-time two-way communication between client and server. Even though WebSocket connections are used, effective traffic management mechanisms are still required to avoid overloading the server, resulting in service interruption and unavailability.
HAProxy is a free and reliable load balancer that can also be used as a reverse proxy. By configuring HAProxy to support WebSocket connections, you can better utilize the real-time data transmission characteristics of WebSockets and reduce the server load. This article will describe the detailed steps to configure HAProxy to support WebSocket connections.
Step-by-step guide on how to configure HAProxy for WebSocket connections
Through the WebSocket connection, the communication between the server and the client is persistent until one of the parties actively closes the connection. To ensure that traffic can be evenly distributed to other servers when the server load is too high, a load balancer approach can be used. In this way, the client and server can maintain a continuous connection and enjoy a low-latency communication environment.
1. Install HAProxy
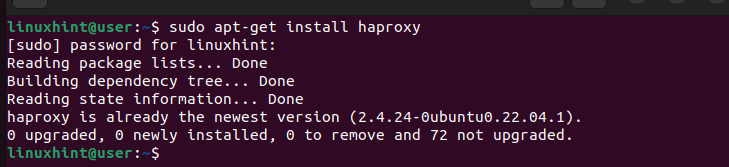
The first step in configuring HAProxy's WebSocket connection is to confirm that HAProxy is installed. If it is not installed yet, follow these steps to install it:
$sudo apt—get install haproxy
2. Edit HAProxy configuration
In order for WebSocket connections to pass through HAProxy, the HAProxy configuration needs to be adjusted to support WebSocket connections. This includes making changes to the "server" section and setting up the "frontend" and "backend" sections.
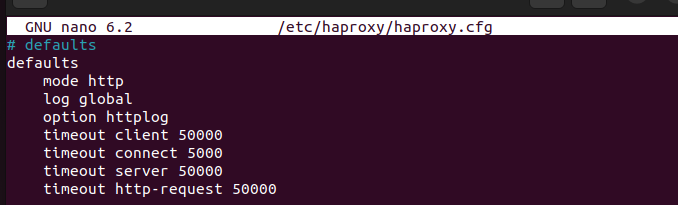
Use a text editor to open the HAProxy configuration as shown below:
$sudo nano/etc/haproxy/haproxy.cfg
In the "Delete" section, modify it as shown in the image below. First, we specify that we are using an HTTP connection and define where to send the log files. Next, we set timeouts for different activities. For example, a connection timeout is the maximum amount of time it takes to connect to a server. If the maximum time is reached, the connection is considered failed and can be retried.
For this case, we set the connection timeout to 5000 milliseconds. You can adjust the timeout based on your situation. Tweak them based on your application, keeping in mind the duration of WebSocket sessions and how long you expect them to live.
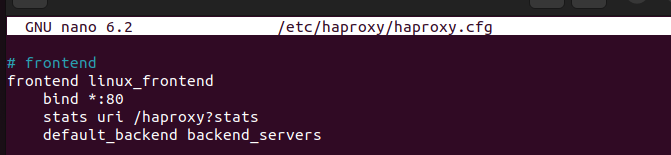
Next, we have to create the "frontend" part, where we bind the port used for the WebSocket connection and the referenced backend server. In this case, we specify port 80 and give the URL to access the “Stats” page to monitor our HAProxy. Finally, we define the backend parts that are referenced in load balancing.
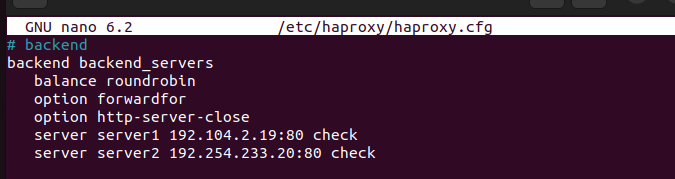
In the "Backend" part, we use round-robin scheduling to distribute the load. "option forward for" specifies that HAProxy includes an "X-Forward-For" header when sending a connection request, which contains the client's IP address. This way the backend server will get the correct client IP.
"Option http_server_close" limits resources by eliminating any idle connections taking up server resources. Although WebSocket connections are long-lived, we must check if there are idle long-lived connections and close them to avoid unnecessary waste of resources.
Finally, add the backend servers that will be used to distribute traffic. Make sure to give the server the correct IP address and replace the IP address in the image below:
Your HAProxy is now configured for a WebSocket connection. Save changes and close file.
3. Validity test
Before restarting HAProxy, we can run a quick command to check that the file is valid and has no errors. To do this, run the following command:
$sudo haproxy-c-f/etc/haproxy/haproxy.cfg

4. Restart and test the WebSocket connection
After the file is valid, restart the HAProxy service.

That's it. You configured HAProxy for WebSocket connections. You can test the connection to ensure all WebSocket traffic is forwarded correctly.
in conclusion
Configuring HAProxy for WebSocket connections is a popular solution, especially among web administrators. This article elaborates on the process in detail, giving the steps and an example to ensure you are comfortable following and managing to implement the same process in your case. Work through each step to make sure you understand the concept and the process of implementing it.
The above is the detailed content of How to configure HAProxy for WebSocket connections. For more information, please follow other related articles on the PHP Chinese website!

Hot AI Tools

Undresser.AI Undress
AI-powered app for creating realistic nude photos

AI Clothes Remover
Online AI tool for removing clothes from photos.

Undress AI Tool
Undress images for free

Clothoff.io
AI clothes remover

Video Face Swap
Swap faces in any video effortlessly with our completely free AI face swap tool!

Hot Article
Hot Tools

Notepad++7.3.1
Easy-to-use and free code editor

SublimeText3 Chinese version
Chinese version, very easy to use

Zend Studio 13.0.1
Powerful PHP integrated development environment

Dreamweaver CS6
Visual web development tools

SublimeText3 Mac version
God-level code editing software (SublimeText3)
Hot Topics
 1389
1389
 52
52

 This workbook contains links to one or more external sources that may be unsafe
Feb 26, 2024 am 11:07 AM
This workbook contains links to one or more external sources that may be unsafe
Feb 26, 2024 am 11:07 AM
Does Excel continue to throw This workbook contains links to one or more external sources that may display an unsafe warning message when opening the workbook? Many users have reported that they receive this warning whenever they open an Excel file. Although this warning indicates that there are potentially malicious links in the workbook, it may be triggered even if you have included a trusted external source. This workbook contains links to one or more potentially unsafe external sources if you open Excel. The warning "This workbook contains links to one or more external sources that may be unsafe" appears when you open a file. You can try the following solutions to resolve the issue: Check external links in the workbook and remove untrusted links. . Use the edit link feature
 Slack: This link cannot be opened
Feb 19, 2024 pm 09:20 PM
Slack: This link cannot be opened
Feb 19, 2024 pm 09:20 PM
We don't want users to get confused when Sack can't open a link. In this article, we will explore ways to solve this problem. If you encounter a similar situation, check out the solutions provided in this article to quickly resolve the issue. Why isn't my Slack working? If Slack isn't running properly, there are some common factors you may want to check. First check the internet connection as the application requires a stable network. Next, check to see if cache and cookies are corrupted, then check the status of the Slack server to clear any firewall or antivirus programs that may be interfering. Users can also try resetting the app or doing a clean installation. Fix We can't open this link in Slack error If you can't open this link in Slack
 How to implement SSL passthrough in HAProxy
Mar 20, 2024 am 09:30 AM
How to implement SSL passthrough in HAProxy
Mar 20, 2024 am 09:30 AM
Keeping web servers load balanced is one of the key measures to prevent downtime. Using a load balancer is a reliable approach, with HAProxy being a highly regarded choice. Using HAProxy, you can accurately configure the load balancing method and support SSL passthrough to ensure the security of communication between the client and the server. It starts by exploring the importance of implementing SSL passthrough in HAProxy, followed by a detailed discussion of the steps required to implement this feature and an example for better understanding. What is SSL passthrough? Why is it important? As a load balancer, HAProxy accepts and distributes the load flowing to your web servers across configured servers. Load distribution is targeted to client devices and
 How to solve the problem of slow Mysql connection in Docker
Feb 19, 2024 pm 03:09 PM
How to solve the problem of slow Mysql connection in Docker
Feb 19, 2024 pm 03:09 PM
After using Docker to deploy MySQL, the connection speed is slow. Through online searches, I found that the problem may be caused by the lack of modules such as DNS resolution during the minimum container installation. Therefore, there will be a problem of super slow connection when connecting. We directly add this sentence skip-name-resolve and directly modify the docker-compose.yml configuration. The configuration is as follows version: "3" services: mysql: image: mysql: latestcontainer_name: mysql_composerestart: alwaysports:-3306:3306command:--default-a
 How to analyze Haproxy port reuse
May 29, 2023 am 09:25 AM
How to analyze Haproxy port reuse
May 29, 2023 am 09:25 AM
Author of this article: Spark (Ms08067 intranet security team member) 1. Overview Haproxy is a high-performance load balancing proxy software developed in C language. It provides tcp and http application proxies. It is free, fast and reliable. Similar to frp, it can be run using a configuration file + a server. Advantages: Large-scale business field applications widely support four-layer proxies (transport layer) and seven-layer proxies (application layer). Support ACL (access control list), and can flexibly configure routing windows. It can be run after compiling with cygwin (can be cross-platform) access control list (AccessControlLists, ACL) is a list of commands applied to the router interface. These command lists
 How to configure HAProxy for WebSocket connections
Mar 20, 2024 pm 03:51 PM
How to configure HAProxy for WebSocket connections
Mar 20, 2024 pm 03:51 PM
WebSocket applications enable real-time two-way communication between client and server. Even though WebSocket connections are used, effective traffic management mechanisms are still required to avoid overloading the server, resulting in service interruption and unavailability. HAProxy is a free and reliable load balancer that also works as a reverse proxy. By configuring HAProxy to support WebSocket connections, you can better utilize the real-time data transmission characteristics of WebSockets and reduce the server load. This article will describe the detailed steps to configure HAProxy to support WebSocket connections. Step-by-step guide on how to configure HAProxy for WebSocket connections via WebSoc
![Outlook insists on trying to connect [Fix]](https://img.php.cn/upload/article/000/465/014/171029292689611.jpg?x-oss-process=image/resize,m_fill,h_207,w_330) Outlook insists on trying to connect [Fix]
Mar 13, 2024 am 09:22 AM
Outlook insists on trying to connect [Fix]
Mar 13, 2024 am 09:22 AM
This article will explore the steps you can take to resolve situations where Outlook is stuck while trying to connect. No matter what version of Microsoft Office, including Microsoft 365, you may encounter this problem. This issue causes the Outlook desktop application to be unable to receive emails properly, so it becomes crucial to resolve this issue. Fix Outlook Hangs on Trying to Connect If Outlook is having trouble connecting and you find that you're not receiving new mail on the desktop app, the following suggestions may be able to help resolve the issue. Before trying these methods, check to see if your internet connection is working properly. Try restarting your router sometimes
 What are the characteristics of LVS, Nginx and HAProxy load balancers in Linux
May 14, 2023 pm 10:49 PM
What are the characteristics of LVS, Nginx and HAProxy load balancers in Linux
May 14, 2023 pm 10:49 PM
LVS features: 1. Strong load resistance, using IP load balancing technology, only for distribution, so LVS itself does not generate much traffic; 2. Good stability and reliability, and has a perfect hot backup plan; (such as: LVS +keepalived) 3. It has a wide range of applications and can load balance all applications; 4. It does not support regular processing and cannot separate dynamic and static. Four commonly used algorithms: 1.rr: round-robin, allocated to back-end servers in turn; 2.wrr: weighted round-robin, allocated according to the load of the back-end server; 3.lc: minimum connection, allocated to the server with the fewest established connections Above; 4.wlc: connection with the smallest weight, allocated according to the processing capacity of the back-end server. You can use ipvsadm–p (pe
