How to add handwritten signature to word document
How to add a handwritten signature to a Word document has always been a concern for many users. In daily work, sometimes it is necessary to add a handwritten signature to a document to ensure its authenticity and reliability. PHP editor Apple will introduce you in detail how to add a handwritten signature to a Word document, allowing you to easily cope with various signing needs. Next, let’s learn about the specific steps!
Use a scanner, camera or mobile phone to scan or photograph the handwritten signature, and then use PS or other image editing software to perform necessary cropping on the image.

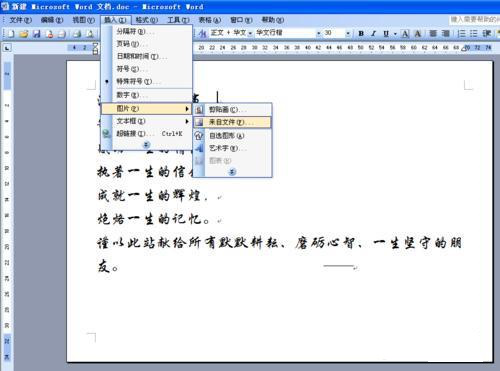
#2. Select "Insert - Picture - From File" in the Word document where you want to insert the handwritten signature, and select the cropped handwritten signature.

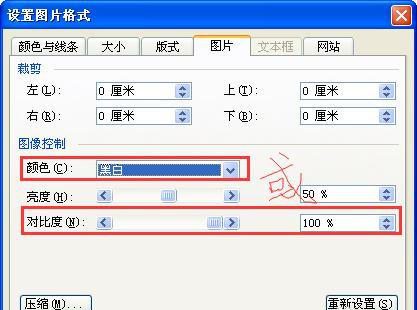
#3. Double-click the handwritten signature image (or right-click the image and select "Format Image"), and the "Format Image" panel will pop up. Select "Image Control" in the "Picture" column and set "Color" to "Black and White" (or set "Contrast" to maximum, that is, 100%).

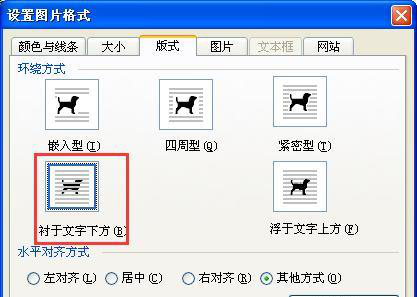
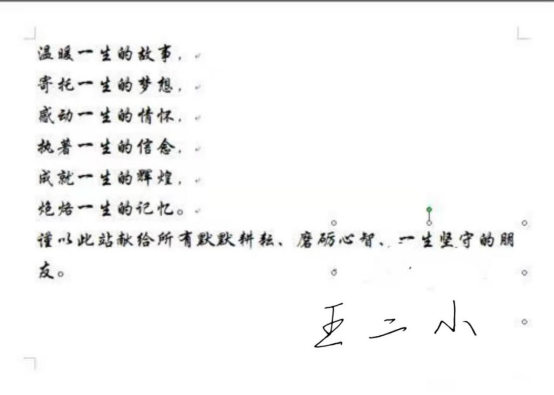
4. In the "Format Image" panel, select the "Layout" column, select "Inline below text" in "Wrap mode", and click OK. (In this way, the handwritten signature will not block the original layout effect of the text in the document, but also make the signature overlap with the text, making the signature more authentic.)

5. Finally, adjust the size and position of the signature appropriately, and it’s OK!

The editor has told you how to add a handwritten signature to a word document. It seems complicated, but is it easy to learn? In the future, we will use our own handwritten documents for To maintain our own copyright and confidentiality, we can also use this method to add our own handwritten signature to the document.
The above is the detailed content of How to add handwritten signature to word document. For more information, please follow other related articles on the PHP Chinese website!

Hot AI Tools

Undresser.AI Undress
AI-powered app for creating realistic nude photos

AI Clothes Remover
Online AI tool for removing clothes from photos.

Undress AI Tool
Undress images for free

Clothoff.io
AI clothes remover

AI Hentai Generator
Generate AI Hentai for free.

Hot Article

Hot Tools

Notepad++7.3.1
Easy-to-use and free code editor

SublimeText3 Chinese version
Chinese version, very easy to use

Zend Studio 13.0.1
Powerful PHP integrated development environment

Dreamweaver CS6
Visual web development tools

SublimeText3 Mac version
God-level code editing software (SublimeText3)

Hot Topics
 How to cancel automatic word wrapping in word
Mar 19, 2024 pm 10:16 PM
When editing content in a word document, lines may automatically wrap. If no adjustment is made at this time, it will have a great impact on our editing and make people very headache. What is going on? In fact, it is a problem with the ruler. Below, I will introduce the solution to how to cancel automatic word wrapping in word. I hope it can help everyone! After opening a Word document and entering text, when you try to copy and paste, the text may jump to a new line. In this case, you need to adjust the settings to solve this problem. 2. To solve this problem, we must first know the cause of this problem. At this time we click View under the toolbar. 3. Then click the "Ruler" option below. 4. At this time we will find that a ruler appears above the document with several conical markers on it.
 Detailed explanation of how to display the ruler in Word and how to operate the ruler!
Mar 20, 2024 am 10:46 AM
When we use Word, in order to edit the content more beautifully, we often use rulers. You should know that the rulers in Word include horizontal rulers and vertical rulers, which are used to display and adjust the document's page margins, paragraph indents, tabs, etc. So, how do you display the ruler in Word? Next, I will teach you how to set the ruler display. Students in need should quickly collect it! The steps are as follows: 1. First, we need to bring up the word ruler. The default word document does not display the word ruler. We only need to click the [View] button in word. 2. Then, we find the option of [Ruler] and check it. In this way, we can adjust the word ruler! Yes or no
 How to add handwritten signature to word document
Mar 20, 2024 pm 08:56 PM
Word documents are widely used due to their powerful functions. Not only can various formats be inserted into Word, such as pictures and tables, etc., but now for the integrity and authenticity of the files, many files require a manual signature at the end of the document. It sounds like this How to solve complex problems? Today I will teach you how to add a handwritten signature to a word document. Use a scanner, camera or mobile phone to scan or photograph the handwritten signature, and then use PS or other image editing software to perform necessary cropping on the image. 2. Select "Insert - Picture - From File" in the Word document where you want to insert the handwritten signature, and select the cropped handwritten signature. 3. Double-click the handwritten signature picture (or right-click the picture and select "Set Picture Format"), and the "Set Picture Format" pops up.
 How to set page margins for Word
Mar 19, 2024 pm 10:00 PM
Among office software, Word is one of our most commonly used software. The text documents we produce are generally operated with Word. Some documents need to be submitted in paper version as required. Before printing, the layout must be set before it can be presented. produce better results. So the question is, how do you set page margins in Word? We have specific course explanations to help you solve your doubts. 1. Open or create a new word document and click the "Page Layout" menu on the menu bar. 2. Click the "Margins" button of the "Page Setup" option. 3. Select a commonly used page margin in the list. 4. If there are no suitable margins in the list, click "Custom Margins". 5. The "Page Setup" dialog box pops up, enter the "Margins" option respectively.
 How to draw a dotted line in word
Mar 19, 2024 pm 10:25 PM
Word is a software that we often use in our office. It has many functions that can facilitate our operations. For example, for a large article, we can use the search function inside to find out that a word in the full text is wrong, so we can directly replace it. Make changes one by one; when submitting the document to your superiors, you can beautify the document to make it look better, etc. Below, the editor will share with you the steps on how to draw a dotted line in Word. Let's learn together! 1. First, we open the word document on the computer, as shown in the figure below: 2. Then, enter a string of text in the document, as shown in the red circle in the figure below: 3. Next, press and hold [ctrl+A] Select all the text, as shown in the red circle in the figure below: 4. Click [Start] on the top of the menu bar
 Where is the shading setting in word?
Mar 20, 2024 am 08:16 AM
We often use word for office work, but do you know where the shading settings are in word? Today I will share with you the specific operation steps. Come and take a look, friends! 1. First, open the word document, select a paragraph of text paragraph information that needs to be added with shading, then click the [Start] button on the toolbar, find the paragraph area, and click the drop-down button on the right (as shown in the red circle in the figure below) ). 2. After clicking the drop-down box button, in the pop-up menu options, click the [Border and Shading] option (as shown in the red circle in the figure below). 3. In the pop-up [Border and Shading] dialog box, click the [Shading] option (as shown in the red circle in the figure below). 4. In the filled column, select a color
 Specific steps to delete down arrow in Word!
Mar 19, 2024 pm 08:50 PM
In daily office work, if you copy a piece of text from a website and paste it directly into Word, you will often see a [down arrow]. This [down arrow] can be deleted by selecting it, but if there are too many such symbols, So is there a quick way to delete all arrows? So today I will share with you the specific steps to delete the downward arrow in Word! First of all, the [Down Arrow] in Word actually represents [Manual Line Break]. We can replace all [Down Arrows] with [Paragraph Mark] symbols, as shown in the figure below. 2. Then, we select the [Find and Replace] option on the menu bar (as shown in the red circle in the figure below). 3. Then, click the [Replace] command, a pop-up box will pop up, click [Special Symbols]
 How to automatically sort word serial numbers
Mar 20, 2024 pm 09:20 PM
When there is a lot of content in word, there will be many chapters. It is impossible for us to write each chapter one by one. In fact, we can use the word serial number to automatically sort. The operation is simple and convenient. Friends who don’t know how to operate, come and learn it. Bar! 1. First, we open the document to be processed on the computer, as shown in the figure below: 2. After opening the document, select the text that needs to be automatically sorted. In this example, select [Chapter 1] and [Chapter 2] and hold down the Ctrl key. To select multiple areas, use the mouse to click the [Start] menu of Word after selection, as shown in the red circle in the figure below: 3. Click the small triangle symbol to the right of the number on the [Paragraph] toolbar, and click in the pop-up menu The serial number type that needs to be selected is as shown below with the red arrow pointing to it.


