How to set image transparency in PPT
php editor Xinyi will introduce to you today how to set the transparency of images in PPT. By setting the image transparency, you can make the PPT page more beautiful and professional. Setting image transparency in PPT is very simple and can be done easily in just a few simple steps. Next, let’s take a look at the specific operation method!
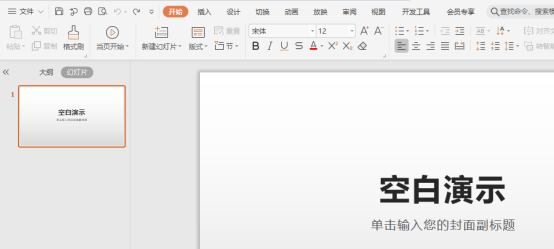
1. First, open and create a new PPT document on your computer (as shown in the picture below).
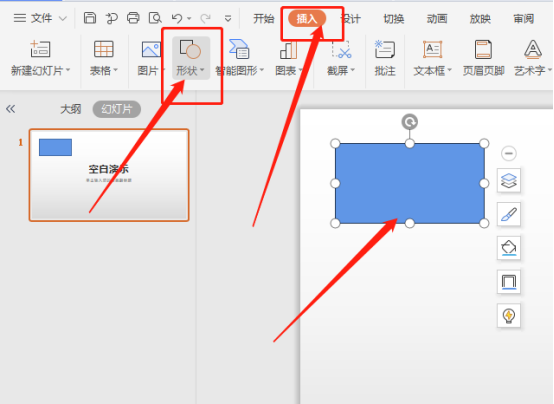
2. Next, select [Insert]-[Shape] in the upper toolbar, select a rectangle and draw it on the blank canvas, (circled in red as shown below section and the red arrow points as shown).
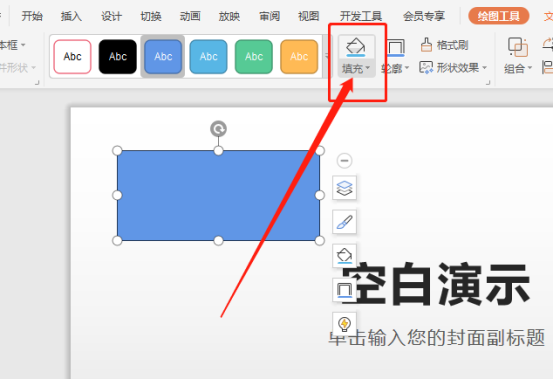
3. Then, select [Fill] in the upper toolbar (as shown in the red circled part and the red arrow in the figure below).
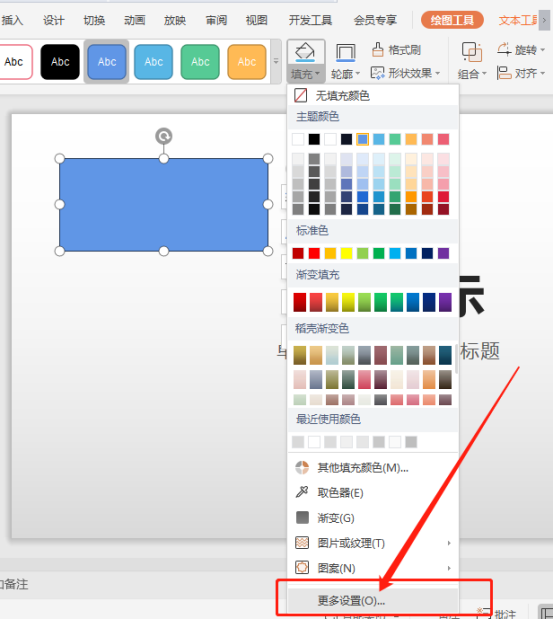
4. Next, select [More Settings] in the [Fill] dialog box, (as shown in the red circled part and the red arrow in the figure below).
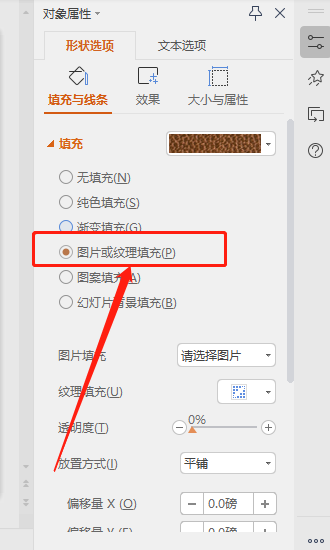
5. Then select [Picture or Texture Fill] and select the picture or texture you need to insert (as shown in the red circled part and the red arrow in the figure below).
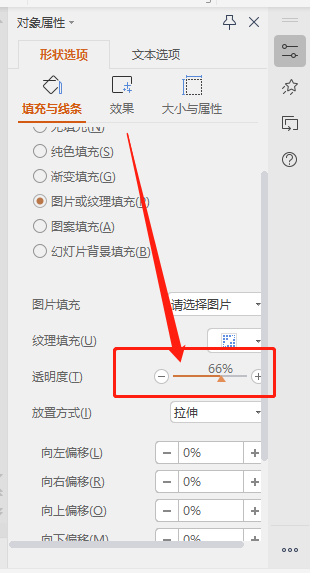
#6. Finally, adjust the transparency slider to adjust the transparency of the image (as shown in the red circled part and the red arrow in the figure below).
The above is the detailed content of How to set image transparency in PPT. For more information, please follow other related articles on the PHP Chinese website!

Hot AI Tools

Undresser.AI Undress
AI-powered app for creating realistic nude photos

AI Clothes Remover
Online AI tool for removing clothes from photos.

Undress AI Tool
Undress images for free

Clothoff.io
AI clothes remover

AI Hentai Generator
Generate AI Hentai for free.

Hot Article

Hot Tools

Notepad++7.3.1
Easy-to-use and free code editor

SublimeText3 Chinese version
Chinese version, very easy to use

Zend Studio 13.0.1
Powerful PHP integrated development environment

Dreamweaver CS6
Visual web development tools

SublimeText3 Mac version
God-level code editing software (SublimeText3)

Hot Topics
 How to insert excel icons into PPT slides
Mar 26, 2024 pm 05:40 PM
1. Open the PPT and turn the page to the page where you need to insert the excel icon. Click the Insert tab. 2. Click [Object]. 3. The following dialog box will pop up. 4. Click [Create from file] and click [Browse]. 5. Select the excel table to be inserted. 6. Click OK and the following page will pop up. 7. Check [Show as icon]. 8. Click OK.
 PPT operation content for drawing the animation of a bird flying over
Mar 26, 2024 pm 05:06 PM
1. Open the PPT software, create a new slide, and insert an arc from the menu bar. 2. Copy the arc that has been set, and then move the arc to form the shape of the sea surface. 3. Insert a picture of a bird from [Insert], [Picture] in the menu bar. Then set the image size larger. 4. Click [Animation] on the menu bar, select the picture, set the animation to a custom path, and select left. 5. Copy a picture and set the custom animation path to arc downward. 6. Select the first picture, set the picture animation duration to a longer point, and then extend the picture animation path to the left end of the slide.
 Detailed method of inserting formula effect flow chart into PPT
Mar 26, 2024 pm 04:36 PM
1. Open PPT, click the [Insert] tab, and click the [smartArt] button in the [Illustrations] group. 2. Click [Process] in the [Select smartArt graphics] dialog box that opens. 3. Select the [Formula] flow chart in the [Process] pane that opens. 4. Click [OK], and the [Formula] flow chart will be inserted into the slide pane. 5. Click [Text] in the [Type text here] column, or click [Text] on the graphic to enter content. 6. Select the shape in the graphic, click the [Design] tab of [smartArt Tools], and click the [Add Shape] button in the [Create Graphics] group to add a shape. 7. The shapes in the graphics can also be selected and deleted. Of course, you can also delete them in smar as needed.
 How to deal with blanks when playing PPT slides
Mar 26, 2024 pm 07:51 PM
1. Open the PPT file you created and select the second slide. 2. On the second slide, select one of the pictures, and then select [Animation] to add any animation effect. 3. In the start column of the animation bar, change [While Standalone] to [After Previous Animation], and you will see that the picture animation label [1] will change to [0]. Do the same for subsequent slides, and you can see the effect by playing the slide at the end.
 How to remove the date that appears automatically when printing from PPT handouts
Mar 26, 2024 pm 08:16 PM
1. Let me first talk about the method I used at the beginning, maybe everyone is using it too. First, open [View]——]Remarks Template[. 2. A place where you can actually see the date after opening it. 3. Select it first and delete it. 4. After deleting, click [Close Master View]. 5. Open the print preview again and find that the date is still there. 6. In fact, this date was not deleted here. It should be in the [Handout Master]. Look at the picture below. 7. Delete the date after you find it. 8. Now when you open the preview and take a look, the date is no longer there. Note: In fact, this method is also very easy to remember, because the printed handouts are handouts, so you should look for the [Handout Master].
 Detailed steps for designing a light bulb icon in PPT
Mar 26, 2024 pm 08:36 PM
1. Hold down the shift key to draw a perfect circle in PPT, then copy the perfect circle twice, and stick it together as shown below. Notice in the picture below that the blue guide line exactly crosses the diameters of the three circles. (Pay attention to the arrow in the picture below). 2. The next step is very important. Insert an inverted trapezoid in the middle of the three circles. The long side of the trapezoid is at the diameter of the middle circle. (arrow in the picture below). 3. If you view the perspective version, please pay attention to the position pointed by the arrow in the picture below. Exactly tangent to both circles. 4. Next, adjust the remaining details. For example, the rounded corners at the bottom of the light bulb are actually completed with a rounded rectangle. The effect is as follows. Especially the small semicircle at the bottom is solved by arc graphics. 2 points in the picture below. 5. After using the direction arrows to fine-tune the distance between the graphics, add a T shape in the middle.
 How to create underline animation when mouse clicks text in PPT
Mar 26, 2024 pm 06:40 PM
1. Enter text. 2. Select the shape under Insert and select Line within it. 3. Draw a straight line below the word love. 4. Select the straight line, then select the animation menu, and choose an animation effect from it. 5. Play the animation. At this time, there are no horizontal lines under the text. 6. Click the mouse, and a horizontal line will appear under the text.
 Introduction to the method of inserting heptagons into PPT slides
Mar 26, 2024 pm 07:46 PM
1. Open the PPT slide document, and in the [Outline, Slide] column on the left side of the PPT, click to select the slide where you want to insert the basic [shape]. 2. After selecting, select the [Insert] menu in the function menu bar above the PPT and click. 3. After clicking the [Insert] menu, the [Insert] submenu bar pops up below the function menu bar. Select the [Shape] menu in the [Insert] submenu bar. 4. Click the [Shape] menu to pop up the preset shape type selection page. 5. In the shape type selection page, select the [Heptagon] shape and click. 6. After clicking, move the mouse to the slide editing interface, press the mouse to draw, and release the mouse after the drawing is completed. Complete the insertion of the [heptagon] shape.


