

2 Ways to Lock Photos on Mac

When you store photos on your Mac, you sometimes include some private photos. To ensure their privacy, you may consider locking them. This prevents others from viewing the photos without permission. This article will explain how to lock photos on Mac to ensure that only you can access them when you need them.
How to Lock Photos on Mac [2 Methods]
You can lock photos on Mac in two ways – using the Photos app or the Disk Utility app.
Method 1: Use the Photos app
You can use the Photos app to lock your photos if they are stored in the app. If your photos are stored elsewhere, you'll need to lock them by moving them to the Photos app.
Step 1: Add Pictures to the Photos App
If you have pictures saved in your Mac’s storage, you can add them to the Photos app.
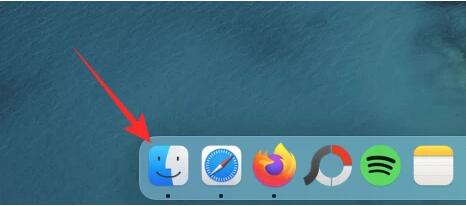
1. Open the Finder app and find the picture you want to lock.
2. Once you find the pictures, hold down the Command(⌘) key and click on the picture you want to select.
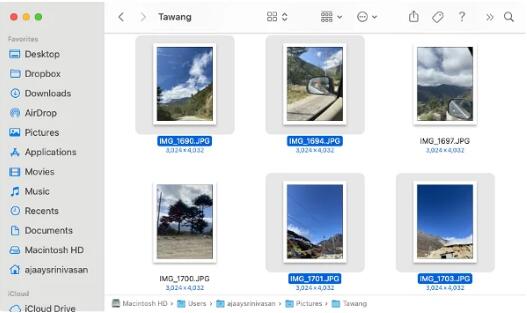
3. Once selected, right-click or Control-click any selected file and go to Share > Add to Photos from the menu that appears .

The selected picture will now be sent to the Photos app.
Step 2: Hide Pictures on Photos
To lock a picture, open the Photos app on your Mac from Finder, Launchpad, or Spotlight. Within Photos, click the Library tab on the left sidebar. You will now see all the pictures added to the Photos app. To select a picture to lock, hold down the Command (⌘) key on your keyboard, and then click the picture you want to select. Once selected, right-click or Control-click any selected picture and select Hide Photos, where n is the number of photos you selected. To confirm your action, click Hide in the prompt that appears.The pictures you selected will now be locked in a hidden folder in the Photos app. Anyone who opens the Photos app won't be able to access the photos because they will be hidden.
Method 2: Use the Disk Utility application
If you have a bunch of pictures scattered in different folders on your Mac. You can then lock them with a password using the Disk Utility application. Until then, you can compile all the pictures you want to lock into a separate folder on your Mac.
Step 1: Create a folder containing the images you want to lock
First, open the Finder app and navigate to the location where you want to place the locked folder. From there, click the File tab in the top menu bar and select New Folder. After creating the new folder, type a name for the folder and press the Return key on your keyboard when finished. Once done, move the pictures from your Mac to this newly created folder before locking them. To do this, you can use the following keyboard shortcuts to accomplish this:To select multiple files: Hold down Command(⌘) and click on the files you want to select.
To cut selected files: Use the Command(⌘) X shortcut on your keyboard.
To paste selected files: Use the Command(⌘) V shortcut on your keyboard. After moving all the pictures you want to hide, you can now lock them using the next step.
Step 2: Lock the folder using Disk Utility
To lock the folder with a password, open the Disk Utility application from Finder, Launchpad, or Spotlight. When the Disk Utility application opens, click the File tab in the top menu bar and go to New > Disk Image in Folder. In the Finder window that appears on the screen, navigate to the folder you created in step #1, select it, and click Select. Now you will see the New Image from Folder menu on your screen. To lock the selected folder, click the Encrypt drop-down box. In the menu that appears, select 128-bit AES encryption (recommended). Now you will see a prompt asking you to create a password to lock the selected folder. Carefully enter your preferred password in the Password and Verification boxes and click Select. You will now return to the New Image from Folder menu. Here you can edit the name of the locked image (where it is saved) and add a label to it. When finished, click Save in the lower right corner. The Disk Utility application will now start creating a disk image of the locked folder. When ready, you will see the following message. To continue, click Finish. The selected folder will now be locked and saved as a DMG file in your preferred location. You can open it to check if all the contents are there and then delete the original folder from your Mac.How to View Locked Photos on Mac
If you have locked photos using any of the above methods, you can follow the steps below to view them on your Mac.
Method 1: If Using Photos Lock
When you lock pictures using the Photos app on your Mac, you can unlock them directly from the same app.
Method 2: If locked using Disk Utility
If you used Method 2 above to lock pictures on your Mac, you can view them by opening the Finder app and navigating to the location where the folder-locked image was created. Once you find the disk image you created, double-click it to access its contents. Now you will see a prompt on the screen asking you to enter your password. Enter the password you added to the folder in Method #2 and click OK. The contents of the locked folder will now appear in the disk image folder in a new window. You can open, copy, or share pictures just like in any folder. The disk image will also appear on your desktop with a gray drive icon. Once you have accessed the pictures, right-click or Control-click the disk image and select EjectIf you keep the injected disk image, it can be accessed from within the desktop, and others who open it may not need to enter the necessary password. Therefore, it is very important to eject the disk image after you are done using the locked folder.
How to Prevent Other Applications from Accessing Photos on Mac
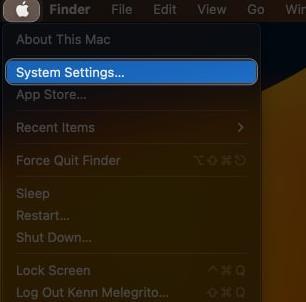
Locking pictures has many purposes, but if you want to prevent other applications on your Mac from accessing pictures stored in the Photos app, you need to remove them from Disable this access in macOS settings.
You can repeat this for other apps you want to block access to photos.
That’s all there is to know about locking photos on Mac.
The above is the detailed content of 2 Ways to Lock Photos on Mac. For more information, please follow other related articles on the PHP Chinese website!

Hot AI Tools

Undresser.AI Undress
AI-powered app for creating realistic nude photos

AI Clothes Remover
Online AI tool for removing clothes from photos.

Undress AI Tool
Undress images for free

Clothoff.io
AI clothes remover

AI Hentai Generator
Generate AI Hentai for free.

Hot Article
Hot Tools

Notepad++7.3.1
Easy-to-use and free code editor

SublimeText3 Chinese version
Chinese version, very easy to use

Zend Studio 13.0.1
Powerful PHP integrated development environment

Dreamweaver CS6
Visual web development tools

SublimeText3 Mac version
God-level code editing software (SublimeText3)
Hot Topics
 1371
1371
 52
52

 How to export project with pycharm
Apr 18, 2024 am 12:15 AM
How to export project with pycharm
Apr 18, 2024 am 12:15 AM
Exporting a project in PyCharm requires just the following steps: Make sure you have saved your changes, and go to File > Export Project. Select the export format (ZIP or TAR.GZ), export path and file to export. (Optional) Exclude files or customize export settings. Click the "Export" button to start the export process. The exported project contains project settings and files and can be shared or archived.
 How to Fix 'Encryption Credentials Expired” When Printing on Apple Mac
Feb 05, 2024 pm 06:42 PM
How to Fix 'Encryption Credentials Expired” When Printing on Apple Mac
Feb 05, 2024 pm 06:42 PM
Have you ever encountered the "Printer encryption credentials have expired" error message on your Apple Mac computer when trying to print a document? Don't worry! In this tutorial, I will share how to fix expired printer encryption credentials on Apple computers. Let’s get started without further ado. Have you ever encountered the "Printer encryption credentials have expired" error message on your Mac when trying to print a document? Don't worry! In this tutorial, I will share how to fix expired printer encryption credentials on Mac. Let’s get started without further ado. What does it mean if printer encryption credentials expired on Mac? How to Fix Expired Printer Encryption Credentials on Mac Additional Tips and Precautions What Does Expired Printer Encryption Credentials on Mac Mean? Printer encryption credentials on Mac
 How to set the screen of an Apple computer to always be on, and how to make the Mac never sleep
Feb 05, 2024 pm 05:33 PM
How to set the screen of an Apple computer to always be on, and how to make the Mac never sleep
Feb 05, 2024 pm 05:33 PM
Want to stop your Apple Macbook from going to sleep? These are all your options. Apple designed macOS for maximum energy efficiency. Therefore, by default, Apple Mac computers will try to save power as much as possible to extend battery life. Therefore, when you stop using your Mac temporarily, it automatically goes to sleep to save energy. You probably don't want your Mac to go to sleep when you're working on an important task. This guide will show you how to prevent your Mac from going to sleep and keep it awake. How to turn off sleep mode on your Mac macOS lets you control how and when your Mac goes to sleep. However, with the arrival of system settings in macOS Ventura, you may be saving energy
 How to check the battery level of a connected Bluetooth device on your Mac
Feb 05, 2024 pm 01:45 PM
How to check the battery level of a connected Bluetooth device on your Mac
Feb 05, 2024 pm 01:45 PM
Bluetooth accessories such as mice and keyboards are very convenient for your Apple Mac computer. However, these devices have a limited battery life, so checking their battery life regularly ensures you're not caught off guard by sudden disconnections. Who wouldn’t want to check the battery level of a Bluetooth accessory with just a few clicks? Fortunately, your Mac offers several easy ways to check the battery level of Bluetooth devices connected to your Apple Mac computer. Let’s explore these simple options. 1. Check from the Menu Bar on Mac In a Mac, the menu bar is one of the easiest areas to view. Just swipe your cursor to display the menu bar. And, you can make the menu bar always visible in full-screen mode. If you don't see the Bluetooth icon in the menu bar, you need to manually
 How to adjust sleep time on your Mac (set up hibernation)
Feb 05, 2024 pm 02:10 PM
How to adjust sleep time on your Mac (set up hibernation)
Feb 05, 2024 pm 02:10 PM
Do you find that when you don't use your Mac for more than a minute, you constantly need to wake it up? Or do you have the opposite problem, where you leave your Mac alone for a few hours, only to find that when you return it's still awake with the screen on? On your Mac, you can control exactly how long you spend inactive before your display and other components go to sleep. Here's how to adjust your Mac's sleep time. How to set sleep time on Mac In Mac system settings, you can choose how long the display waits before going to sleep. You can choose anywhere from one minute to three hours, or you can choose to have the display never sleep unless you manually put it to sleep. The steps are slightly different depending on which version of macOS you are running.
 How to delete gallery from File Explorer on Windows 11?
Feb 05, 2024 pm 04:27 PM
How to delete gallery from File Explorer on Windows 11?
Feb 05, 2024 pm 04:27 PM
A new gallery feature has been added to Windows 11’s File Explorer, and users can find the gallery option in the Explorer navigation pane. The gallery displays all photos in a timeline. This article will introduce you how to add or delete folders to the Gallery in Windows 11’s File Explorer. How to add a folder to the Library in File Explorer in Windows 11 To add a folder to the Library in File Explorer, follow these steps: 1. Open File Explorer (can be accessed by pressing Win+E keys to quickly open). 2. In the left navigation bar, right-click the Library option and select New Library. 3. Enter a name for the new library folder. 4. Right click on New Create
 How to move files and folders on Mac computer? 4 ways to explain!
Feb 05, 2024 pm 06:48 PM
How to move files and folders on Mac computer? 4 ways to explain!
Feb 05, 2024 pm 06:48 PM
If you want to organize the files and folders on your Apple Mac computer, you may consider moving some content. By moving items, you can create a more organized file structure to work more efficiently or find what you need faster. We'll show you how to move files and folders on macOS using drag and drop, shortcuts or right-click menus, Terminal, and more so you can use the method that makes more sense or that you're most comfortable with. Method 1: Use Drag and Drop on Mac The easiest way to move files and folders on Apple Mac computers is through drag and drop. Whether you're rearranging icons, widgets, and shortcuts on your desktop, or moving items to other locations on macOS, this method is very convenient and easy to use. 1.Open in two
 (Fixed) apt-get command not found on Mac – full tutorial
Feb 05, 2024 am 11:51 AM
(Fixed) apt-get command not found on Mac – full tutorial
Feb 05, 2024 am 11:51 AM
If you have ever used a Linux system, you may be familiar with the Apt-get command. It is a command used to install applications or software packages on Linux systems. Although macOS and Linux have some similarities, only a very small number of Linux packages can be installed on macOS. Especially older versions of macOS are more likely to be unable to run Linux applications. Can't find apt-get command? When users try to install Linux applications on macOS, they may receive an "Apt-get command not found" message. Actually, there is nothing wrong with the Apt-get command itself, but it doesn't work on macOS. This is because macOS doesn't have a built-in
