
 Web Front-end
JS Tutorial
Calculate the position of an element in a web page in JavaScript_javascript tips
Web Front-end
JS Tutorial
Calculate the position of an element in a web page in JavaScript_javascript tips
Calculate the position of an element in a web page in JavaScript_javascript tips

Due to the needs of the project, screenshots of web page elements are required during testing to ensure that it looks normal. BeforeI wrote an article introducing a method, first use WebDriver to take a full-screen screenshot, and then crop the screenshot according to the location of the target element (DOM Element), retaining what we need location.
That code was working fine until I figured out something: iframe. The content in an iframe (ordinary frame is the same, but frame is less common now, only iframe is used as an example here) is regarded as an independent web page, and even the Window object is separated from its parent web page. The WebElement.getLocation() method in WebDriver can only return the positional relationship between this WebElement and the Window it is located in. There is no problem with its implementation, but the full-screen screenshot not only contains the content of the iframe, but may also include the content of its parent page. Content, you need to know the position of the target element in the screenshot when cropping. So the question is, which company has the best excavator technology? How to calculate the position of an element relative to the screenshot?
This issue needs to be discussed in a separate category. The reason is: the behavior of screenshots in Chrome and Firefox is different. Chrome's screenshot is the currently visible (viewport) web page content. For example, when the actual size of the web page exceeds the Chrome window size, the content displayed in the window is different depending on the position of the scroll bar. Chrome's screenshot is the displayed content. So we need to calculate the position of the target element relative to the currently visible content. Firefox uses a method that can capture the content of the entire web page, regardless of the current window size. So for Firefox we need to calculate the absolute position of the element (Absolute Position).
To obtain the position of an element, you need to use a method: Element.getBoundingClientRect(). This method returns the position of this element relative to the currently visible content of the Windows it is located in, represented by four values: top, left, right, and bottom. We only care about top and left. As for the clipping size, we can get it from the length and width of the element itself, without calculation. To calculate the position of the target element relative to the top-level Window, we only need to add the top and left of its parent Window in sequence. The code is as follows:
function calcViewportLocation(element) {
 var currentWindow = window;
 var rect = element.getBoundingClientRect(); // 元素的位置
 var top = rect.top;
 var left = rect.left;
 while (currentWindow.frameElement != null) { // 处理父级 Window
  element = currentWindow.frameElement;
  currentWindow = currentWindow.parent;
  rect = element.getBoundingClientRect();
  if (rect.top > 0) { top += rect.top; }
  if (rect.left > 0) { left += rect.left; }
 }
 return [Math.round(top), Math.round(left)];
}
The above code works for Chrome, but in Firefox, we also need to calculate the absolute position of the element. Window.pageXOffset is needed here. pageXOffset, or scrollX, represents the scrolling position of the current Window's horizontal scroll bar. Add this value to the above left to get the horizontal absolute position of the target element. Of course, iframe can also be treated specially:
function calcAbsolutLocation(element) {
 var top = 0;
 var left = 0;
 var currentWindow = window;
 while (element != null) {
  rect = element.getBoundingClientRect();
  var pageYOffset = currentWindow.pageYOffset;
  var pageXOffset = currentWindow.pageXOffset;
  if (typeof pageYOffset === 'undefined') { // IE8
   currentDocument = currentWindow.document;
   var bodyElement = (currentDocument.documentElement
     || currentDocument.body.parentNode || currentDocument.body);
   pageYOffset = bodyElement.scrollTop;
   pageXOffset = bodyElement.scrollLeft;
  }
  top += rect.top + pageYOffset;
  left += rect.left + pageXOffset;
  element = currentWindow.frameElement;
  currentWindow = currentWindow.parent;
  if (element != null) {
   style = window.getComputedStyle(element);
   top += parseInt(style.borderTopWidth, 10);
   left += parseInt(style.borderLeftWidth, 10);
  }
 }
 return [Math.round(top), Math.round(left)];
}
Since IE8 does not support pageXOffset and scrollX, some special processing is required in IE8, that is, the part marked "IE8" in the code. By replacing these two pieces of Javascript code with WebElement.getLocation() in the previous article, you can take a screenshot of a specific element in an iframe.

Hot AI Tools

Undresser.AI Undress
AI-powered app for creating realistic nude photos

AI Clothes Remover
Online AI tool for removing clothes from photos.

Undress AI Tool
Undress images for free

Clothoff.io
AI clothes remover

AI Hentai Generator
Generate AI Hentai for free.

Hot Article
Hot Tools

Notepad++7.3.1
Easy-to-use and free code editor

SublimeText3 Chinese version
Chinese version, very easy to use

Zend Studio 13.0.1
Powerful PHP integrated development environment

Dreamweaver CS6
Visual web development tools

SublimeText3 Mac version
God-level code editing software (SublimeText3)
Hot Topics
 1376
1376
 52
52

 Details on how to turn on environment variable settings on Windows 11
Dec 30, 2023 pm 06:07 PM
Details on how to turn on environment variable settings on Windows 11
Dec 30, 2023 pm 06:07 PM
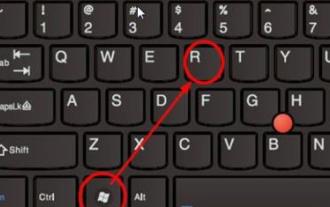
The environment variable function is an essential tool for running the configuration program in the system. However, in the latest win11 system, there are still many users who do not know how to set it up. Here is a detailed introduction to the location of the win11 environment variable opening. Come and join us. Learn to operate it. Where are the win11 environment variables: 1. First enter "win+R" to open the run box. 2. Then enter the command: controlsystem. 3. In the system information interface that opens, select "Advanced System Settings" from the left menu. 4. Then select the "Environment Variables" option at the bottom of the "System Properties" window that opens. 5. Finally, in the opened environment variables, you can make relevant settings according to your needs.
 Win11 startup path and how to open it
Jan 03, 2024 pm 11:13 PM
Win11 startup path and how to open it
Jan 03, 2024 pm 11:13 PM
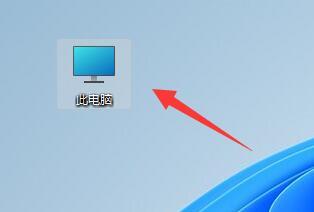
Every Windows system has a startup path. If you add files or software to it, it will be opened at boot time. However, many friends don’t know where the win11 startup path is. In fact, we only need to enter the corresponding folder on the C drive. Win11 startup path: 1. Double-click to open "This PC" 2. Directly paste the path "C:\ProgramData\Microsoft\Windows\StartMenu\Programs\Startup" into the path box. 3. Here is the win11 startup path. If we want to open the file after booting, we can put the file in. 4. If you cannot enter according to this path, it may be hidden.
 CUDA's universal matrix multiplication: from entry to proficiency!
Mar 25, 2024 pm 12:30 PM
CUDA's universal matrix multiplication: from entry to proficiency!
Mar 25, 2024 pm 12:30 PM
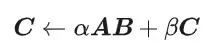
General Matrix Multiplication (GEMM) is a vital part of many applications and algorithms, and is also one of the important indicators for evaluating computer hardware performance. In-depth research and optimization of the implementation of GEMM can help us better understand high-performance computing and the relationship between software and hardware systems. In computer science, effective optimization of GEMM can increase computing speed and save resources, which is crucial to improving the overall performance of a computer system. An in-depth understanding of the working principle and optimization method of GEMM will help us better utilize the potential of modern computing hardware and provide more efficient solutions for various complex computing tasks. By optimizing the performance of GEMM
 How to calculate addition, subtraction, multiplication and division in word document
Mar 19, 2024 pm 08:13 PM
How to calculate addition, subtraction, multiplication and division in word document
Mar 19, 2024 pm 08:13 PM
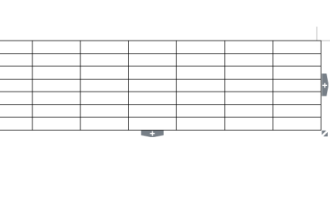
WORD is a powerful word processor. We can use word to edit various texts. In Excel tables, we have mastered the calculation methods of addition, subtraction and multipliers. So if we need to calculate the addition of numerical values in Word tables, How to subtract the multiplier? Can I only use a calculator to calculate it? The answer is of course no, WORD can also do it. Today I will teach you how to use formulas to calculate basic operations such as addition, subtraction, multiplication and division in tables in Word documents. Let's learn together. So, today let me demonstrate in detail how to calculate addition, subtraction, multiplication and division in a WORD document? Step 1: Open a WORD, click [Table] under [Insert] on the toolbar, and insert a table in the drop-down menu.
 Understand the location and structure of pip installation package storage
Jan 18, 2024 am 08:23 AM
Understand the location and structure of pip installation package storage
Jan 18, 2024 am 08:23 AM
To learn more about the storage location of packages installed by pip, you need specific code examples. Pip is a commonly used package management tool in the Python language. It is used to easily install, upgrade and manage Python packages. When using pip to install a package, it will automatically download the corresponding package file from PyPI (Python Package Index) and install it to the specified location. So, where are the packages installed by pip stored? This is a problem that many Python developers will encounter. This article will delve into the location of the packages installed by pip and provide
 Location of Origami Bird at Stardome Railway Crocker Film and Television Park
Mar 27, 2024 pm 11:51 PM
Location of Origami Bird at Stardome Railway Crocker Film and Television Park
Mar 27, 2024 pm 11:51 PM
There are a total of 20 origami birds in Croaker Film and Television Park on Star Dome Railway. Many players don’t know where the origami birds are in Crocker Film and Television Park. The editor has summarized the locations of each origami bird to help everyone. Search for it, and take a look at this latest summary of the locations of the origami birds in Croaker Film and Television Park for specific content. Guide to the Honkai Star Dome Railway: Origami Bird in Crook Movie Park Location 1, Crook Movie Park 1st Floor 2, and Crook Movie Park 2nd Floor Star Dome Railway
 Where is Kuaishou published and how to change its location? How to add a location to a video that has been uploaded?
Mar 21, 2024 pm 06:00 PM
Where is Kuaishou published and how to change its location? How to add a location to a video that has been uploaded?
Mar 21, 2024 pm 06:00 PM
As a well-known short video platform in China, Kuaishou provides many creators with opportunities to showcase their talents and share their lives. When uploading a video, some novice creators may be confused about how to change the video posting location. This article will introduce you to how to change the publishing location of Kuaishou videos, and share some tips for Kuaishou video publishing to help you make better use of this platform to showcase your work. 1. Where is Kuaishou published and how to change its location? 1. Publishing interface: In Kuaishou APP, click the "Publish" button to enter the video publishing interface. 2. Location information: In the publishing interface, there is a "Location" column. Click to enter the location selection interface. 3. Change location: In the location selection interface, click the "Location" button to view the current location. If you want to change the location, click "Location"
 How to change the location of Gaode Map Home
Feb 27, 2024 pm 07:31 PM
How to change the location of Gaode Map Home
Feb 27, 2024 pm 07:31 PM
As a powerful assistant for our daily travels, Amap not only provides accurate navigation services, but also allows users to directly determine their "home location" in a user-friendly manner. It is convenient to check your route home every time. But sometimes the location of our home also needs to be updated, so how can we easily modify the "location of home" in Amap? Next, follow the editor's guide and learn how to modify it together! Amap How to change the location of your home? Answer: [AMAP] - [Settings] - [Three-dot icon] - [Modify location] - [Set location] - [Set as home address]. Specific steps: 1. First open the Amap software, enter the homepage, slide up, find home and click [Settings]; 2. Then in the settings page, we can
