
 Mobile Tutorial
Android Phone
How to set up split screen on Xiaomi Mi 11 Youth Edition_Tutorial on setting up split screen on Xiaomi Mi 11 Youth Edition
Mobile Tutorial
Android Phone
How to set up split screen on Xiaomi Mi 11 Youth Edition_Tutorial on setting up split screen on Xiaomi Mi 11 Youth Edition
How to set up split screen on Xiaomi Mi 11 Youth Edition_Tutorial on setting up split screen on Xiaomi Mi 11 Youth Edition

php editor Strawberry brings you a tutorial on split-screen settings for Xiaomi Mi 11 Youth Edition. Xiaomi Mi 11 Youth Edition supports split-screen function, which allows you to display two applications on one screen at the same time. This tutorial will introduce in detail how to set up the split-screen function on Xiaomi Mi 11 Youth Edition, allowing you to easily enjoy the convenience of multitasking. Next, let’s explore how to set up split screen on Xiaomi Mi 11 Youth Edition!
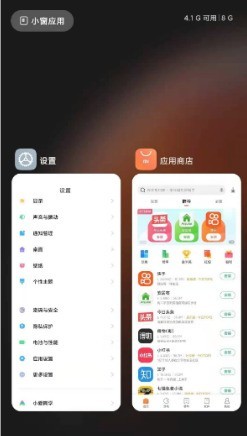
1. Swipe up from the bottom of the screen to enter the multitasking interface.
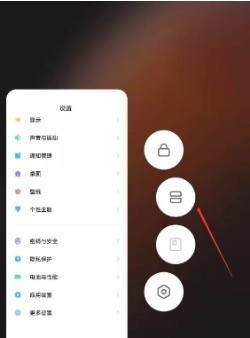
2. Long press the application that requires split screen and click the split screen icon.
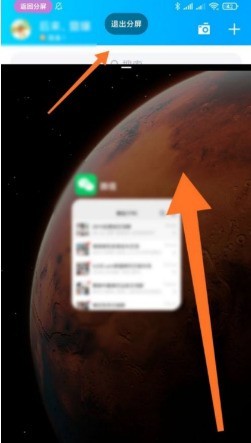
3. Next, select another application to split screen.
The above is the detailed content of How to set up split screen on Xiaomi Mi 11 Youth Edition_Tutorial on setting up split screen on Xiaomi Mi 11 Youth Edition. For more information, please follow other related articles on the PHP Chinese website!

Hot AI Tools

Undresser.AI Undress
AI-powered app for creating realistic nude photos

AI Clothes Remover
Online AI tool for removing clothes from photos.

Undress AI Tool
Undress images for free

Clothoff.io
AI clothes remover

AI Hentai Generator
Generate AI Hentai for free.

Hot Article
Hot Tools

Notepad++7.3.1
Easy-to-use and free code editor

SublimeText3 Chinese version
Chinese version, very easy to use

Zend Studio 13.0.1
Powerful PHP integrated development environment

Dreamweaver CS6
Visual web development tools

SublimeText3 Mac version
God-level code editing software (SublimeText3)
Hot Topics


 Introduction to how to set different wallpapers in windows 7 split screen
Jul 12, 2023 am 10:57 AM
Introduction to how to set different wallpapers in windows 7 split screen
Jul 12, 2023 am 10:57 AM
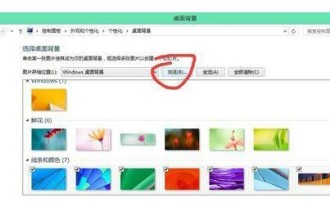
Windows 7 computers support split-screen operation, so how do we set different wallpapers for the display in split-screen mode? First, we open the personalization options of the computer, then click on the desktop background, click to select a picture, and select the picture for monitor 1 Select the picture for each monitor 2, and finally click Apply. This will successfully set different wallpapers when the Windows 7 computer is split-screen. Introduction to how to set different wallpapers in Windows 7 split screen 1. Right-click on the Windows 7 system - "Personalization -" Select desktop background 2. Visit and select the folder where the wallpaper photo you want is located 3. Right-click on a specific photo and select Monitor 14. Right-click another picture, select Monitor 25. Select Save Changes, and then you can view
 Windows 11 computer split screen operation guide
Dec 22, 2023 pm 09:51 PM
Windows 11 computer split screen operation guide
Dec 22, 2023 pm 09:51 PM
Nowadays, many office users are inseparable from computers, and the split-screen function allows you to operate better. For this reason, today I will bring you how to set up split-screen on win11 computers. If you still don’t know how Let’s learn how to operate it. How to set up split screen on win11 computer 1. First click on the start menu in the lower left corner of the computer and then click on settings. 2. Then in the Windows settings interface, select the "System" option. 3. Select the "Display" option in the menu on the left. 4. Finally, find "Multiple Monitors" on the right side to split the screen.
 How to set up split screen on Xiaomi Mi 11 Youth Edition_Tutorial on setting up split screen on Xiaomi Mi 11 Youth Edition
Mar 25, 2024 pm 04:51 PM
How to set up split screen on Xiaomi Mi 11 Youth Edition_Tutorial on setting up split screen on Xiaomi Mi 11 Youth Edition
Mar 25, 2024 pm 04:51 PM
1. Swipe up from the bottom of the screen to enter the multitasking interface. 2. Long press the application that requires split screen and click the split screen icon. 3. Next, select another application to split screen.
 How to turn off application desktop icons in Xiaomi Mi 11 Youth Edition_How to turn off application desktop icons in Xiaomi Mi 11 Youth Edition
Mar 25, 2024 pm 02:46 PM
How to turn off application desktop icons in Xiaomi Mi 11 Youth Edition_How to turn off application desktop icons in Xiaomi Mi 11 Youth Edition
Mar 25, 2024 pm 02:46 PM
1. Open the phone settings and click [Notification and Control Center]. 2. Click [Desktop Corner]. 3. Turn off the switch behind the application.
 How to set the screen pause time on Xiaomi Mi 11 Youth Edition_Xiaomi 11 Youth Edition screen pause time setting tutorial
Mar 26, 2024 am 10:36 AM
How to set the screen pause time on Xiaomi Mi 11 Youth Edition_Xiaomi 11 Youth Edition screen pause time setting tutorial
Mar 26, 2024 am 10:36 AM
1. Open the phone settings and click [Screen and Lock Screen]. 2. Click [Auto Lock Screen]. 3. Check the automatic lock screen time.
 How to turn off the lock screen key sound on Xiaomi Mi 11 Youth Edition_Tutorial on turning off the lock screen key sound on Xiaomi Mi 11 Youth Edition
Mar 25, 2024 pm 02:56 PM
How to turn off the lock screen key sound on Xiaomi Mi 11 Youth Edition_Tutorial on turning off the lock screen key sound on Xiaomi Mi 11 Youth Edition
Mar 25, 2024 pm 02:56 PM
1. Click the [Sound and Vibration] option in the phone settings menu. 2. Click [More Sound Settings]. 3. Turn off the switch on the right side of [Lock Screen Sound].
 How to set the lock screen password on Xiaomi Mi 11 Youth Edition_How to set the lock screen password on Xiaomi Mi 11 Youth Edition
Mar 25, 2024 pm 05:51 PM
How to set the lock screen password on Xiaomi Mi 11 Youth Edition_How to set the lock screen password on Xiaomi Mi 11 Youth Edition
Mar 25, 2024 pm 05:51 PM
1. Everyone first finds the settings, and after entering, find the [Password and Security] option. 2. Next find [Password Unlock]. 3. Finally, there are different types of passwords that everyone likes.
 How to set the time on Xiaomi Mi 11 Youth Edition_How to set the time on Xiaomi Mi 11 Youth Edition
Mar 26, 2024 am 09:36 AM
How to set the time on Xiaomi Mi 11 Youth Edition_How to set the time on Xiaomi Mi 11 Youth Edition
Mar 26, 2024 am 09:36 AM
1. First, open the settings and find the [More Settings] option. 2. After entering, we need to find [Date and Time] on the page and select it. 3. Finally, you can set it by selecting [Time].
