 Mobile Tutorial
 Android Phone
 The operation process of turning off the automatic brightness adjustment of oppok1
The operation process of turning off the automatic brightness adjustment of oppok1
php editor Xiaoxin brings you the operation process of turning off automatic brightness adjustment of OPPO K1. In daily use, turning off automatic adjustment can better control the screen brightness and improve the user experience. The following are simple and easy-to-understand steps: first enter the "Settings" menu, click "Display and Brightness", find the "Automatic Brightness Adjustment" option, and turn it off. With this simple setting, you can manage screen brightness independently and enjoy a more comfortable viewing experience.
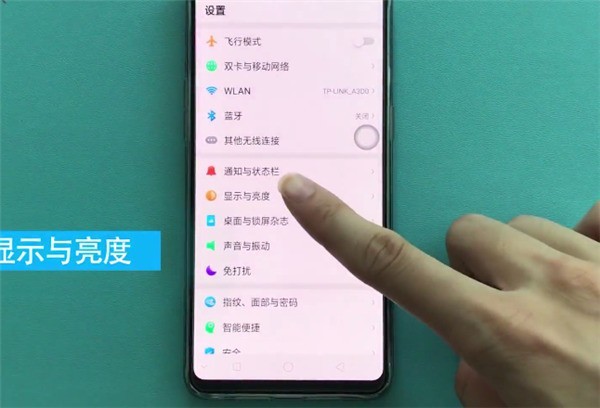
1. In the standby interface, click [Settings] on the desktop.

2. On the settings page, slide down to find the [Display and Brightness] option.

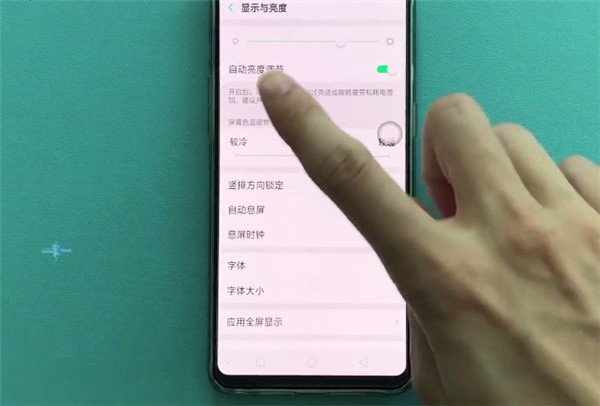
3. Click the button on the right side of [Automatic Brightness Adjustment] to turn it off.

The above is the detailed content of The operation process of turning off the automatic brightness adjustment of oppok1. For more information, please follow other related articles on the PHP Chinese website!

Hot AI Tools

Undresser.AI Undress
AI-powered app for creating realistic nude photos

AI Clothes Remover
Online AI tool for removing clothes from photos.

Undress AI Tool
Undress images for free

Clothoff.io
AI clothes remover

AI Hentai Generator
Generate AI Hentai for free.

Hot Article

Hot Tools

Notepad++7.3.1
Easy-to-use and free code editor

SublimeText3 Chinese version
Chinese version, very easy to use

Zend Studio 13.0.1
Powerful PHP integrated development environment

Dreamweaver CS6
Visual web development tools

SublimeText3 Mac version
God-level code editing software (SublimeText3)

Hot Topics
 Oppok1 steps to add contacts
Mar 25, 2024 pm 12:46 PM
1. Enter the mobile phone desktop, find the [Dial] icon on the desktop, and click to enter. 2. Enter the phone number of the contact you want to add and click [New Contact] above. 3. After entering the contact’s name, click [Save].
 Operation process of switching input method in oppok1
Mar 25, 2024 pm 05:21 PM
1. After downloading the third-party input method from the app store, enter [Settings] on your phone. 2. Click the [Other Settings] option in the settings page. 3. Click [Keyboard and Input Method]. 4. In the available input methods, click the input method you want to switch.
 Tips for dealing with oppok1 forgetting unlock password
Mar 25, 2024 pm 08:46 PM
1. After restarting the phone, you need to enter the lock screen password to unlock the phone. After entering the wrong numeric password five times in a row, you will automatically be prompted to "Reset Password Using Fingerprint". 2. After clicking [Reset Password Using Fingerprint], enter your fingerprint with your finger. 3. Enter the new password to successfully reset the password.
 Tutorial on how to deal with forgotten unlock password of oppok1
Mar 25, 2024 pm 05:11 PM
1. Log in to the opoo cloud service official website. 2. Enter your OPPO account and password. If you don’t have one, you can click [Create Oppo Account] to register one. 3. Then click [Login]. 4. Click [Find Phone]. 5. Select [Lock Phone] in the upper right menu bar. . 6. Select [Reset Password] on the pop-up [Lock Screen Password] page to reset the lock screen password. 7. The lock screen password will be changed from the original [Pattern Password] to [Numeric Password]. Enter the [Numeric Password] just now to unlock the phone. At this point, the lock screen password reset for your Oppo phone is complete. (If there is a lock screen password before).
 oppok1 finds the steps for smart scanning
Mar 25, 2024 pm 05:41 PM
1. Return to the desktop, find the [Smart Scan] icon, and click to enter. 2. Click the corresponding function to use it. Method 2: 1. Swipe right to the negative screen and select [Smart Assistant] 2. Find the corresponding function in the shortcut function and click to use it.
 Operation content of oppok1 saving pictures
Mar 26, 2024 am 10:40 AM
1. First find the picture you want to save. 2. Then long press the picture you want to save. 3. Click Save, and then go to the mobile phone album to check whether the save is successful.
 Oppok1 steps to enable positioning
Mar 25, 2024 pm 02:50 PM
1. Enter the mobile phone desktop, find the [Settings] icon, and click it. 2. On the settings page, slide down to find the [Other Settings] option. 3. Find [Device and Privacy] and click to enter. 4. Click [Location Information] and click the button on the right to open it after entering.
 The operation process of entering facial information on oppok1
Mar 25, 2024 pm 02:21 PM
1. First enter the mobile phone desktop and click to enter [Settings]. 2. Then find the [Fingerprint, Face and Password] option and click to enter. 3. Next click [Enter Face]. 4. Follow the prompts to enter the face, click [Continue] to set up successfully.


