
 Software Tutorial
Office Software
Detailed explanation of how to set line spacing in Word documents
Software Tutorial
Office Software
Detailed explanation of how to set line spacing in Word documents
Detailed explanation of how to set line spacing in Word documents

When editing a Word document, line spacing is a very important typesetting parameter that can affect the readability and aesthetics of the entire document. This article will introduce in detail how to set line spacing in Word documents to help readers better master this technique.
1. The difference between single spacing and multiple spacing
In Word documents, we generally divide them into three options: single spacing, 1.5x spacing and double spacing. Single line spacing means that the distance and font size between each line of text are the same. 1.5 times line spacing is 1.5 times single line spacing, and double line spacing is 2 times single line spacing.
2. Methods for setting line spacing
In Word documents, we can set line spacing through the following methods.
1. Shortcut keys to set line spacing
After selecting text, use shortcut keys to quickly set line spacing. The specific method is to use the shortcut key "Ctrl 1" to set the line spacing to single, "Ctrl 5" to set the line spacing to 1.5 times, and "Ctrl 2" to set the line spacing to double.
2. Use layout options to set line spacing
In a Word document, we can set line spacing through the "Paragraph" group in the "Layout" tab. The specific operation is to select the text, find the "Paragraph" group in the "Layout" tab, and select the required line spacing settings in the "Line Spacing" drop-down menu, including single line spacing, 1.5x line spacing, double line spacing, etc.
3. Custom line spacing settings
If the above line spacing settings cannot meet the needs, we can also set the line spacing of the document by customizing the line spacing. The specific method is to select the text, click the "Paragraph Settings" button in the "Paragraph" group on the "Layout" tab, select the "Spacing" tab in the pop-up dialog box, and select "Multiple" in the "Line Spacing" column. "Double line spacing" and fill in the specific value. You can set different line spacing as needed.
3. Precautions for setting line spacing
When setting line spacing, we need to pay attention to the following points:
1. Maintain uniform line spacing
Throughout the document, uniform line spacing settings should be maintained to ensure the unity and beauty of the entire document.
2. Set line spacing according to document requirements
Choose appropriate line spacing settings according to the specific needs of the document to avoid excessively large or small line spacing affecting the reading experience of the document.
3. Pay attention to the difference between line spacing and paragraph spacing
Line spacing refers to the distance between each line of text, while paragraph spacing refers to the distance between different paragraphs. When setting, Pay attention to the distinction.
Through the above methods, we can more flexibly master the skills of setting line spacing in Word documents, effectively improve the typesetting quality of the document, and make the document look clearer, more beautiful, and easier to read. I hope readers can become more comfortable when editing Word documents and effectively improve work efficiency.
The above is the detailed content of Detailed explanation of how to set line spacing in Word documents. For more information, please follow other related articles on the PHP Chinese website!

Hot AI Tools

Undresser.AI Undress
AI-powered app for creating realistic nude photos

AI Clothes Remover
Online AI tool for removing clothes from photos.

Undress AI Tool
Undress images for free

Clothoff.io
AI clothes remover

Video Face Swap
Swap faces in any video effortlessly with our completely free AI face swap tool!
Hot Article
Hot Tools

Notepad++7.3.1
Easy-to-use and free code editor

SublimeText3 Chinese version
Chinese version, very easy to use

Zend Studio 13.0.1
Powerful PHP integrated development environment

Dreamweaver CS6
Visual web development tools

SublimeText3 Mac version
God-level code editing software (SublimeText3)
Hot Topics
 1392
1392
 52
52

 Why does a word document break into new lines when I type a space?
Oct 09, 2023 pm 02:55 PM
Why does a word document break into new lines when I type a space?
Oct 09, 2023 pm 02:55 PM
Word document breaks into new lines as soon as you hit the space button. This is caused by default settings, text alignment, table operations, etc. The solution is as follows: 1. Use non-line-breaking spaces to keep the text neat and aligned; 2. Adjust the default settings. In the option settings of Word, you can find the "Advanced" tab, and then uncheck the "Typesetting Options" Select the option "Automatically wrap lines when hitting the space bar"; 3. Use tab characters to keep the table aligned and avoid line wrapping problems; 4. Use text boxes, etc.
 How to calculate addition, subtraction, multiplication and division in word document
Mar 19, 2024 pm 08:13 PM
How to calculate addition, subtraction, multiplication and division in word document
Mar 19, 2024 pm 08:13 PM
WORD is a powerful word processor. We can use word to edit various texts. In Excel tables, we have mastered the calculation methods of addition, subtraction and multipliers. So if we need to calculate the addition of numerical values in Word tables, How to subtract the multiplier? Can I only use a calculator to calculate it? The answer is of course no, WORD can also do it. Today I will teach you how to use formulas to calculate basic operations such as addition, subtraction, multiplication and division in tables in Word documents. Let's learn together. So, today let me demonstrate in detail how to calculate addition, subtraction, multiplication and division in a WORD document? Step 1: Open a WORD, click [Table] under [Insert] on the toolbar, and insert a table in the drop-down menu.
 What to do if there is no rotation button in the Word text box
Dec 08, 2022 am 09:50 AM
What to do if there is no rotation button in the Word text box
Dec 08, 2022 am 09:50 AM
The solution to the problem that there is no rotation button in the Word text box: After opening the compatibility mode document, press the F12 key to save it as a higher version, and then open it again.
 Why can't the word document be edited?
Jun 28, 2023 pm 02:48 PM
Why can't the word document be edited?
Jun 28, 2023 pm 02:48 PM
Reasons why the word document cannot be edited: 1. The word document is locked, unexpected power outages and unexpected machine shutdowns will cause system file abnormalities; 2. The word file is damaged due to improper computer operation, computer viruses, storage device errors or file transfer problems. Caused by; 3. The word document is set to read-only mode, which usually occurs in a shared document environment; 4. An error occurs in the word program and an error message is seen.
 What to do if word document cannot be edited
Mar 19, 2024 pm 09:37 PM
What to do if word document cannot be edited
Mar 19, 2024 pm 09:37 PM
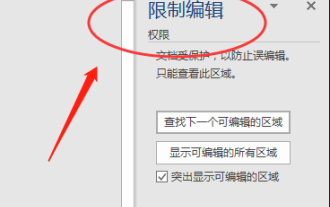
After editing the document, we will save the document to provide convenience for editing and modifying the document next time. Sometimes we can modify it directly after clicking on the edited document, but sometimes for some unknown reason, there is no response no matter how we click on the word document, and the command will not be executed. , what should I do if the word document cannot be edited? Don’t worry, the editor will help you solve this problem. Let’s take a look at the operation process. After opening a Word document, when editing text, you will see a "Restrict Editing" prompt displayed on the right side of the page, as shown in the figure below. 2. You need to cancel editing and you need to know the set password. Click "Stop Protection" below the pop-up prompt, as shown in the figure below. 3. Then enter the password in the "Unprotect Document" dialog box and click OK, as shown in the figure below.
 What to do if Word text overflows the border
Jun 07, 2023 am 11:11 AM
What to do if Word text overflows the border
Jun 07, 2023 am 11:11 AM
Solution to word text overflowing the boundary: 1. Right-click the mouse in the blank space and click the "Table Properties" option; 2. Uncheck the specified height of the size in the table in the "Table Properties" interface; 3. Click OK to solve the problem The problem that the text in Word exceeds the right boundary of the page.
 Detailed explanation of how to use C language to find the greatest common divisor
Feb 18, 2024 pm 11:10 PM
Detailed explanation of how to use C language to find the greatest common divisor
Feb 18, 2024 pm 11:10 PM
Detailed explanation of the method of finding the greatest common divisor in C language The greatest common divisor (GCD, Greatest Common Divisor) is a commonly used concept in mathematics, which refers to the largest divisor among several integers. In C language, we can use many methods to find the greatest common divisor. This article will detail several of these common methods and provide specific code examples. Method 1: Euclidean division is a classic method for finding the greatest common divisor of two numbers. Its basic idea is to continuously divide the divisors and remainders of two numbers
 What should I do if the font format of the subdocuments changes after the Word document is split?
Feb 07, 2023 am 11:40 AM
What should I do if the font format of the subdocuments changes after the Word document is split?
Feb 07, 2023 am 11:40 AM
Solution to the problem that the font format of subdocuments has changed after the Word document is split: 1. Before splitting the document in outline mode, select the text content to create a new style and give the style a unique name; 2. Select the For the second paragraph of text content, set all the remaining text content to the new style format through the function of selecting similar text; 3. Enter the outline mode to split the document. After the operation is completed, open the subdocument. The text font format is the new style content before splitting. .
