How to operate PPT design Rubik's Cube renderings
php editor Strawberry will share with you an article today about how to use PPT to design Rubik's Cube renderings. In our daily work, we often need to make PPT to display work results or make reports. How to use Rubik's Cube renderings to enhance the visual effect of PPT and make the content more vivid and interesting is a question that many people are concerned about. Below, we will introduce in detail how to use Rubik's Cube renderings in PPT to make your presentation more attractive.
1. Open PPT and create a blank presentation.

2. Insert a square.

3. Copy multiple squares and combine them into a whole, which is also square as a whole.

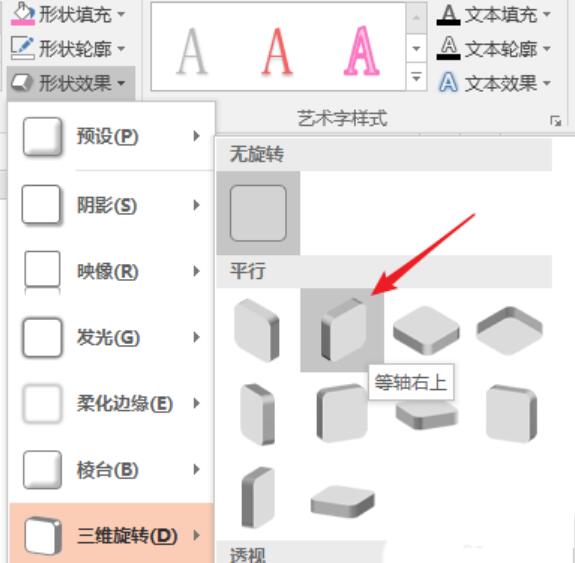
4. Rotate the combined graphics three-dimensionally in an isometric upper-right direction.

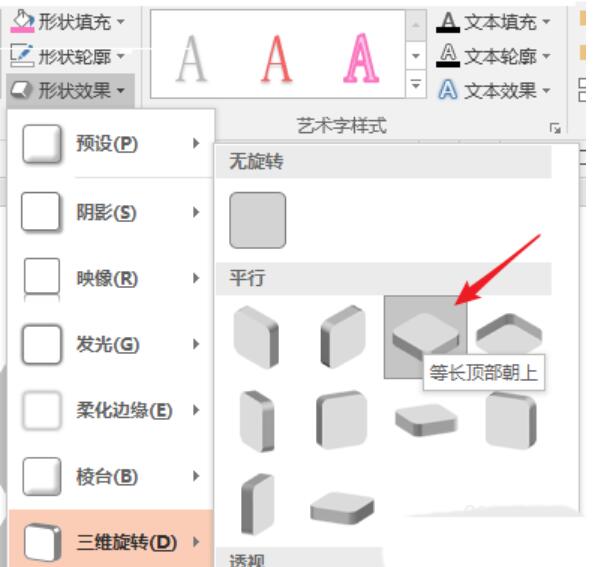
5. Copy the combined shape and perform a three-dimensional rotation with the top of the same length facing upward.

6. Move the position of the combined graphics to get two sides of the Rubik's Cube.

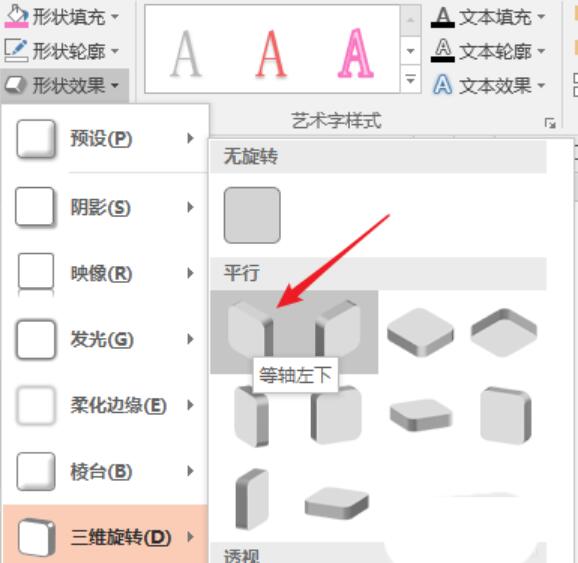
7. Copy another combined shape and perform isometric lower-left three-dimensional rotation.

8. Similarly, if you move the position, you will get another side.

9. Finally, set the theme color for the combined shape of each face to get the final effect.

The above is the detailed content of How to operate PPT design Rubik's Cube renderings. For more information, please follow other related articles on the PHP Chinese website!

Hot AI Tools

Undresser.AI Undress
AI-powered app for creating realistic nude photos

AI Clothes Remover
Online AI tool for removing clothes from photos.

Undress AI Tool
Undress images for free

Clothoff.io
AI clothes remover

AI Hentai Generator
Generate AI Hentai for free.

Hot Article

Hot Tools

Notepad++7.3.1
Easy-to-use and free code editor

SublimeText3 Chinese version
Chinese version, very easy to use

Zend Studio 13.0.1
Powerful PHP integrated development environment

Dreamweaver CS6
Visual web development tools

SublimeText3 Mac version
God-level code editing software (SublimeText3)

Hot Topics
 1386
1386
 52
52
 How to use PPT design poster size
Mar 26, 2024 pm 09:46 PM
1. Open PPT, click New Slide, and after creating a new slide document, select Page Settings in the Design column of the menu bar. In the pop-up dialog box, set the Slide Size to A4 size, and then set the Slide Orientation to Portrait. Click OK. 2. Select [Background] in [Design] in the menu bar, and select [Background...] in the drop-down menu to open the background setting interface. Click the inverted triangle of [Background Fill], select [Fill Effect], click [Picture] in the pop-up window, then [Select Picture], and click OK. 3. You can add some elements to the poster. Menu bar [Insert] → [Shape]/[Picture], and then you can select some appropriate graphics to add to the poster. 4. We can give the inserted element
 Insurance ppt layout design principles: principles of intimacy and hierarchy
Mar 19, 2024 pm 08:25 PM
The design of ppt layout is directly related to the presentation of ppt content, especially the layout design of intimate and hierarchical relationships, which can well highlight the key content of ppt, making the relationship clear and focused. Insurance ppt especially needs to master and use this layout design principle. Below, we will take a look at how to understand and use this principle. The first part emphasizes the importance of intimacy to the understanding of copywriting, analyzes the ppt of the case, and points out existing problems: improper placement and deviations caused by different intimacy relationships. 2. The second part [Two hierarchical relationships that affect intimacy in PPT] By analyzing this case, the size of the font, the white space and the color of the font are often used to highlight the hierarchical relationship. 3. Two hierarchical relationships in the PPT page:
 How to use PPT to design a colored pencil
Mar 26, 2024 pm 05:56 PM
1. Open PPT, click the [Insert] tab, and click the [Shape] button in the [Illustration] group. Click [Down Arrow] in [Arrow Summary] in the open drop-down list to draw a downward arrow in the slide pane. 2. Right-click the down arrow and select [Edit Vertices] in the pop-up shortcut menu. 3. At this time, some editable vertices appear on the down arrow. 4. Use the mouse to drag the two upper vertices of the arrow inverted triangle inward, so that these two vertices coincide with the two adjacent editable vertices inside. 5. A simpler method is to insert a [Pentagon] from [Shape] and use the yellow control points on the pentagon to adjust the angle on the right side. 6. Rotate the adjusted pentagon and set the gradient fill as needed.
 How to design printer icons using PPT
Mar 26, 2024 pm 08:46 PM
1. Insert a rounded rectangle. 2. Adjust the arc of the rounded rectangle. 3. Insert a rectangle. 4. Copy another rectangle. 5. Adjust the relationship between upper and lower levels. 6. Adjust the format: white fill, black border. 7. Add a black circle in the upper right corner.
 Operation steps for PPT design to play animation of beautiful ancient poems
Mar 26, 2024 pm 04:51 PM
1. Start PPT and create a new blank slide. 2. Click the [Insert] tab in the menu bar, select [Rounded Rectangle] in the [Shape] group, and insert it into the page. 3. After drawing the rounded rectangle, adjust the size of the rounded rectangle appropriately, and then click the [Format] tab in the menu bar. A color style option will appear on the right side of the [Shape Style] area. Click the Use the drop-down triangle of the line to adjust the fill color of the rectangle. Because you want to add text, it is recommended to choose a lighter color. 4. Right-click a blank space on the page and select [Format Background] in the pop-up menu. 5. In the pop-up [Set Background Format] property box, check [Picture or Texture Fill], then click the drop-down triangle on the right side of [Texture] and select a fill you like.
 Specific operation methods for designing the text effects of tomb robbing notes using PPT
Mar 26, 2024 pm 06:50 PM
1. Enter text and adjust. Enter five text boxes in Chinese and English: Robbery, Tomb, Pen, Note, and THELOSTTOMB. For Chinese, use Chinese Song Dynasty → font size 88 → bold. For English, use Chinese New Wei → Font size 14 → Bold. 2. Convert Chinese from Simplified to Traditional Chinese. Select all Chinese text boxes → Review tab → Convert from Simplified to Traditional → Place the text as shown in the picture. 3. Text background image processing. Set the image saturation to 0%→Brightness 66%→Contrast 50%→Ctrl+C to copy the image. 4. Fill the picture with text. Fill the text you just copied with the clipboard → Ctrl+G combination. 5. Text three-dimensional settings. The text 3D rotation default is set to front perspective → perspective is 120° → 3D depth is set to 20 → depth color is set to black. Once done, you can assemble
 How to operate slides with PPT design curtain effect
Mar 26, 2024 pm 07:51 PM
1. Create a new slide document. 2. Add the first slide. 3. Select blank slide mode. 4. Complete the rendering of the blank slide document. 5. Copy and paste the underlying image. 6. Add a text box and fill in the congratulatory words. 7. Copy and paste the curtain image on the left. 8. Copy and paste the curtain image on the right. 9. Open the custom animation option. 10. Select the erase option in the exit action. 11. Set the custom animation options for the left curtain. The parameters are: (click), direction (from the right), speed (very slow). 12. Set the right curtain. Custom animation options, the parameters are: (after), direction (from the left), speed (very slow) 13. Effect picture after playback Note: Be sure to adjust the size of the picture before pasting it to ensure that the underlying picture
 Tutorial on how to design icons with double exposure effect using PPT
Mar 26, 2024 pm 07:30 PM
1. Create a new PPT file with a blank page, and copy the processed picture of the person with a white background to the blank page. 2. Click Insert in the PPT options bar, select Shape and click to insert a rectangular shape. 3. Adjust the size of the rectangle to be exactly the same as the image size. 4. Click on the image and select Copy. 5. Click the picture and right-click to format the shape. 6. As shown in the figure below, select fill as image or texture fill, set the illustration image from the clipboard, and set the transparency to a suitable transparency. 7. Select the line, set no line, and remove the border of the shape; adjust the inserted picture shape position to the appropriate position to get the double-exposure character effect.


