

Solution to the problem that win7 input method is not displayed

php editor Banana brings you a solution to the problem that the win7 input method does not display. When using the Windows 7 system, sometimes you encounter the problem that the input method cannot be displayed, which causes trouble in daily use. This article will introduce in detail how to solve this problem so that your input method can resume normal operation and improve your user experience.
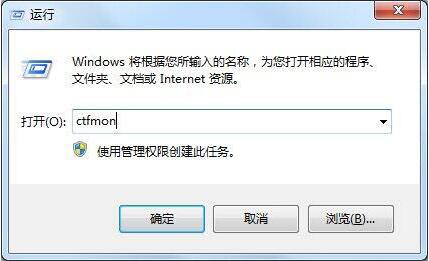
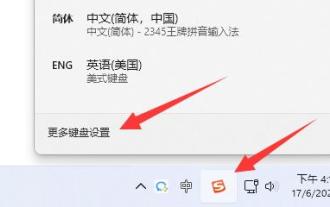
1. Enter [ctfmon] in [Run] in [Start Menu] to start the service to solve this problem. As shown in the picture:
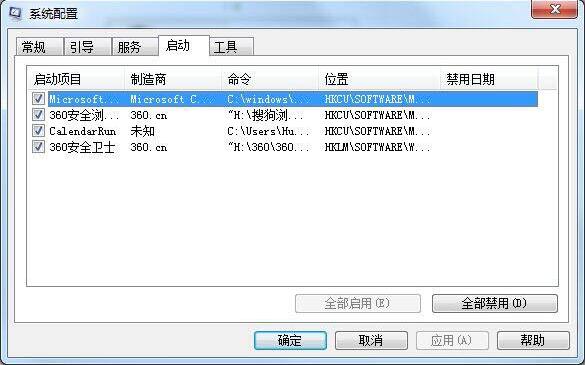
2. If this is indeed the cause and you want to get rid of it once and for all, you need to add it to the startup items. Enter [msconfig] in [Run] in [Start Menu], switch to the [Startup] item, and check the [msconfig] startup item. If the user has insufficient permissions, the startup item cannot be displayed. As shown in the picture:
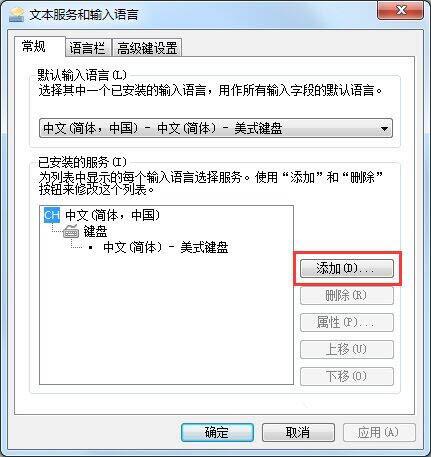
2. The input method is deleted, leaving only [American keyboard] or none left
The editor has also encountered a similar situation. After looking for the reason for a long time, I found out that after uninstalling the driver, the custom input method was automatically deleted from the list. The specific solution is also relatively simple, we only need to add an input method.
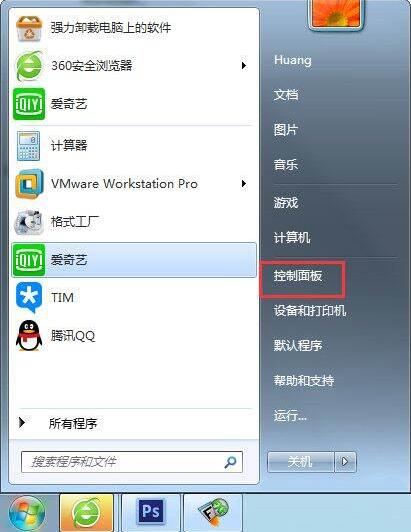
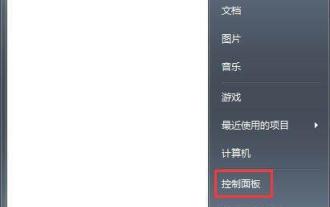
1. Enter the control panel. As shown in the picture:
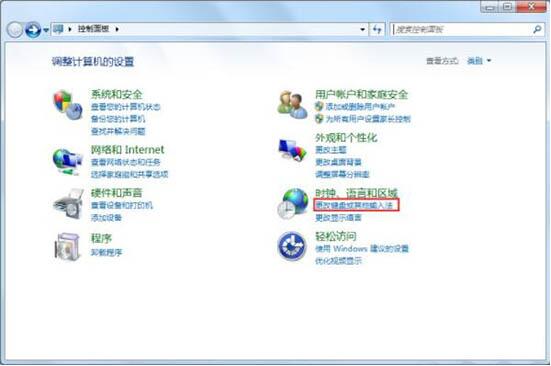
2. Change the keyboard or other input method. As shown in the picture:
3. Click to change the keyboard. As shown in the picture:

4. Click Add. As shown in the picture:
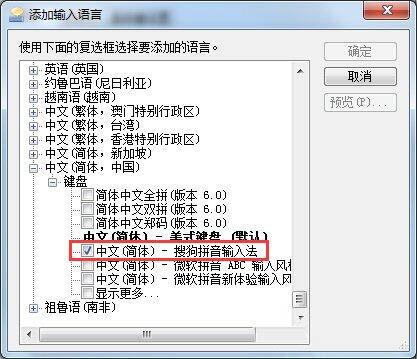
5. Scroll to the bottom and add an existing input method. As shown in the picture:
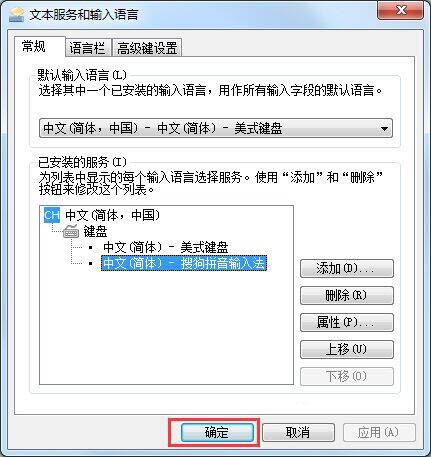
6. Confirm the modification. as the picture shows:
The above is the detailed content of Solution to the problem that win7 input method is not displayed. For more information, please follow other related articles on the PHP Chinese website!

Hot AI Tools

Undresser.AI Undress
AI-powered app for creating realistic nude photos

AI Clothes Remover
Online AI tool for removing clothes from photos.

Undress AI Tool
Undress images for free

Clothoff.io
AI clothes remover

AI Hentai Generator
Generate AI Hentai for free.

Hot Article
Hot Tools

Notepad++7.3.1
Easy-to-use and free code editor

SublimeText3 Chinese version
Chinese version, very easy to use

Zend Studio 13.0.1
Powerful PHP integrated development environment

Dreamweaver CS6
Visual web development tools

SublimeText3 Mac version
God-level code editing software (SublimeText3)
Hot Topics


 How to pin the input method to the taskbar in Windows 11
Apr 14, 2024 pm 06:31 PM
How to pin the input method to the taskbar in Windows 11
Apr 14, 2024 pm 06:31 PM
Recently, some friends encountered the problem that the position of the input method icon changes when using the Windows 11 operating system, and they want to fix it to the taskbar for quick switching. In order to solve this problem, this article will introduce in detail the specific steps to firmly place the input method icon on the taskbar in Windows 11 system to help friends who have this need to control the input method more conveniently. Operation method 1. Use the "win+i" shortcut key to quickly enter the "Settings" interface. After entering the new interface, click the "Time and Language" option in the left column. 2. Then click "Language and Region" on the right. 3. Then click "Enter". 4. Then click the "Advanced Keyboard Settings" option. 5. Finally find "Use desktop language bar".
 How to solve the problem that the candidate word box is not displayed when typing in the input method in Windows 11 system
Apr 11, 2024 pm 05:20 PM
How to solve the problem that the candidate word box is not displayed when typing in the input method in Windows 11 system
Apr 11, 2024 pm 05:20 PM
Recently, some users have encountered the problem that the candidate word box cannot be displayed normally when typing in the Microsoft input method when using the Windows 11 operating system. This prevents users from conveniently selecting the required Chinese characters when entering text, affecting work efficiency and user experience. . What should you do if you encounter this situation? The following brings you detailed solutions, let’s take a look. Solution 1. Right-click the input method icon in the taskbar in the lower right corner and select "More Keyboard Settings" in the option box. 2. Then click the three-dot icon on the right side of Chinese and select "Language Options" in the option list. 3. Then click the three dots icon on the right side of the input method and select "Keyboard Options" to open it. 4. Then click the "General" option. 5. Finally, press the switch under "Compatibility"
 What should I do if the Win7 taskbar does not display the icon? How to solve the problem of the computer taskbar icon disappearing
Jun 09, 2024 pm 01:49 PM
What should I do if the Win7 taskbar does not display the icon? How to solve the problem of the computer taskbar icon disappearing
Jun 09, 2024 pm 01:49 PM
Recently, many users using Win7 system have found that the icons in the taskbar suddenly disappeared, which makes the operation very inconvenient and they do not know how to solve the problem. This article will introduce to you how to solve the problem of disappearing taskbar icons in Win7 system. Bar! Cause Analysis When encountering such a situation, there are generally two situations: one is that the taskbar on the computer does not really disappear, but is just hidden, and the other is that the taskbar does disappear. Method 1: 1. There is a situation that you need to confirm first, that is, when the mouse is placed at the bottom of the screen, the taskbar will be displayed. You can directly click the mouse on the taskbar and select "Properties". 2. In the dialog box that opens, click & on the "Hide taskbar" option.
 How to clear all desktop background images in Win7? Tips for deleting personalized background images in Win7
Jun 02, 2024 am 09:01 AM
How to clear all desktop background images in Win7? Tips for deleting personalized background images in Win7
Jun 02, 2024 am 09:01 AM
In Win7 system, many users want to delete personalized desktop background images, but do not know how to delete them. This article will show you how to delete personalized background images in Win7 system. 1. First, open the control panel interface of the Win7 system and click to enter the "Appearance and Personalization" settings; 2. Then, in the opened interface, click the "Change Desktop Background" setting; 3. Then, click below "Desktop background" option; 4. Then, select Select all, and then click Clear all. Of course, you can also use it under "Customize", right-click the theme you want to delete, and then click &q on the shortcut menu
 How to add Windows credentials in Win7
Mar 26, 2024 pm 07:46 PM
How to add Windows credentials in Win7
Mar 26, 2024 pm 07:46 PM
1. First, select the Control Panel option in the Start button of the Win7 system. 2. Then in the control panel that pops up, click the [User Accounts and Family Safety] item. 3. Then click [Credential Manager] in the pop-up interface. 4. Finally, click [Add Windows Credentials] to create your credentials. The operation method of adding and managing windows credentials in win7 is shared here in detail with friends. More exciting tutorials are available on the PHP Chinese website!
 Where is the network discovery in Win7? Tips for enabling the network discovery function in Win7
Jun 04, 2024 am 09:02 AM
Where is the network discovery in Win7? Tips for enabling the network discovery function in Win7
Jun 04, 2024 am 09:02 AM
Many computer users know that network discovery is a network setting. This setting will affect whether the computer can find other computers and devices on the network and whether it can find the computer when other computers on the network are found. So how to enable network discovery in win7? The following computer System Home U Disk Installation will introduce you to the tutorial on how to enable network discovery in win7 system. 1. First, click the "Start Menu" icon on the desktop taskbar and choose to open the "Control Panel" interface. 2. Then, in the interface that opens, set "View by" to "Category", and then choose to enter "Network and Internet"
 How to delete vbs virus in win7
Mar 26, 2024 pm 09:21 PM
How to delete vbs virus in win7
Mar 26, 2024 pm 09:21 PM
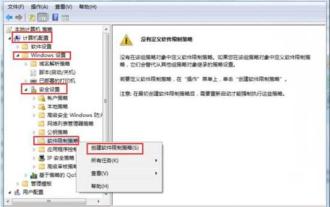
1. Click [Start → Run] and enter gpedit.msc. On the left side of the [Group Policy] window, click the [Computer Configuration → Windows Settings → Security Settings → Software Restriction Policy] item, and then click the [Action → Create New Policy] menu item. As shown in the picture: 2. Select [Other Rules] from the left. Right-click the blank space in the right pane and select the [New Path Rule] item in the menu. In the pop-up window, click the [Browse] button after [Path], select the wscript.exe file in the C: WindowsSystem32 folder, and set the [Security Level] to [Not Allowed]. Change C: System32, Dllcache and I386 under Windows
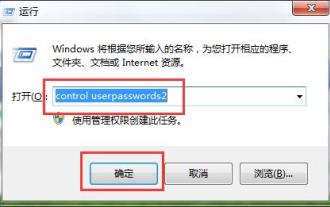 How to quickly cancel the power-on password of WIN7
Mar 26, 2024 pm 06:56 PM
How to quickly cancel the power-on password of WIN7
Mar 26, 2024 pm 06:56 PM
1. Press win+r to enter the run window, enter [controluserpasswords2] and press Enter. 2. In the user account window, uncheck [To use this machine, the user must enter a username and password (E)], and then click [Apply → OK].
