

How to combine PPT graphics into love text effect

php Xiaobian Yuzai will introduce to you how to combine graphics in PPT into "LOVE" text effect. First, choose a suitable font and color, then insert and adjust the position of each letter one by one. Next, adjust the spacing between the letters so that they are closely connected to create an overall effect. Finally, some decorative elements can be added appropriately to make the overall effect more vivid. In this way, you can easily create a unique and creative "LOVE" text effect PPT to add interest and highlights to your presentation.
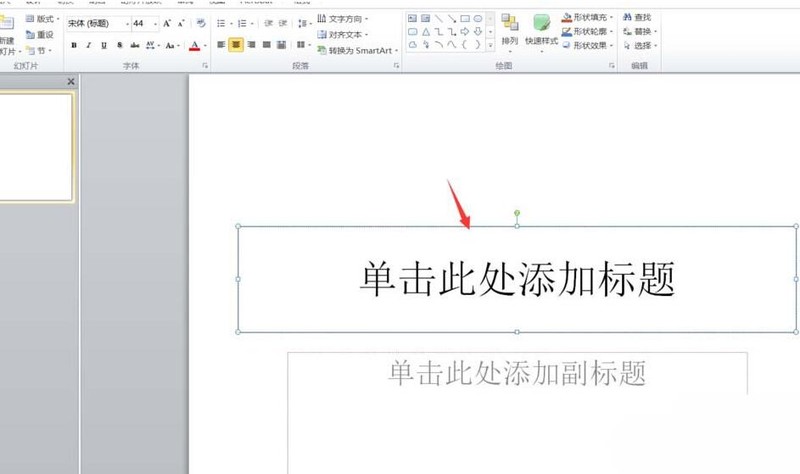
1. Open PPT and create a new blank page after opening the software.
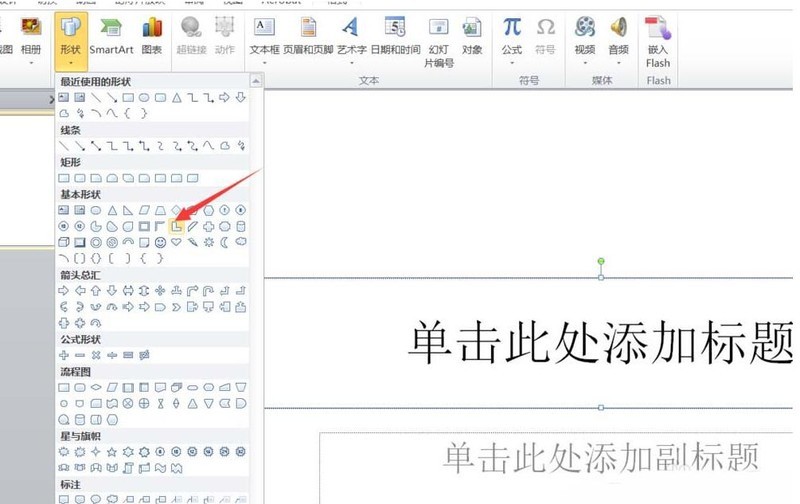
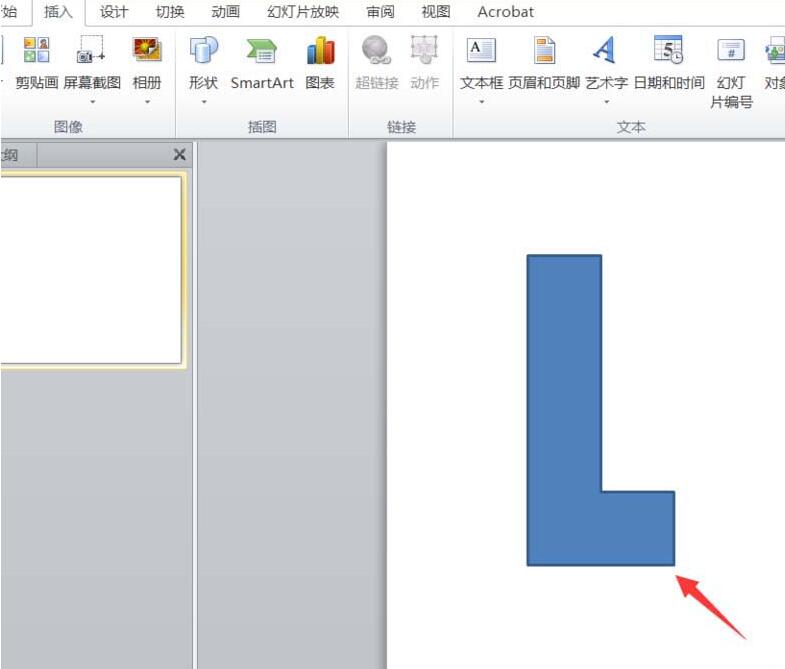
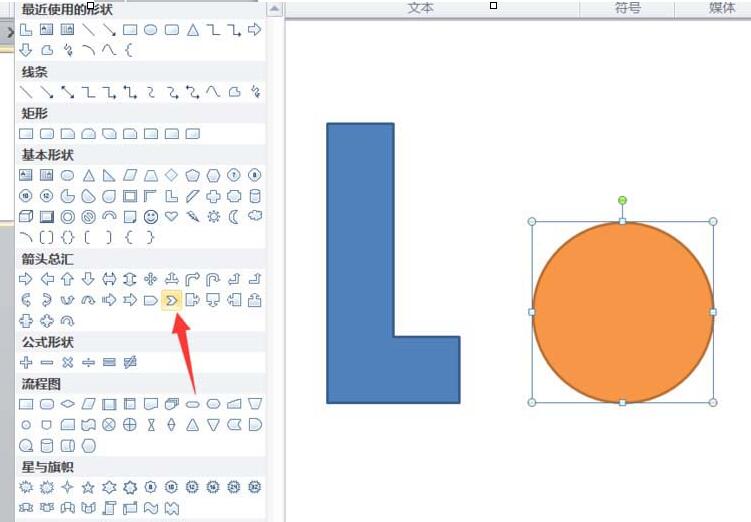
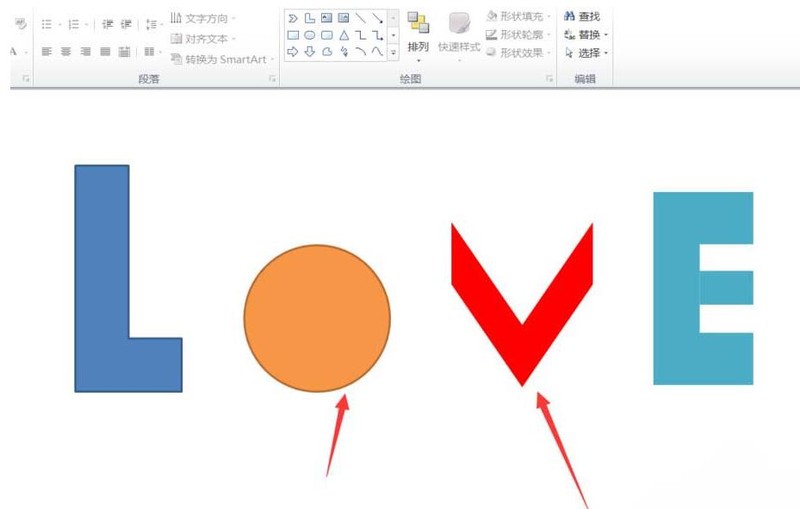
2. After creating a new blank page, click Insert Select Shape at the top, and first select the L-shaped insertion shape.
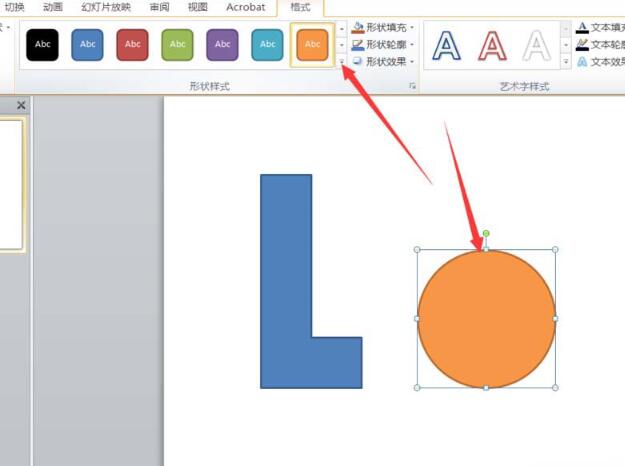
3. After inserting the L-shaped shape, select to insert the oval shape. Press the shift key to change the ellipse into a perfect circle. Then we set the shape fill of the ellipse. is orange.
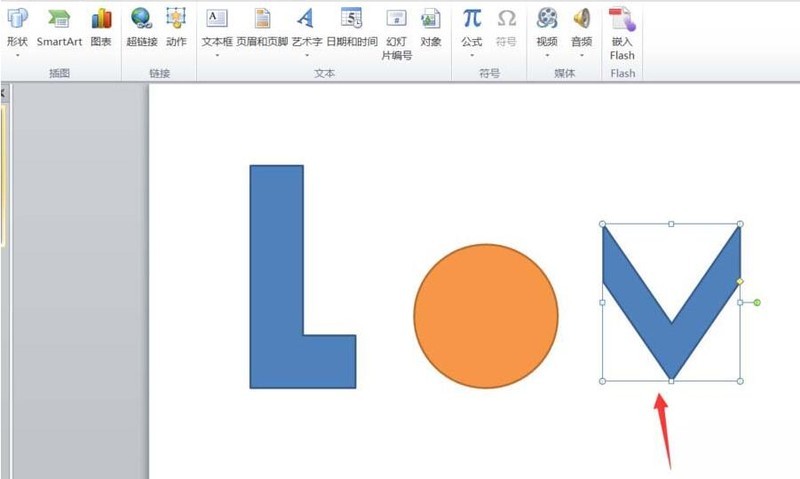
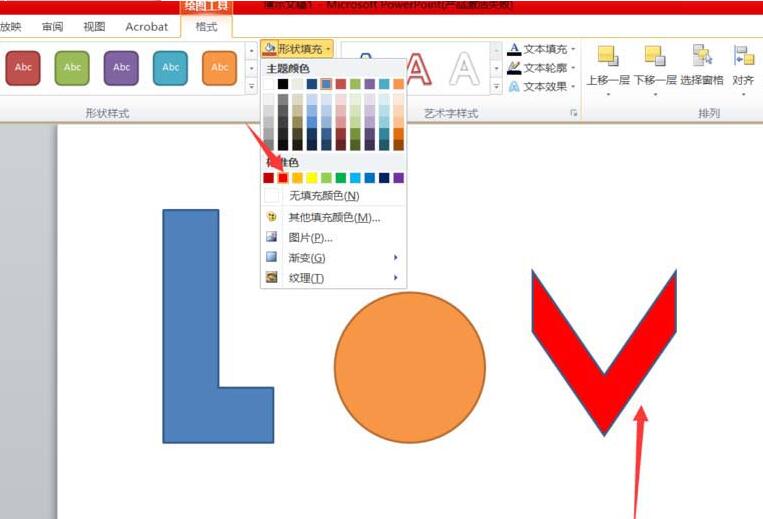
#4. Use process symbols to design the shape of v. After selecting the symbol, rotate it to create a v effect. We can fill the v graphic with red.
#5. Use the L-shaped shape and apply it to combine the letters e.
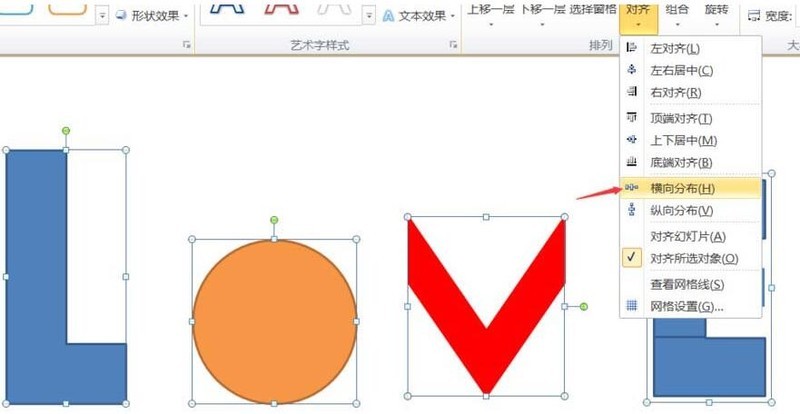
6. Select the 4 shapes we inserted, click Horizontal Distribution, and distribute them neatly and evenly.
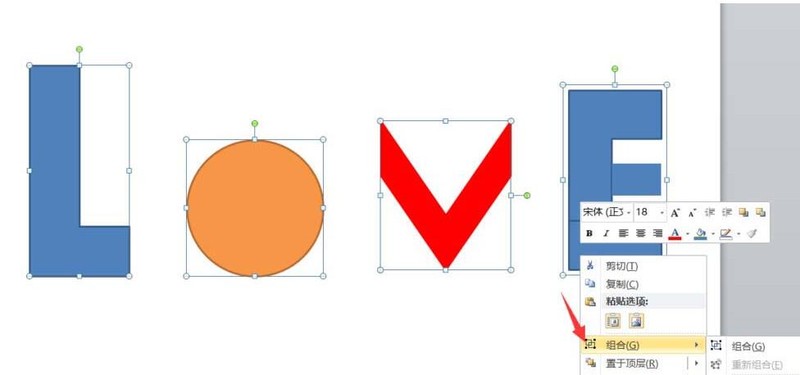
7. Finally, select all the shapes, right-click and select Group, so that all the shapes are grouped together, and you can also move this combined shape very conveniently.
The above is the detailed content of How to combine PPT graphics into love text effect. For more information, please follow other related articles on the PHP Chinese website!

Hot AI Tools

Undresser.AI Undress
AI-powered app for creating realistic nude photos

AI Clothes Remover
Online AI tool for removing clothes from photos.

Undress AI Tool
Undress images for free

Clothoff.io
AI clothes remover

AI Hentai Generator
Generate AI Hentai for free.

Hot Article
Hot Tools

Notepad++7.3.1
Easy-to-use and free code editor

SublimeText3 Chinese version
Chinese version, very easy to use

Zend Studio 13.0.1
Powerful PHP integrated development environment

Dreamweaver CS6
Visual web development tools

SublimeText3 Mac version
God-level code editing software (SublimeText3)
Hot Topics
 1376
1376
 52
52

 How to insert excel icons into PPT slides
Mar 26, 2024 pm 05:40 PM
How to insert excel icons into PPT slides
Mar 26, 2024 pm 05:40 PM
1. Open the PPT and turn the page to the page where you need to insert the excel icon. Click the Insert tab. 2. Click [Object]. 3. The following dialog box will pop up. 4. Click [Create from file] and click [Browse]. 5. Select the excel table to be inserted. 6. Click OK and the following page will pop up. 7. Check [Show as icon]. 8. Click OK.
 Introduction to the method of making a human icon in PPT
Mar 26, 2024 pm 04:21 PM
Introduction to the method of making a human icon in PPT
Mar 26, 2024 pm 04:21 PM
1. Create a new PPT page, insert a circle, a rounded rectangle on the same side (1 in the picture below) and a rectangle in the graphic, and then combine it to create a human-shaped graphic effect. Note that the circle (head) and rectangle (legs) are the same width, with the rounded rectangle slightly wider on the same side. Pay attention to the proportions between the human figures. 2. Next, select all three shapes, remove their outlines, change the color to gray, and use the shape [join] function (2 in the figure below) to turn the three shapes into a humanoid shape. 3. After zooming out, you can use the fast copy method of Ctrl+D for efficient copying. 4. Color the villain part. If there is no technical content in coloring them all, just change the color of the villain to green. 2. Color the human icon 1. Copy a little person separately. Then insert a [
 How to remove the date that appears automatically when printing from PPT handouts
Mar 26, 2024 pm 08:16 PM
How to remove the date that appears automatically when printing from PPT handouts
Mar 26, 2024 pm 08:16 PM
1. Let me first talk about the method I used at the beginning, maybe everyone is using it too. First, open [View]——]Remarks Template[. 2. A place where you can actually see the date after opening it. 3. Select it first and delete it. 4. After deleting, click [Close Master View]. 5. Open the print preview again and find that the date is still there. 6. In fact, this date was not deleted here. It should be in the [Handout Master]. Look at the picture below. 7. Delete the date after you find it. 8. Now when you open the preview and take a look, the date is no longer there. Note: In fact, this method is also very easy to remember, because the printed handouts are handouts, so you should look for the [Handout Master].
 Detailed method of inserting formula effect flow chart into PPT
Mar 26, 2024 pm 04:36 PM
Detailed method of inserting formula effect flow chart into PPT
Mar 26, 2024 pm 04:36 PM
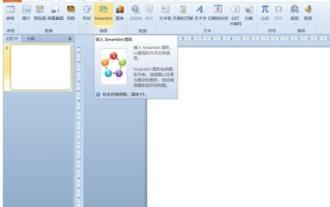
1. Open PPT, click the [Insert] tab, and click the [smartArt] button in the [Illustrations] group. 2. Click [Process] in the [Select smartArt graphics] dialog box that opens. 3. Select the [Formula] flow chart in the [Process] pane that opens. 4. Click [OK], and the [Formula] flow chart will be inserted into the slide pane. 5. Click [Text] in the [Type text here] column, or click [Text] on the graphic to enter content. 6. Select the shape in the graphic, click the [Design] tab of [smartArt Tools], and click the [Add Shape] button in the [Create Graphics] group to add a shape. 7. The shapes in the graphics can also be selected and deleted. Of course, you can also delete them in smar as needed.
 How to deal with blanks when playing PPT slides
Mar 26, 2024 pm 07:51 PM
How to deal with blanks when playing PPT slides
Mar 26, 2024 pm 07:51 PM
1. Open the PPT file you created and select the second slide. 2. On the second slide, select one of the pictures, and then select [Animation] to add any animation effect. 3. In the start column of the animation bar, change [While Standalone] to [After Previous Animation], and you will see that the picture animation label [1] will change to [0]. Do the same for subsequent slides, and you can see the effect by playing the slide at the end.
 PPT operation content for drawing the animation of a bird flying over
Mar 26, 2024 pm 05:06 PM
PPT operation content for drawing the animation of a bird flying over
Mar 26, 2024 pm 05:06 PM
1. Open the PPT software, create a new slide, and insert an arc from the menu bar. 2. Copy the arc that has been set, and then move the arc to form the shape of the sea surface. 3. Insert a picture of a bird from [Insert], [Picture] in the menu bar. Then set the image size larger. 4. Click [Animation] on the menu bar, select the picture, set the animation to a custom path, and select left. 5. Copy a picture and set the custom animation path to arc downward. 6. Select the first picture, set the picture animation duration to a longer point, and then extend the picture animation path to the left end of the slide.
 Introduction to the method of inserting heptagons into PPT slides
Mar 26, 2024 pm 07:46 PM
Introduction to the method of inserting heptagons into PPT slides
Mar 26, 2024 pm 07:46 PM
1. Open the PPT slide document, and in the [Outline, Slide] column on the left side of the PPT, click to select the slide where you want to insert the basic [shape]. 2. After selecting, select the [Insert] menu in the function menu bar above the PPT and click. 3. After clicking the [Insert] menu, the [Insert] submenu bar pops up below the function menu bar. Select the [Shape] menu in the [Insert] submenu bar. 4. Click the [Shape] menu to pop up the preset shape type selection page. 5. In the shape type selection page, select the [Heptagon] shape and click. 6. After clicking, move the mouse to the slide editing interface, press the mouse to draw, and release the mouse after the drawing is completed. Complete the insertion of the [heptagon] shape.
 How to create underline animation when mouse clicks text in PPT
Mar 26, 2024 pm 06:40 PM
How to create underline animation when mouse clicks text in PPT
Mar 26, 2024 pm 06:40 PM
1. Enter text. 2. Select the shape under Insert and select Line within it. 3. Draw a straight line below the word love. 4. Select the straight line, then select the animation menu, and choose an animation effect from it. 5. Play the animation. At this time, there are no horizontal lines under the text. 6. Click the mouse, and a horizontal line will appear under the text.
