

PPT tutorial on using drawing tools to make clocks

php editor Baicao brings you a PPT tutorial on how to use drawing tools to make clocks. In daily work and study, making PPT is a very common task. As a symbol of time, clocks are also a commonly used element in PPT, which can add interest and highlights to presentations. This tutorial will introduce in detail how to use the drawing tools in PPT to create an exquisite clock pattern to make your PPT content more vivid and interesting.
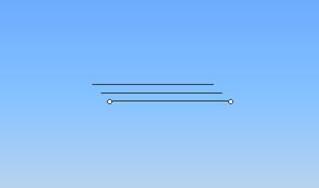
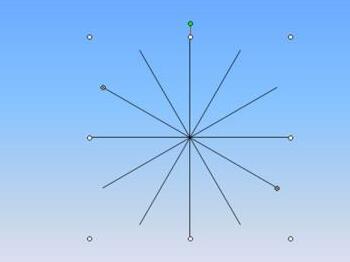
1. Start PPT, select the straight line tool in the lower left corner, draw a straight line in the center, press ctrl c twice and press ctrl v twice to copy two straight lines.
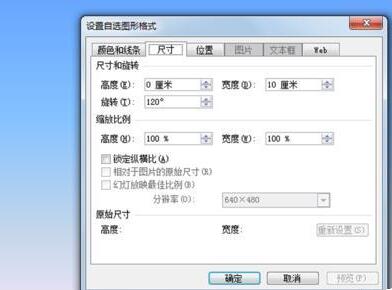
2. Select the two copied straight lines respectively, right-click and select the Format AutoShape option from the drop-down menu. A dialog box will pop up. In the dialog box, click the Size tab. , set the rotation angle to 60/120 degrees respectively.
3. Select three straight lines, execute Draw-Align or Distribute-Horizontal Centering, then set vertical centering again, and execute Draw-Combine command again to combine the three straight lines into one graphic.
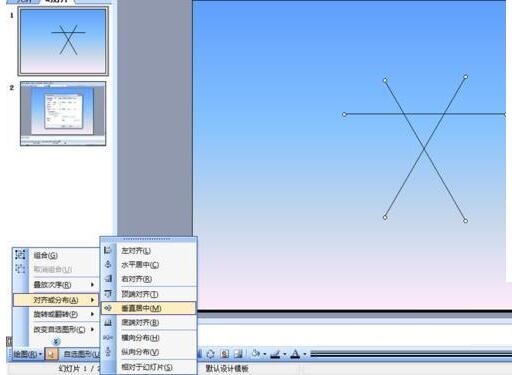
4. Select this combined graphic, execute ctrl c and then ctrl v command to get a new graphic. Right-click the graphic and select the Format Object option from the drop-down menu. In the pop-up Set the rotation angle to 30 degrees in the dialog box.
5. Select the two graphics and execute Draw-Align or Distribute-Horizontal Center and Vertical Center, and execute the Draw-Combine command again to combine the two graphics into one graphic.
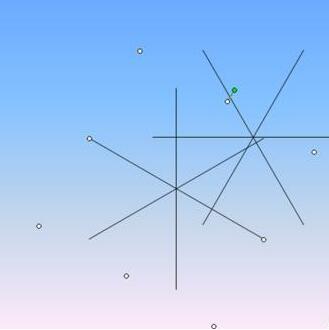
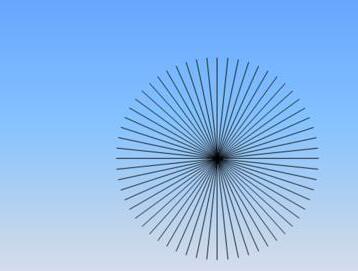
6. Execute the copy and paste command, paste four consecutive times to get four graphics, and set the rotation angles of these four graphics to 24 degrees, 18 degrees, 12 degrees, and 6 degrees respectively. , select all the graphics and execute drawing-alignment or distribution-horizontal centering and vertical centering to stitch all the graphics together.
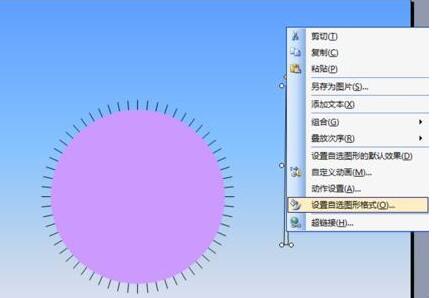
7. Select the Ellipse tool to draw a perfect circle, right-click and select Format AutoShape from the drop-down menu. In the pop-up dialog box, set the fill color and line color to lavender. , and adjust the size and position of the circle. Select all graphics and perform Draw-Align or Distribute-Vertical Center and Horizontal Center.

8. Select AutoShape-Basic Shape-Isosceles Triangle, draw an isosceles triangle, right-click the shape and set the fill color and line color to red in the pop-up dialog box.
9. Select this isosceles triangle and make a copy, execute the Draw-Rotate or Flip-Vertical Flip command to get a figure with the same shape.
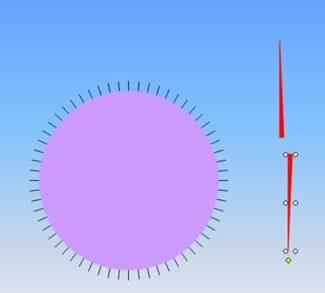
10. Adjust the sizes of the two pointers respectively, then select the two pointers and move them to the center of the dial, select all the graphics, execute the draw-combine command, and combine all the graphics. combined into one graphic.
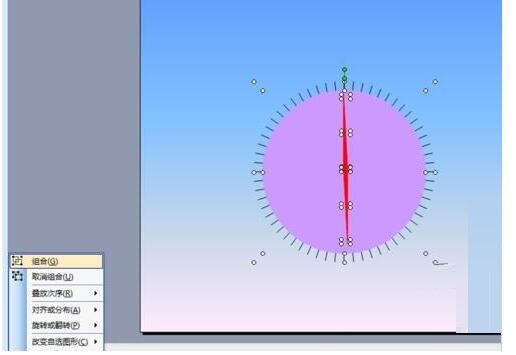
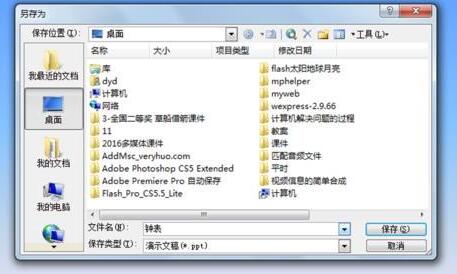
11. Such a clock is completed. Execute the file-save command, enter [clock] in the pop-up dialog box, and select a suitable location to save.
The above is the detailed content of PPT tutorial on using drawing tools to make clocks. For more information, please follow other related articles on the PHP Chinese website!

Hot AI Tools

Undresser.AI Undress
AI-powered app for creating realistic nude photos

AI Clothes Remover
Online AI tool for removing clothes from photos.

Undress AI Tool
Undress images for free

Clothoff.io
AI clothes remover

AI Hentai Generator
Generate AI Hentai for free.

Hot Article
Hot Tools

Notepad++7.3.1
Easy-to-use and free code editor

SublimeText3 Chinese version
Chinese version, very easy to use

Zend Studio 13.0.1
Powerful PHP integrated development environment

Dreamweaver CS6
Visual web development tools

SublimeText3 Mac version
God-level code editing software (SublimeText3)
Hot Topics
 1377
1377
 52
52

 How to center images in html web pages
Apr 05, 2024 pm 12:18 PM
How to center images in html web pages
Apr 05, 2024 pm 12:18 PM
In HTML, there are two ways to center-align an image: use CSS: margin: 0 auto; to center the image horizontally, and display: block; to make it occupy the entire width. Use the HTML: <center> element to center the image horizontally, but it is less flexible and does not comply with the latest web standards.
 How to adjust text position in dreamweaver
Apr 09, 2024 am 02:24 AM
How to adjust text position in dreamweaver
Apr 09, 2024 am 02:24 AM
Adjusting the text position in Dreamweaver can be completed by the following steps: Select the text and use the text position adjuster to make horizontal adjustments: left alignment, right alignment, center alignment; 2. Make vertical adjustments: top alignment, bottom alignment, vertical center; 3. Press Shift key and use the arrow keys to fine-tune the position; 4. Use shortcut keys to quickly align: left alignment (Ctrl/Cmd + L), right alignment (Ctrl/Cmd + R), center alignment (Ctrl/Cmd + C).
 Detailed steps for designing a light bulb icon in PPT
Mar 26, 2024 pm 08:36 PM
Detailed steps for designing a light bulb icon in PPT
Mar 26, 2024 pm 08:36 PM
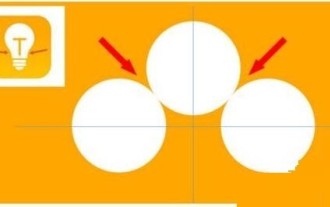
1. Hold down the shift key to draw a perfect circle in PPT, then copy the perfect circle twice, and stick it together as shown below. Notice in the picture below that the blue guide line exactly crosses the diameters of the three circles. (Pay attention to the arrow in the picture below). 2. The next step is very important. Insert an inverted trapezoid in the middle of the three circles. The long side of the trapezoid is at the diameter of the middle circle. (arrow in the picture below). 3. If you view the perspective version, please pay attention to the position pointed by the arrow in the picture below. Exactly tangent to both circles. 4. Next, adjust the remaining details. For example, the rounded corners at the bottom of the light bulb are actually completed with a rounded rectangle. The effect is as follows. Especially the small semicircle at the bottom is solved by arc graphics. 2 points in the picture below. 5. After using the direction arrows to fine-tune the distance between the graphics, add a T shape in the middle.
 Restricted processing operation method is prompted when embedding fonts in PPT
Mar 26, 2024 pm 08:41 PM
Restricted processing operation method is prompted when embedding fonts in PPT
Mar 26, 2024 pm 08:41 PM
1. Open PowerPoint and edit the PPT document. 2. Find the font that cannot be embedded, select the text box, right-click - Cut/Copy. 3. Right-click the blank space of the slide and select [Paste] - Paste as picture. 4. It is simple and convenient to save the font as a picture, but the font cannot be modified. Method 2: Software FontCreatorProgram 1. Download the FontCreatorProgram software from the Internet, unzip the file, and select the [FCP.EXE] file to install. 2. Open the installed software, click [File] - Open - Installed Fonts in the window menu bar, and select PPT. For fonts that cannot be embedded, click [OK]. 3. Select [
 How to center the text box in html
Apr 22, 2024 am 10:33 AM
How to center the text box in html
Apr 22, 2024 am 10:33 AM
There are many ways to center the HTML text box: text input box: use the CSS code input[type="text"] { text-align: center; } text area: use the CSS code textarea { text-align: center; } horizontal centering: Use the text-align: center style on the text box parent element to center it vertically: use the vertical-align attribute input[type="text"] { vertical-align: middle; }Flexbox: use display:
 How to center ul content in css
Apr 26, 2024 pm 12:24 PM
How to center ul content in css
Apr 26, 2024 pm 12:24 PM
Center UL content in CSS: Use the text-align property: Set the alignment of text, including the content of list items. Use the margin attribute: Set the left and right margins of the element, and use margin: auto to achieve horizontal centering. Use the display attribute: Set the element to inline-block, then center it vertically using text-align: center. Use flexbox properties: Horizontal and vertical centering through justify-content: center and align-items: center.
 Detailed method to create animation effect of finger erasing displayed text in PPT
Mar 26, 2024 pm 09:46 PM
Detailed method to create animation effect of finger erasing displayed text in PPT
Mar 26, 2024 pm 09:46 PM
1. Create a new PPT presentation, select the horizontal text box in the insert menu, insert a horizontal text box on the slide page, and enter the text content in the text box. 2. Select the created text box or select all the text content in the text box. Under the start menu, set the text font, font size and other related text font attributes. 3. Find the picture in the insert menu, click the picture, select the material picture of a finger that you found before and import it to the slide page, select the inserted picture, reduce it to the appropriate size and place it in the appropriate position. 4. Select the text box, click on the animation menu, find the [Erase] animation effect in the animation menu, click Erase to apply this effect to the text box, and set the erasing animation direction to
 Steps to unify the theme color of PPT slides
Mar 26, 2024 pm 08:51 PM
Steps to unify the theme color of PPT slides
Mar 26, 2024 pm 08:51 PM
1. The color scheme is naturally related to design, so we click on the design toolbar and on the right side, you can see the color options. Point the mouse up, and you can see that the current theme color is: Default design template 1. 2. Click on this option, and the first one is the current color design. To change that, we're going to go down below the panel: New Theme Colors. 3. Click in, and in the column of colors that appear, you can see that there are three accent text colors, all of which are light and almost impossible to display on a light background. Among them is the text color in this example. 4. Click the drop-down arrow on the right side of the color to display the color selection panel. In order not to destroy the overall color matching, choose a dark color in the primary color system to replace the primary color. Replace the other two colors in the same way. 5. Compare the changed color with the original color. On the left is
