
 Software Tutorial
Office Software
How to draw mobile phone icons in wps_steps and methods of making mobile phone icons in wps
Software Tutorial
Office Software
How to draw mobile phone icons in wps_steps and methods of making mobile phone icons in wps
How to draw mobile phone icons in wps_steps and methods of making mobile phone icons in wps

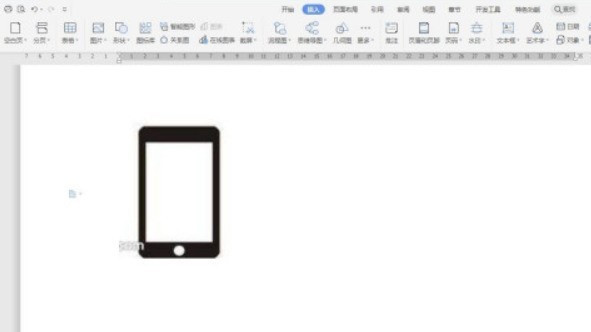
1. Open the WPS software, select the text part, then create a new file and insert the graphic style we need to draw in the form of a picture.
2. Choose the most suitable graphic according to the style of the picture. For example, I choose a rounded rectangle. The yellow control point can adjust the size of the rounded corners.
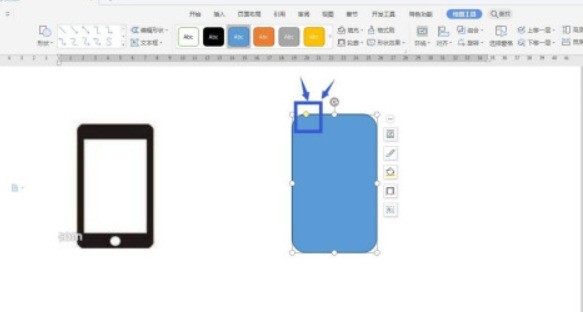
3. Fill the rounded rectangle with black, then insert a rectangle, place it inside, adjust the size, and set it to white.
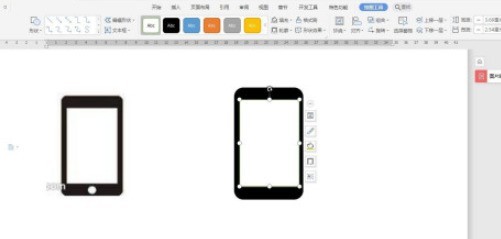
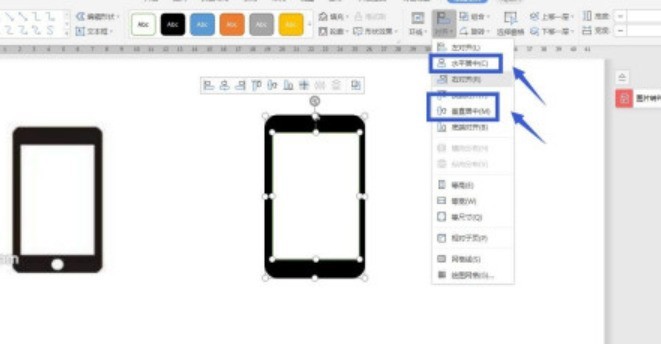
4. Select these two shapes, and then set the horizontal center alignment and vertical center alignment in Alignment.
5. Click to insert a shape, find the circle, click once to insert a perfect circle, and enter a value in the ribbon to set the size of the circle.
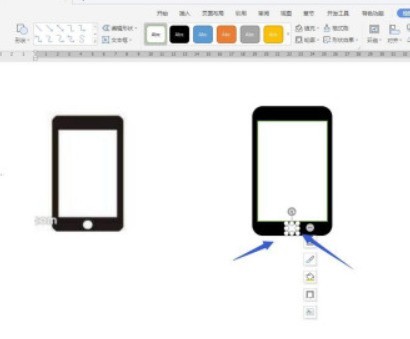
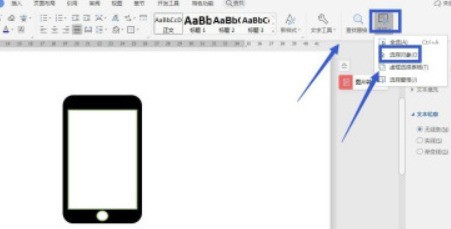
6. Click the Home tab, there is a selection in the right ribbon, click - Select Object, and then we can select all shapes by box selection.
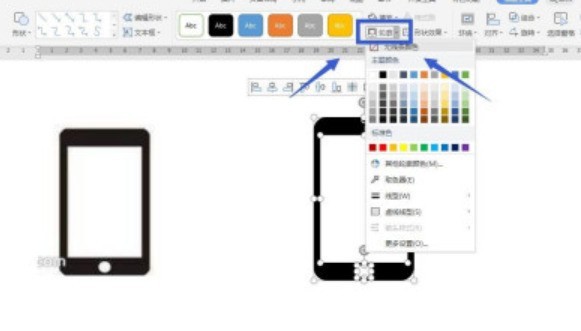
7. Remove the outlines of all selected shapes. If there is an outline in the ribbon, set it to None.
The above is the detailed content of How to draw mobile phone icons in wps_steps and methods of making mobile phone icons in wps. For more information, please follow other related articles on the PHP Chinese website!

Hot AI Tools

Undresser.AI Undress
AI-powered app for creating realistic nude photos

AI Clothes Remover
Online AI tool for removing clothes from photos.

Undress AI Tool
Undress images for free

Clothoff.io
AI clothes remover

AI Hentai Generator
Generate AI Hentai for free.

Hot Article
Hot Tools

Notepad++7.3.1
Easy-to-use and free code editor

SublimeText3 Chinese version
Chinese version, very easy to use

Zend Studio 13.0.1
Powerful PHP integrated development environment

Dreamweaver CS6
Visual web development tools

SublimeText3 Mac version
God-level code editing software (SublimeText3)
Hot Topics
 1376
1376
 52
52

 WPS and Office do not have Chinese fonts, and Chinese font names are displayed in English.
Jun 19, 2024 am 06:56 AM
WPS and Office do not have Chinese fonts, and Chinese font names are displayed in English.
Jun 19, 2024 am 06:56 AM
My friend's computer, all Chinese fonts such as imitation Song, Kai style, Xing Kai, Microsoft Yahei, etc. cannot be found in WPS and OFFICE. The editor below will tell you how to solve this problem. The fonts in the system are normal, but all fonts in the WPS font options are not available, only cloud fonts. OFFICE only has English fonts, not any Chinese fonts. After installing different versions of WPS, English fonts are available, but there is also no Chinese font. Solution: Control Panel → Categories → Clock, Language, and Region → Change Display Language → (Region and Language) Management → (Language for Non-Unicode Programs) Change System Regional Settings → Chinese (Simplified, China) → Restart. Control Panel, change the view mode in the upper right corner to "Category", Clock, Language and Region, change
 How to center images in html web pages
Apr 05, 2024 pm 12:18 PM
How to center images in html web pages
Apr 05, 2024 pm 12:18 PM
In HTML, there are two ways to center-align an image: use CSS: margin: 0 auto; to center the image horizontally, and display: block; to make it occupy the entire width. Use the HTML: <center> element to center the image horizontally, but it is less flexible and does not comply with the latest web standards.
 How to adjust text position in dreamweaver
Apr 09, 2024 am 02:24 AM
How to adjust text position in dreamweaver
Apr 09, 2024 am 02:24 AM
Adjusting the text position in Dreamweaver can be completed by the following steps: Select the text and use the text position adjuster to make horizontal adjustments: left alignment, right alignment, center alignment; 2. Make vertical adjustments: top alignment, bottom alignment, vertical center; 3. Press Shift key and use the arrow keys to fine-tune the position; 4. Use shortcut keys to quickly align: left alignment (Ctrl/Cmd + L), right alignment (Ctrl/Cmd + R), center alignment (Ctrl/Cmd + C).
 How to create a QR code using wps
Mar 28, 2024 am 09:41 AM
How to create a QR code using wps
Mar 28, 2024 am 09:41 AM
1. Open the software and enter the wps text operation interface. 2. Find the insert option in this interface. 3. Click the Insert option and find the QR code option in its editing tool area. 4. Click the QR code option to pop up the QR code dialog box. 5. Select the text option on the left and enter our information in the text box. 6. On the right side, you can set the shape of the QR code and the color of the QR code.
 How to center the text box in html
Apr 22, 2024 am 10:33 AM
How to center the text box in html
Apr 22, 2024 am 10:33 AM
There are many ways to center the HTML text box: text input box: use the CSS code input[type="text"] { text-align: center; } text area: use the CSS code textarea { text-align: center; } horizontal centering: Use the text-align: center style on the text box parent element to center it vertically: use the vertical-align attribute input[type="text"] { vertical-align: middle; }Flexbox: use display:
 How to center ul content in css
Apr 26, 2024 pm 12:24 PM
How to center ul content in css
Apr 26, 2024 pm 12:24 PM
Center UL content in CSS: Use the text-align property: Set the alignment of text, including the content of list items. Use the margin attribute: Set the left and right margins of the element, and use margin: auto to achieve horizontal centering. Use the display attribute: Set the element to inline-block, then center it vertically using text-align: center. Use flexbox properties: Horizontal and vertical centering through justify-content: center and align-items: center.
 How to center the font in sublime
Apr 03, 2024 am 10:21 AM
How to center the font in sublime
Apr 03, 2024 am 10:21 AM
Methods to align text in Sublime Text include: using shortcut keys (paragraph: Ctrl + Alt + C, single line: Ctrl + Alt + E), using the "Align" option on the menu bar, and installing alignment plug-ins (such as AlignTab, Alignment Plugin ), or manual alignment (centered: fills spaces, justified: creates borders).
 How to change the shape of the text box in wps_Introduction to the method of changing the shape of the text box in wps
Mar 28, 2024 am 08:10 AM
How to change the shape of the text box in wps_Introduction to the method of changing the shape of the text box in wps
Mar 28, 2024 am 08:10 AM
1. For example, you want to change the shape of the text box in the wps picture below. 2. First click the right mouse button on the border of the text box. 3. Point the mouse to [Change Shape] in the right-click menu. 4. A submenu will pop up with various alternative shapes. Click the mouse on the shape you want to change. 5. After clicking the mouse, the shape of the text box changes. 6. You can also select the text box and click the [Drawing Tools] tab of wps (this tab will appear only after the text box is selected). 7. Click [Edit Shape] as shown in the drawing tools tab. There is also a [Change Shape] submenu in the drop-down menu.
