Introduction to how to open WPS2019 spell check
php editor Yuzai introduces to you how to open WPS2019 spell check. When using WPS2019, spell check is a very practical function that helps to check and correct spelling errors and improve document quality. To turn on the spell check function, you only need a few simple steps to make your documents more standardized and professional. Next, we will introduce in detail how to open WPS2019 spell check so that you can easily master it.
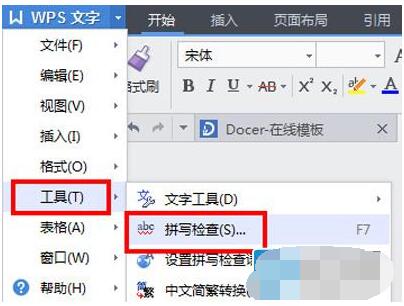
1. First open WPS, select WPS Text--Options, enter the settings page or click the drop-down [Tools] to select spelling check.
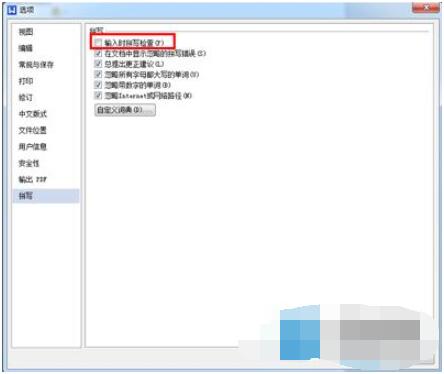
2. Then set the page options spelling tab. In the Spelling tab, select Check spelling as you type.
At this time, there will be no spelling error prompts when we type again. If we want to check, press and hold F7 to enter the spelling check option.
The above is the detailed content of Introduction to how to open WPS2019 spell check. For more information, please follow other related articles on the PHP Chinese website!

Hot AI Tools

Undresser.AI Undress
AI-powered app for creating realistic nude photos

AI Clothes Remover
Online AI tool for removing clothes from photos.

Undress AI Tool
Undress images for free

Clothoff.io
AI clothes remover

AI Hentai Generator
Generate AI Hentai for free.

Hot Article

Hot Tools

Notepad++7.3.1
Easy-to-use and free code editor

SublimeText3 Chinese version
Chinese version, very easy to use

Zend Studio 13.0.1
Powerful PHP integrated development environment

Dreamweaver CS6
Visual web development tools

SublimeText3 Mac version
God-level code editing software (SublimeText3)

Hot Topics


1. As shown in the picture below, after we open a WPS text software, we cannot see the required toolbar or ribbon. This is because we have hidden it. 2. Solution 1: We first click the Show/Hide Ribbon button in the upper right corner of the menu bar to hide or show the ribbon. 3. Click this button to display the ribbon. 4. Method 2: When the ribbon is hidden, we can place the mouse on the name of the ribbon, such as Start and Insert, to display the hidden ribbon. 5. But if we move the mouse to the editing area and do not move the mouse for a long time, as shown in the figure below, the ribbon will automatically hide again. This is because we have turned on the automatic hiding/showing function. 6. At this point we need to click the interface settings button in the upper right corner first. 7. Then click the drop-down menu

1. Open wps2019 and enter the business card information you want to edit. 2. Then click the [Page Layout] menu item in the wps2019 menu bar. 3. Next, find the expand button of [Page Settings] on the toolbar of the opened page layout. 4. The page setup window will pop up. In the window, set all page margins to 05. Next, click the [Paper] tab in the page setup window that opens. 6. Then click the Paper Size drop-down button and select the [Custom Size] menu item in the pop-up menu. 7. Next we set the width to 9 cm and the height to 5.4 cm, and finally click the OK button. 8. The business card has been set up here. Just print it out.

1. In the main interface of the opened wps2019 software, click the [Insert] menu in the menu bar. 2. On the open insertion toolbar, find the [Symbol] icon. 3. In the pop-up symbol drop-down menu, click the [Other Symbols] menu item. 4. The symbol window of wps2019 will pop up. Click the [Math Operator] menu item in the window. 5. In the opened mathematical operator window, click the [Approximately equal to] button, and finally click the OK button. 6. At this time, you can see the inserted approximately equal symbol in the editing area of wps2019.

1. Open wps2019 and click the [Insert] menu item on the main interface of wps2019. 2. Click the drop-down button of [Picture] on the open insertion toolbar, and then select the picture to be inserted in the pop-up menu. 3. Return to the wps2019 document editing area, and you can see and select the inserted picture. 4. At this time, click the [Picture Tools] menu item on the wps2019 menu bar. 5. Click the [Picture Outline] button on the toolbar of the opened picture tool. 6. Return to the editing area of wps2019, and you can see that the outline has been added to the picture.

1. After opening wps2019, click the [wps] menu in the upper left corner. 2. In the newly opened page, find and click the [Settings] button in the upper right corner. 3. In the settings drop-down menu that opens, click the [Configuration and Repair Tools] menu item. 4. The wpsOffice configuration tool window will open. Click the [Advanced] button in the window. 5. In the opened wpsOffice configuration tool window, click the [Upgrade Settings] option. 6. In the upgrade settings window that opens, click the [Turn off automatic upgrade] option.

How to enable enhanced spell check in Google Chrome? Turning on the spell checker can check whether there are any errors when we type and improve our typing efficiency. It is a very useful tool. Some friends may not know how to turn on this setting. Here are the specific solutions to this problem. In this article, experts teach you how to turn on the enhanced spell check of Google Chrome. Experts teach you how to turn on the enhanced spell check of Google Chrome 1. In the first step, we click to open Google Chrome on the computer, and then open the "Customize and Control Google Chrome" option in the upper right corner of the browser page (as shown in the picture) ) 2. In the second step, in the drop-down list of the "Customize and control Google Chrome" option, we find

1. First, we see the following document. All the documents we have opened are displayed at the top, and they are displayed side by side in the form. 2. At this time, we click the side-by-side comparison option under the toolbar view. 3. A dialog box for side-by-side windows pops up. Select which document the current window will be compared with. Here we select document 4 and click OK. 4. In this way, we see that the two documents have been displayed in one window, but there is another problem, that is, we can only slide the interface in one window. What should we do? . 5. If you want to achieve synchronous sliding, click the synchronous sliding option next to side-by-side comparison. Click to make the text of the two documents slide at the same time when you pull the mouse.

1. Open wps2019 and click New. 2. Select the text and click New Blank Document. 3. Enter the content. 4. Click Page Layout on the toolbar. 5. Select columns. 6. Under the columns, you can see column one, column two and column three. We just click on column three.
