

How to remove desktop memory module

How to remove the memory module
1. The following demonstrates the specific steps to remove the memory module from a desktop computer: Shut down the computer and unplug all the cords behind the main chassis. , be sure to prevent electric shock. If you have an anti-static bracelet, it is best to wear it. Next, use a Phillips screwdriver to unscrew the two fixing screws on the right side panel in a counterclockwise direction.
2. Place the main case flat on the ground. You can see two small strips next to the CPU fan. These are the memory strips. Peel the memory module clips on both sides to both sides, and then pull out the memory module to replace it with a larger memory module.
3. Remove the memory from the desktop: separate the white buckles on both sides outwards and pull up the memory. Generally, if the computer is not turned on for a month, the memory will not be damaged. However, the computer cannot be turned on and the memory is abnormally large. At this time, you can pull out the memory, use a rubber to rub the golden finger part, and then put it back into the memory slot.
4. The steps to remove the memory module from a desktop computer are as follows: Turn off the computer and unplug the power plug to ensure safety. To open the case, you usually need to unscrew or press a release trigger to open the case lid. Locate the memory slot, generally located above the motherboard, which can be found through the motherboard manual or logo.
5. Pull out the memory stick first, and be careful when pulling it out. After pulling it out, use an eraser to slowly wipe its golden part, which is the gold finger. It is also recommended to clean the dust in the memory slot.
How to remove the memory module
1. Remove the host cover and insert it into the memory slot of the motherboard, generally perpendicular to the motherboard.
2. The method of disassembling the memory module is as follows: Place the memory flat on the table and observe the memory. There is a groove in the middle of the memory interface part. One side of the groove is obviously longer than the other side. Gently open the latches on both sides of the motherboard's memory slot. Match the groove of the memory to the protrusion of the memory slot on the motherboard, and place the memory into the slot.
3. Shut down the power supply, unplug the power supply, mouse and other devices! ! Generally, the memory of a notebook is on the back. Find the location of the memory module as shown in the figure. As shown in the picture, a Phillips screwdriver is used here to remove the memory cover. (Pay attention to the cover and the bayonet.) As shown in the picture, there are elastic cards on both sides of the memory.
4. The method of disassembling and installing the computer memory module is as follows: Pull out the computer main case and observe that there are simple screws on the back of the case. There are 2 in total, top and bottom. We unscrew them. After unscrewing the screws, hold down the chassis cover and push it to the left, and the main chassis cover will be removed.
5. The steps to remove the notebook memory module are as follows: Shut down the power supply, unplug the power supply, mouse and other devices. Generally, the memory of notebooks is on the back. Find the location of the memory stick. A Phillips screwdriver is used here to remove the memory cover. (Pay attention to the cover and the bayonet) There are elastic cards on both sides of the memory.
6. Generally, computer motherboards have at least two memory slots. If you only use one and there are free slots, you can keep the original memory stick and just insert the new memory stick into the free slot. groove.
How to remove the host memory module
1. Shut down the computer and unplug all the cords behind the host case. Be sure to prevent electric shock. If you have an anti-static bracelet, it is best to wear it. Next, use a Phillips screwdriver to unscrew the two fixing screws on the right side panel in a counterclockwise direction. After tightening, gently pull the panel downward to remove the panel.
2. Pull out the computer main case and observe that there are simple screws on the back of the case. There are 2 in total on the top and bottom. We will unscrew it. After unscrewing the screws, hold down the chassis cover and push it to the left, and the main chassis cover will be removed.
3. The steps to remove the memory module from a desktop computer are as follows: Turn off the computer and unplug the power plug to ensure safety. To open the case, you usually need to unscrew or press a release trigger to open the case lid. Locate the memory slot, usually located above the motherboard, which can be found through the motherboard manual or logo.
4. Pull out the memory stick first, and be careful when pulling it out. After pulling it out, use an eraser to slowly wipe its golden part, which is the gold finger. It is also recommended to clean the dust in the memory slot.
5. The location of the computer's memory module: Remove the host cover and place it in the memory slot of the motherboard, generally perpendicular to the motherboard.
6. Do you want to ask "How to remove the memory module of Lenovo computer"? First, use screws to remove the protective cover of the hard disk and memory. Because the hard drive and memory need to be easily removable, there is a separate protective cover without having to disassemble the entire machine. Let’s talk about laptop memory. Laptop memory is asymmetrical and has a groove on the left.
How to remove the memory module from a desktop computer
1. The steps to remove the memory module from a desktop computer are as follows: Turn off the computer and unplug the power plug to ensure safety. To open the case, you usually need to unscrew or press a release trigger to open the case lid. Locate the memory slot, usually located above the motherboard, which can be found through the motherboard manual or logo.
2. Pull out the computer main case and observe that there are simple screws on the back of the case. There are 2 in total on the top and bottom. We will unscrew it. After unscrewing the screws, hold down the chassis cover and push it to the left, and the main chassis cover will be removed.
3. But you can find the computer host memory module through the following steps: First, turn off the computer and unplug the power cord. To open the computer case, you usually need to remove the left panel of the case. Find the memory slots on the motherboard, they are usually in a row and usually consist of two or even four slots.
4. The specific steps are as follows: First, observe the memory stick. There is a groove in the gold finger part of the memory stick. One side of the groove is obviously longer than the other side.
5. How to remove the memory module from a desktop computer: 1. Separate the buckles on both sides outward; 2. Pull out the memory module upwards. When disassembling and assembling, be careful not to damage the electronic components and solder joints on the memory module.
6. Taking Apple as an example, the method to remove the memory stick from an all-in-one machine is: dismantle the machine. When you press the clip, it will spring up and become loose. Then take the memory stick down, take out the original memory and replace it with a memory with a larger capacity. All-in-one machines are divided into photocopying all-in-one machines and computer all-in-one machines.
How to remove the memory module from a desktop computer
Pull out the main computer case and observe that there will be simple screws on the back of the case. There are 2 in total on the top and bottom. We will unscrew them. After unscrewing the screws, hold down the chassis cover and push it to the left, and the main chassis cover will be removed.
The steps to remove the memory module from a desktop computer are as follows: Turn off the computer and unplug the power plug to ensure safety. To open the case, you usually need to unscrew or press a release trigger to open the case lid. Locate the memory slot, usually located above the motherboard, which can be found through the motherboard manual or logo.
But you can find the computer host memory module by following these steps: First, turn off the computer and unplug the power cord. To open the computer case, you usually need to remove the left panel of the case. Find the memory slots on the motherboard, they are usually in a row and usually consist of two or even four slots.
The above is the detailed content of How to remove desktop memory module. For more information, please follow other related articles on the PHP Chinese website!

Hot AI Tools

Undresser.AI Undress
AI-powered app for creating realistic nude photos

AI Clothes Remover
Online AI tool for removing clothes from photos.

Undress AI Tool
Undress images for free

Clothoff.io
AI clothes remover

AI Hentai Generator
Generate AI Hentai for free.

Hot Article
Hot Tools

Notepad++7.3.1
Easy-to-use and free code editor

SublimeText3 Chinese version
Chinese version, very easy to use

Zend Studio 13.0.1
Powerful PHP integrated development environment

Dreamweaver CS6
Visual web development tools

SublimeText3 Mac version
God-level code editing software (SublimeText3)
Hot Topics
 1382
1382
 52
52

 Laptop has mouse arrows but black screen
Apr 10, 2024 pm 01:20 PM
Laptop has mouse arrows but black screen
Apr 10, 2024 pm 01:20 PM
After turning on the laptop, the screen goes black and there is nothing on the desktop. There is no icon, only a mouse arrow... Damage to the picture tube or line output circuit. Failure of the picture tube or line output circuit will also cause a black screen without raster when the monitor is powered on. It is also the main cause of a black screen after the notebook is turned on. Sometimes the inability to boot is caused by a short circuit in some components, such as external USB devices, keyboards, mice, or power adapters. Try unplugging these devices and booting with only the battery installed to see if you can enter the BIOS. some type of. A black screen may occur when the computer starts up because the motherboard, monitor and graphics card in the computer are damaged, or the computer configuration is too old. This phenomenon may also occur. Most of the reasons are caused by process errors.
 Lenovo laptop keeps black screen
Mar 19, 2024 am 11:20 AM
Lenovo laptop keeps black screen
Mar 19, 2024 am 11:20 AM
What to do if your Lenovo laptop has a black screen 1. When your Lenovo laptop has a black screen problem, you can try the following solutions: Check the power adapter and battery: Make sure the power adapter is connected properly and the battery is not exhausted. Try removing the battery and relying solely on the power adapter for power, then try starting again. 2. The reason and solution for the black screen of Lenovo laptop that cannot be turned on: The motherboard is not powered on. 3. The Lenovo laptop’s power-on button is on but the screen is black. If you encounter the situation where the Lenovo laptop’s power-on button is on but the screen is black, you can remove the battery on the back of the laptop, connect the computer to the power adapter only, and try to power it on once. If it boots normally, the battery is in contact. Caused by defective or battery failure. 4. The first reason is that the laptop’s power adapter is damaged and cannot be connected.
 Can I log in to two WeChat accounts on my computer?
Feb 18, 2024 am 09:54 AM
Can I log in to two WeChat accounts on my computer?
Feb 18, 2024 am 09:54 AM
Can a computer log in to two WeChat IDs? 1. A computer can log in to two WeChat IDs. You can use the web version and PC version to log in. The operation method is as follows. Equipment: Lenovo computer System: Windows 10 Software: Google Chrome, WeChat version 51 First open the browser, then search on Baidu and click to enter. 2. You can log in to two WeChat IDs on your computer. First download the PC version of WeChat and install it. Find the "WeChat" shortcut icon on the desktop, right-click to display the "Menu", and select the last "Properties" option. 3. The computer can log in to two WeChat IDs. Take the Windows 7 operating system and WeChat version 0.0.47 as an example. 4. Later, WeChat became available on the computer, and many friends found that they could only log in to one WeChat account on their computer, which was very uncomfortable.
 Huawei mobile phone USB sharing network to computer
May 08, 2024 am 08:25 AM
Huawei mobile phone USB sharing network to computer
May 08, 2024 am 08:25 AM
How to connect a Huawei phone to a computer via USB to access the Internet. First, we open the phone settings and search for "HDB". Then we click to open "Mobile Network Sharing" in More. Then we can click to open "USB Sharing Network" in the pop-up window. Summary First, connect the Huawei mobile phone to the computer through the data cable. Open "Settings" on your phone and enter the settings interface. Click "Personal Hotspot", select "USB tethering" and click the switch button at the back to turn it on. First click "Settings About Phone", then click "Version Number" 7 times in succession. You will be prompted to enter developer mode. Then return to the "Settings" list, "Developer Options" will appear, then click to enter "Developer Options", turn on the "USB Debugging" switch, and click
 How to turn off the monitor on a laptop
Mar 24, 2024 am 10:01 AM
How to turn off the monitor on a laptop
Mar 24, 2024 am 10:01 AM
How to turn off the laptop screen and enter the computer, select the start icon in the lower left corner. Find and click to enter the settings option. In the settings interface, select the first one and go to system options. Click to enter the power and sleep options, then turn on the sleep screen and set the time. Question 1: How to turn off the screen on a laptop? Right-click the power icon in the lower right corner of the screen, and then select "Power Options" to enter the power options setting window. (The settings window can also be opened through "Control Panel → Power Options"), and then click "Choose when to turn off the display." Which key on the computer is to pause the screen: The shortcut key to pause the computer screen is "Win+L". When pressed, the computer will pause the screen. How to turn off the screen of Lenovo notebook thinkpad 1. The shortcut key to turn off the computer screen is to press windows at the same time.
 How to enter motherboard bios
Feb 22, 2024 am 09:01 AM
How to enter motherboard bios
Feb 22, 2024 am 09:01 AM
How to enter the BIOS settings of the computer. The method to enter the BIOS settings of the computer is: press the F2 key when the computer is turned on. The specific operation process is as follows: Find the power button on the computer keyboard and press it to turn on the computer. Then click to enter the boot program and load the boot animation. After that, find the F2 key on the keyboard and press the F2 key. You can enter the BIOS interface by pressing the DELETE key or the F1F2 key when turning on the computer power. Taking a Lenovo computer as an example, the operation method is as follows: When turning on the computer power, press and hold the F2 key on the Lenovo computer. At this time, you can see on the computer screen that you have entered the BIOS interface, and all you can see are English letters. There will be a screen prompt shortly after booting, then press F2 as prompted.
 Lenovo computer bios universal password
Apr 30, 2024 am 10:49 AM
Lenovo computer bios universal password
Apr 30, 2024 am 10:49 AM
How to set the bios password of Lenovo computer 1. First, we press f2 to enter the bios and switch to the security menu item. Then we use the up and down arrow keys to select the password option and press the Enter key to enter. Disabled means that the bios super administrator password is not currently set. If enabled, it means that the bios password has been set. 2. The first step is to enter the bios interface. After booting, press F12 immediately to enter the bios startup interface. In this computer information menu bar, you can see main hardware information such as computer model, BIOS version, CPU, memory, hard disk, optical drive, etc. Step 2: Press the right arrow key → on the keyboard to enter the hardware configuration settings. 3. Insert the USB flash drive into the computer, and then
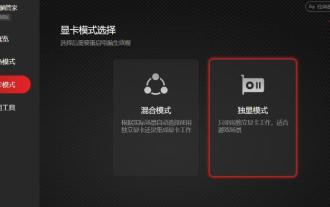 How to switch graphics card mode on Lenovo Rescuer? How to switch to independent graphics mode on Lenovo Savior
Mar 16, 2024 pm 04:37 PM
How to switch graphics card mode on Lenovo Rescuer? How to switch to independent graphics mode on Lenovo Savior
Mar 16, 2024 pm 04:37 PM
Lenovo Savior is a very powerful laptop. This computer is equipped with two graphics processors. Many players switch to independent graphics card mode in order to have better performance when playing games. So how do they switch? Users can directly open Lenovo Computer Manager to set up. Let this site carefully introduce to users the switching method of Lenovo Savior’s independent graphics mode. How to switch the Lenovo Savior independent graphics mode. To switch the graphics card mode, you must restart the computer after each switch under the system. 1. Lenovo Computer Manager: Open Lenovo Computer Manager (switch to game mode in the upper right corner) → select the graphics card mode → you can perform mixed mode (dual graphics card switching) and independent graphics mode (direct graphics card connection). 2.Leno
