 System Tutorial
 Windows Series
 How to solve the problem that the WIN10 notebook is connected to the charger but does not show the connection
How to solve the problem that the WIN10 notebook is connected to the charger but does not show the connection
Since the WIN10 notebook is connected to the charger but does not show the connection status, it may be due to device problems or system settings. First, check if the charger and power cord are intact, then try changing to another power outlet. If the problem is still not resolved, you can try restarting the notebook or updating the system driver. If it still doesn't work, it is recommended to go to the relevant maintenance point to check whether the equipment is damaged. Hope the above method is helpful to you. If you need to know more technical information, please pay attention to more practical information provided by PHP editor Yuzai.
1. First, right-click the battery symbol in the lower right corner of the computer.
2. In the pop-up interface, click Power Options.

3. In the pop-up interface, click Change Plan Settings.

4. Then click Change Advanced Power Settings.
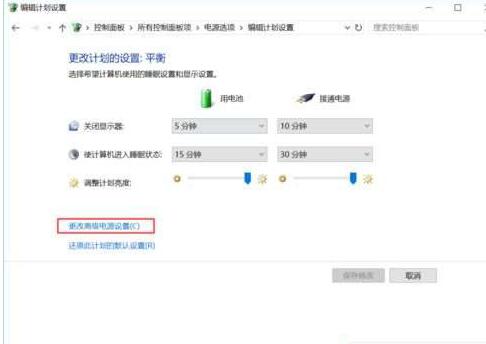
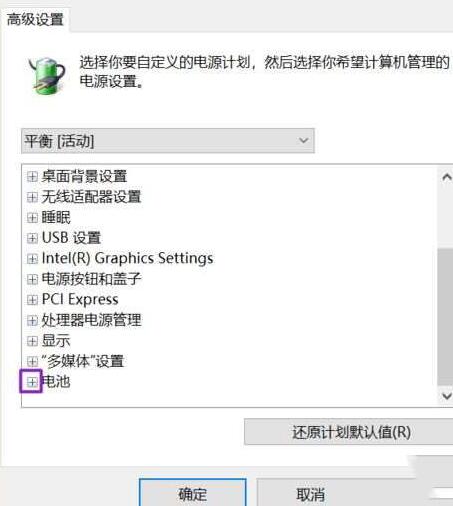
5. In the pop-up interface, find the battery and click the symbol next to it.
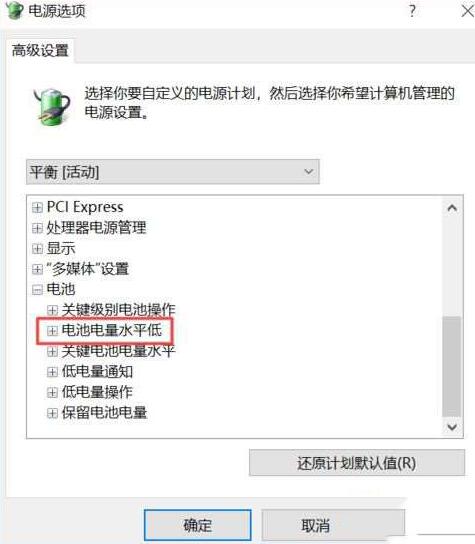
6. In the pop-up interface, click the symbol next to the low battery level.
7. In the pop-up interface, click to turn on the power.
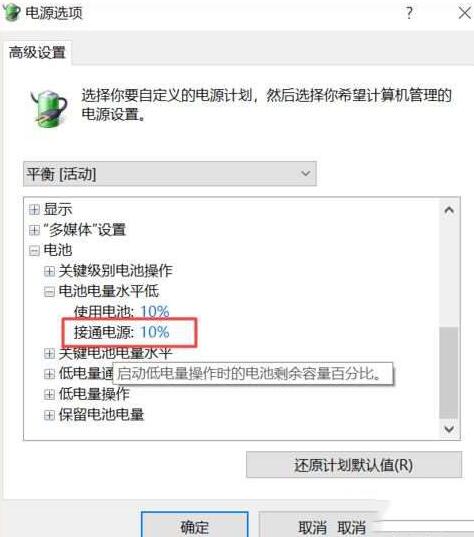
8. Change the value inside to 80.
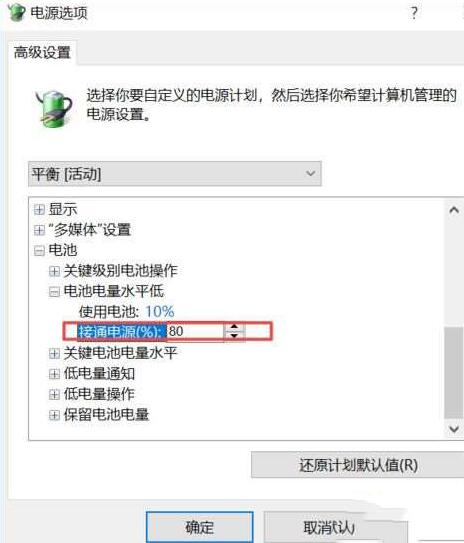
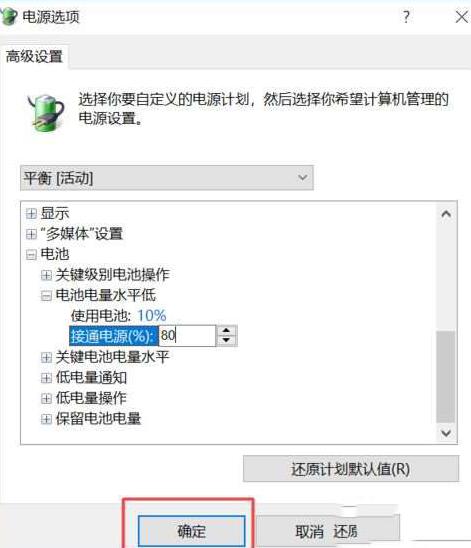
9. Finally, click OK, and then the battery will be connected to the power source when it has 80% power.
The above is the detailed content of How to solve the problem that the WIN10 notebook is connected to the charger but does not show the connection. For more information, please follow other related articles on the PHP Chinese website!

Hot AI Tools

Undresser.AI Undress
AI-powered app for creating realistic nude photos

AI Clothes Remover
Online AI tool for removing clothes from photos.

Undress AI Tool
Undress images for free

Clothoff.io
AI clothes remover

AI Hentai Generator
Generate AI Hentai for free.

Hot Article

Hot Tools

Notepad++7.3.1
Easy-to-use and free code editor

SublimeText3 Chinese version
Chinese version, very easy to use

Zend Studio 13.0.1
Powerful PHP integrated development environment

Dreamweaver CS6
Visual web development tools

SublimeText3 Mac version
God-level code editing software (SublimeText3)

Hot Topics
 System Restore prompts that you must enable system protection on this drive
Jun 19, 2024 pm 12:23 PM
The computer has a restore point, and when the system is restored, it prompts "You must enable system protection on this drive." This usually means that the system protection function is not turned on. System protection is a feature provided by the Windows operating system that can create system restore points to back up system files and settings. That way, if something goes wrong, you can revert to a previous state. When the system fails and you cannot enter the desktop to start it, you can only try the following method: Troubleshooting-Advanced Options-Command Prompt Command 1 netstartvssrstrui.exe/offline:C:\windows=active Command 2 cd%windir%\system32 \configrenSYSTEMsy
 Acer laptop disables secure boot and removes password in Bios
Jun 19, 2024 am 06:49 AM
I repaired an Acer laptop and had to turn off secure boot when entering PE. I recorded how to turn off secure boot and remove the password from Bios. Turn on the computer and when the screen is not on, keep pressing the F2 key to enter the BIOS. On Acer laptops, turn off Secure Boot and press the arrow keys to switch to Boot. If SecureBoot is gray and unclickable, switch to the Security page, select SetSupervisorPassword and press Enter to set the password. Then switch to Boot, SecureBoot can be selected as Disabled, and press F10 to save. Modify and clear the BIOS password on your Acer notebook. Switch to the Security menu and select SetSupervisorPasswo.
 What should I do if win10 does not switch users? Win10 login interface does not have the option to switch users. Solution
Jun 25, 2024 pm 05:21 PM
A problem that Windows 10 users may encounter is that they cannot find the switch user option on the login interface. So what should I do if there is no switch user option on the win10 login interface? Let this site give users a detailed explanation of the problem of not switching user options in the win10 login interface. Detailed solution to the problem of switching user options on the Win10 login interface: Check user account settings: First, make sure you have multiple user accounts on your computer and that these accounts are enabled. You can check and enable the account by following these steps: a. Press Win+I keys to open Settings and select "Accounts". b. Select "Family & Others" or &ld in the left navigation bar
 Dell computer factory reset, dell laptop restores factory settings
Jun 19, 2024 am 04:34 AM
The following introduces the factory reset that comes with DELL notebooks. It restores factory settings. After the reset, the computer is restored to the state when you first bought it. It requires that the hard disk has not been partitioned and the recovery partition has not been damaged. 1. Restart the computer and keep clicking the F12 key on the keyboard until the following interface appears; 2. Select "SupportAssistOSRecovery" and click "EXIT"; 3. Click "Skip" here, or click step-by-step guidance, and there will be Introduction instructions; 4. In this interface, in the lower right corner, click "Start Reset"; 5. Select "Reset to Factory Settings" and click Next; (If you choose "Reset and Update", the network speed is not fast, it will take a long time, You also need to install the driver yourself) 6. If there is important data, select "Yes, back up my files".
 Windows cannot start the Windows Audio service Error 0x80070005
Jun 19, 2024 pm 01:08 PM
The guy's computer appears: Windows cannot start the WindowsAudio service (located on the local computer). Error 0x8007005: Access denied. This situation is usually caused by user permissions. You can try the following methods to fix it. Method 1: Modify the registry to add permissions through batch processing, create a new text document on the desktop, save it as .bat, and right-click the administrator to go far. Echo==========================EchoProcessingRegistryPermission.Pleasewait...Echo================== ========subinacl/subkey
 What to do if the Win10 Task Manager crashes? How to fix the Win10 Task Manager crash?
Jun 25, 2024 pm 04:31 PM
Hello everyone, have you ever encountered the situation where the Windows 10 Task Manager keeps crashing? This function helps us a lot, allowing us to quickly see all running tasks, which is very convenient to use, right? However, some friends said that they encountered this problem and didn’t know how to solve it, so let me share with you the specific solution! Solution to Win10 Task Manager crash 1. First, press and hold the "Win" + "R" keys on the keyboard to open Run, enter "regedit" and press the Enter key. 2. Expand the folders and find "HKEY_CURRENT_USERSoftwareMicros
 What should I do if my Win10 password does not meet the password policy requirements? What to do if my computer password does not meet the policy requirements?
Jun 25, 2024 pm 04:59 PM
In the Windows 10 system, the password policy is a set of security rules to ensure that the passwords set by users meet certain strength and complexity requirements. If the system prompts that your password does not meet the password policy requirements, it usually means that your password does not meet the requirements set by Microsoft. standards for complexity, length, or character types, so how can this be avoided? Users can directly find the password policy under the local computer policy to perform operations. Let’s take a look below. Solutions that do not comply with password policy specifications: Change the password length: According to the password policy requirements, we can try to increase the length of the password, such as changing the original 6-digit password to 8-digit or longer. Add special characters: Password policies often require special characters such as @, #, $, etc. I
 ASUS Lingyao 16 Air notebook goes on sale in China: 1.1cm thick, Ryzen AI 9 HX370, starting from 12,999 yuan
Jul 28, 2024 pm 06:00 PM
According to news from this site on July 28, the Chinese version of the Asus Lingyao 16Air notebook is now on sale, equipped with AMD Ryzen AI9HX370 processor, and the 32GB+1TB version is priced at 12,999 yuan. In terms of appearance, the Lingyao 16 Air notebook is made of Ceraluminum high-tech ceramic aluminum material and CNC technology. It is available in two colors: snowy white and mountain gray. It is about 1.1cm thick and weighs 1.49kg. Lingyao 16Air is equipped with the new AMD Ryzen AI9HX370 processor, equipped with 12C24TZen5 core, 16CURDNA3.5 architecture Radeon890M core display, and the NPU computing power reaches 50TOPS. This computer is also equipped with a dual-fan VC vapor chamber cooling system that can provide 28W


