

What to do if automatic repair occurs on your computer


What should I do if startup repair occurs on my desktop computer?
1. Wait for the automatic repair to complete: Sometimes the computer takes some time to complete the automatic repair operation. You can wait for a while. See if automatic repair can be completed. Restart the computer: Some faults may be temporary and may be repaired automatically after restarting the computer.
2. First try to use the automatic repair tool that comes with Windows to repair the system. The specific steps are as follows: - Restart the computer and follow the on-screen instructions to enter the Advanced Startup Options menu. - In the Advanced Startup Options menu, select Troubleshooting, and then click Advanced Options.
3. Try restarting the computer. Sometimes the computer automatically fixes the problem on startup, which can take a while. Enter safe mode. Press the F8 key and select "Safe Mode" in the advanced boot options. This will start the computer's basic drivers and enable you to check for problems. Run a virus scanner.
4. You can press and hold the power button until the machine is powered off, then turn it on again, then power off again, repeat 3-5 times until it enters the recovery mode as shown below. ② From the Select Options screen, tap or click Troubleshooting ③ Tap or click Advanced Options, and then tap or click Automatic Repair.
5. When the computer restarts, enter safe mode to solve this problem. Enter safe mode when booting, select "Last Known Good Configuration" and press Enter to repair. After entering safe mode, we can use the system restore that comes with the system to restore the system to the last time you made a normal backup.
6. Restart the computer, then press the F8 key during startup to enter the menu. Select options in the boot menu and click to enter. Click on the dialog box that opens.
What should I do if my computer keeps showing that it is preparing for automatic repair?
Enter safe mode: When the computer is turned on, press the F8 key and choose to enter safe mode to try to repair system problems. Perform a disk check: Enter the chkdsk r command at the command prompt, which scans and repairs errors and corruption on your hard drive.
The computer always shows that it is preparing for automatic repair. The solution is as follows: It may be caused by the computer suddenly shutting down or getting stuck before shutting down, causing disk damage. Generally, startup repair is related to improper operations before shutting down, such as : Caused by card lag caused by playing games, watching videos, operating large objects, and using the computer for a long time.
Wait for the automatic repair to complete: Sometimes the computer takes some time to complete the automatic repair operation. You can wait for a while to see if the automatic repair can be completed. Restart the computer: Some faults may be temporary and may be repaired automatically after restarting the computer. To resolve these issues, you can first try restarting your computer.
Solution Try pressing the power button to turn off the computer and then start it again. If the problem persists, you can try entering safe mode and performing a system restore to restore the operating system to a previously working state.
Try to start the computer using the safe mode of Windows system, which can help you determine whether the problem is related to hardware or software drivers. While booting, you need to hold down the "F8" key and then select the "Safe Mode" option. Try to use the "System Recovery" function of Windows system to repair it.
What should I do if my computer keeps repairing automatically?
Wait for the automatic repair to complete: Sometimes the computer needs some time to complete the automatic repair operation. You can wait for a while to see if the automatic repair can be completed. Restart the computer: Some faults may be temporary and may be repaired automatically after restarting the computer.
If there is a problem with the computer hardware, such as a damaged hard disk or insufficient memory, it may cause the computer to automatically repair problems. Users can try to replug the hardware device or replace it with a new one. If the problem is not solved, further diagnosis and repair are required. The second step is to check whether the computer is infected with viruses.
First try to use the automatic repair tool that comes with Windows to repair the system. The specific steps are as follows: - Restart the computer and follow the on-screen instructions to enter the Advanced Startup Options menu. - In the Advanced Startup Options menu, select Troubleshooting, and then click Advanced Options.
Solution Try pressing the power button to turn off the computer and then start it again. If the problem persists, you can try entering safe mode and performing a system restore to restore the operating system to a previously working state.
Steps: 1. Enter safe mode and remove the recently installed driver software. ① Boot into WinRE (Windows Recovery Environment), which can be understood as recovery mode.
Here are some possible solutions: Wait for the automatic repair to complete: If the system is undergoing automatic repair, you can wait for a while to see if the system can repair itself and start normally. Start in safe mode: You can try starting your computer in safe mode.
How to solve the problem of automatic repair when the computer starts up
1. Wait for the automatic repair to be completed: Sometimes the computer needs some time to complete the automatic repair operation. You can wait for a while to see if the automatic repair can be completed. Restart the computer: Some faults may be temporary and may be repaired automatically after restarting the computer.
2. You can press and hold the power button until the machine is powered off, then turn it on again, then power off again, repeat 3-5 times until it enters the recovery mode as shown below. ② From the Select Options screen, please tap or click Troubleshooting ③ Please tap or click Advanced Options, and then tap or click Automatic Repair.
3. You can press and hold the power button until the machine is powered off, then turn it on again, then power off again, repeat 3-5 times until it enters the recovery mode as shown below. ② From the Select Options screen, tap or click Troubleshooting ③ Tap or click Advanced Options, and then tap or click Automatic Repair.
How to fix computer automatic repair
Method 1: Wait for automatic repair to complete When your computer automatically repairs, sometimes you only need to wait for a period of time for the repair to be completed automatically. This is most likely a self-diagnostic mechanism for the computer system to detect and repair problems with itself.
Use the repair function of Windows system. First try to use the automatic repair tool that comes with Windows to repair the system. The specific steps are as follows: - Restart the computer and follow the on-screen instructions to enter the Advanced Startup Options menu.
Wait for the automatic repair to complete: Sometimes the computer takes some time to complete the automatic repair operation. You can wait for a while to see if the automatic repair can be completed. Restart the computer: Some faults may be temporary and may be repaired automatically after restarting the computer.
If there is a problem with the computer hardware, such as a damaged hard disk or insufficient memory, it may cause the computer to automatically repair problems. Users can try to replug the hardware device or replace it with a new one. If the problem is not solved, further diagnosis and repair are required. The second step is to check whether the computer is infected with viruses.
Restart the computer. Generally, this problem may be caused by an abnormal shutdown. You can first try the option in the automatic repair interface to restart the computer. If you are still stuck on the automatic repair interface, proceed to the next step. Try to enter safe mode by selecting "Advanced Options" in the "Automatic Repair" interface to enter safe mode.
The above is the detailed content of What to do if automatic repair occurs on your computer. For more information, please follow other related articles on the PHP Chinese website!

Hot AI Tools

Undresser.AI Undress
AI-powered app for creating realistic nude photos

AI Clothes Remover
Online AI tool for removing clothes from photos.

Undress AI Tool
Undress images for free

Clothoff.io
AI clothes remover

AI Hentai Generator
Generate AI Hentai for free.

Hot Article
Hot Tools

Notepad++7.3.1
Easy-to-use and free code editor

SublimeText3 Chinese version
Chinese version, very easy to use

Zend Studio 13.0.1
Powerful PHP integrated development environment

Dreamweaver CS6
Visual web development tools

SublimeText3 Mac version
God-level code editing software (SublimeText3)
Hot Topics


 When I turn on the computer, it always stops at the motherboard logo screen. Nothing happens when I press anything, and I can't enter the bios?
Apr 23, 2024 am 09:13 AM
When I turn on the computer, it always stops at the motherboard logo screen. Nothing happens when I press anything, and I can't enter the bios?
Apr 23, 2024 am 09:13 AM
When I turn on the computer, it always stops at the motherboard logo screen. Nothing happens when I press anything, and I can't enter the bios? This is usually because the BIOS battery voltage is too low, and the system time has returned to the BIOS preset time, such as 2000.1.1, 00:00. You can use it after pressing F1 to enter the bios and set the time. Do not turn off the AC power after shutting down at night. Generally, the system time will not be lost when you turn on the computer the next day, and you can still enter the system normally. If the AC power is cut off, the battery voltage cannot sustain the power consumption of the bios, and the computer will be in the same state again the next day when it is turned on. Replacing the bios battery is the ultimate solution. Win11 is stuck on the motherboard logo interface when booting? 1. It is a problem with bios settings. We only need to find the corresponding setting items.
 Huawei phone freezes and the screen cannot move. Why?
Apr 10, 2024 am 09:40 AM
Huawei phone freezes and the screen cannot move. Why?
Apr 10, 2024 am 09:40 AM
If a Huawei phone suddenly freezes, there are generally two reasons: 1. System problems. If some incompatible software is installed on a Huawei phone, it may cause the phone to freeze. The solution is to force restart the phone. The specific operations are The method is to keep pressing the power button for 10 seconds until you see that the Huawei phone has restarted and then release the button. When we usually download software when using Huawei phones, try to download and install the software in Huawei's own mall. This can avoid system problems. Appear. 2. Motherboard problem. As a Huawei mobile phone repair practitioner, the editor found that most Huawei mobile phones are stuck on the HUAWEI startup interface when they are turned on. The mobile phones will restart from time to time, automatically enter the emergency recovery mode when they are turned on, and the mobile phones will have a black screen and will not turn on.
 Why can't Xiaohongshu reply to other people's comments be posted? What should I do if I can't reply to other people's comments?
Apr 27, 2024 pm 02:23 PM
Why can't Xiaohongshu reply to other people's comments be posted? What should I do if I can't reply to other people's comments?
Apr 27, 2024 pm 02:23 PM
On the social platform Xiaohongshu, the interaction between users is a reflection of the vitality of the platform. Sometimes users encounter problems being unable to send when replying to other people's comments. So, why can’t Xiaohongshu reply to other people’s comments and send them out? How to solve this situation? Next, I will answer these two questions in detail for you. 1. Why can’t Xiaohongshu reply to other people’s comments be posted? Xiaohongshu's failure to reply to other people's comments may be due to the following reasons: 1. Network problem: The network connection is unstable or the signal is poor, resulting in the failure to successfully send the comment. 2. Account problems: There may be abnormalities in the account, such as not logging in for a long time, illegal operations, etc., resulting in failure to send comments. 3. System problems: There may be system failures or maintenance on the Xiaohongshu platform, which affects the comment sending function. 4.Content
 The computer is starting up and preparing for automatic repair.
Apr 17, 2024 pm 09:30 PM
The computer is starting up and preparing for automatic repair.
Apr 17, 2024 pm 09:30 PM
The computer keeps showing that it is preparing for automatic repair. In summary, when the computer shows that it is preparing for automatic repair, it may be caused by damaged system files, hardware problems, or operating system update issues. Depending on the situation, you can wait for the system to automatically repair, check your hardware connections, or perform a system restore to resolve the issue. Automatic repair at startup may be related to improper operations you performed before shutting down, such as: playing games, watching videos, operating large things, using the computer for a long time, causing card lag, or downloading inappropriate things, or deleting the system. Files, or power outages, shutdowns, etc., failures will not occur for no reason. The operating system file is corrupted. When operating system files on your computer become corrupted or corrupted, your computer may attempt to initiate automatic repair to resolve the issue.
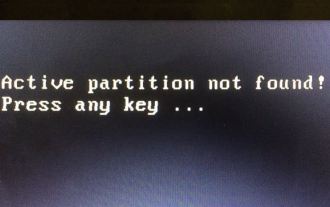 What should I do if the active partition cannot be found when the computer is turned on? Five solutions to the problem of no active partition in win10
Apr 11, 2024 pm 08:43 PM
What should I do if the active partition cannot be found when the computer is turned on? Five solutions to the problem of no active partition in win10
Apr 11, 2024 pm 08:43 PM
The active partition is the partition on the boot disk that contains the operating system and is used to boot the computer into Windows. And only one partition can be set as the active partition to start Windows. Therefore, if you encounter the error "Active partition not found, please press any key", you should consider the following possible reasons: The partition containing the boot file is inactive. The partition containing the operating system needs to be active so that your computer can boot. The master boot record disk is damaged. The MBR is a special type of boot sector at the beginning of the disk that contains critical information about booting the operating system. It plays an important role in Windows startup. The BIOS cannot detect the system disk. When you start your computer, the BIOS will
 Win7 network adapter is missing, how to restore it (methods and steps to solve the problem of Win7 network adapter disappearing)
Apr 23, 2024 pm 06:19 PM
Win7 network adapter is missing, how to restore it (methods and steps to solve the problem of Win7 network adapter disappearing)
Apr 23, 2024 pm 06:19 PM
But sometimes users may encounter the problem that the network adapter suddenly disappears. Win7 operating system is a widely used operating system, which brings great troubles to network connection and use. To help users quickly solve network connection problems, this article will introduce the methods and steps on how to restore the Win7 network adapter. 1. Check the network adapter in the device manager 2. Uninstall and reinstall the network adapter driver. Select, right-click the network adapter and "Uninstall Device" and then restart the computer and install the driver automatically, or go to the official website to download the latest driver and install it manually. . 3. Check whether the device is disabled. Search for "Network Connections" in the start menu, open it, right-click the wireless connection or Ethernet connection, and select "Enable" to ensure that the device has not been disabled.
 How to transfer computer C drive to D drive
Mar 30, 2024 am 10:30 AM
How to transfer computer C drive to D drive
Mar 30, 2024 am 10:30 AM
Use the following five steps to transfer the computer's C drive to the D drive to free up C drive space and optimize system performance: 1. Back up data; 2. Create a D drive system image; 3. Change the boot sequence; 4. Start the system image and restore C drive; 5. Reassign the drive letter. Note: Make sure the D drive has enough space, the whole process may take several hours.
 How to delete vbs virus in win7
Mar 26, 2024 pm 09:21 PM
How to delete vbs virus in win7
Mar 26, 2024 pm 09:21 PM
1. Click [Start → Run] and enter gpedit.msc. On the left side of the [Group Policy] window, click the [Computer Configuration → Windows Settings → Security Settings → Software Restriction Policy] item, and then click the [Action → Create New Policy] menu item. As shown in the picture: 2. Select [Other Rules] from the left. Right-click the blank space in the right pane and select the [New Path Rule] item in the menu. In the pop-up window, click the [Browse] button after [Path], select the wscript.exe file in the C: WindowsSystem32 folder, and set the [Security Level] to [Not Allowed]. Change C: System32, Dllcache and I386 under Windows
