

Enable nested virtualization on KVM on Centos7

Nested virtualization means configuring a virtualization environment within a virtual machine. In other words, we can say that nested virtualization is a feature of hypervisor that allows us to ) to install and run virtual machines within a virtual server using hardware acceleration. In this article, we will discuss how to enable nested virtualization on KVM on CentOS 7 / RHEL 7. I assume you have already configured the KVM hypervisor. If you are unfamiliar with how to install and configure the KVM hypervisor, please refer to the following article.
Install KVM hypervisor on CentOS 7.x and RHEL 7.x
[root@kvm-hypervisor ~]# cat /sys/module/kvm_intel/parameters/nested
N
[root@kvm-hypervisor ~]# cat /sys/module/kvm_amd/parameters/nested
N
N
indicates that nested virtualization is disabled. If the output we get isY it means nested virtualization is enabled on your host. Now to enable nested virtualization, create a file named /etc/modprobe.d/kvm-nested.conf
with the following content:
[root@kvm-hypervisor ~]# vi /etc/modprobe.d/kvm-nested.conf
options kvm-intel nested=1
options kvm-intel enable_shadow_vmcs=1
options kvm-intel enable_apicv=1
options kvm-intel ept=1
kvm_intel
module and add the same module via themodprobe command. Before removing the module, make sure the virtual machine is shut down, otherwise we will get error messages like “modprobe: FATAL: Module kvm_intel is in use”.
[root@kvm-hypervisor ~]# modprobe -r kvm_intel
[root@kvm-hypervisor ~]# modprobe -a kvm_intel
[root@kvm-hypervisor ~]# cat /sys/module/kvm_intel/parameters/nested
Y
Testing Nested Virtualization
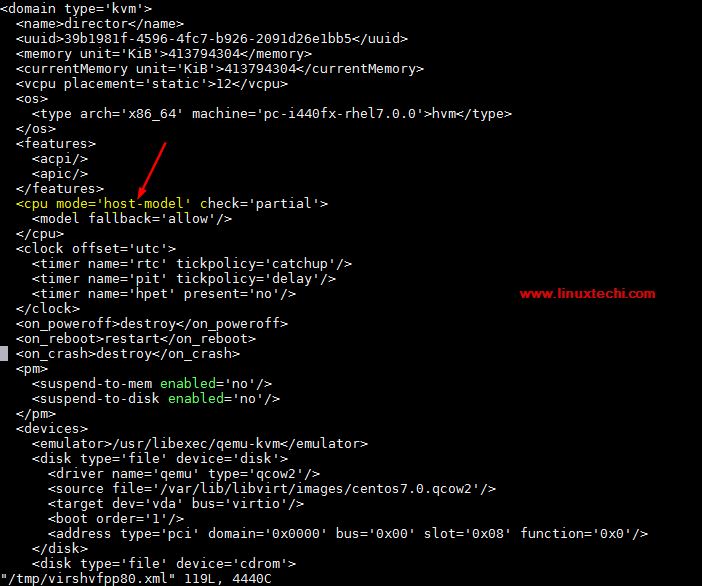 cpu_mode_vm_kvm
Now log in to the director virtual machine and run the lscpu
andlsmod commands.
[root@kvm-hypervisor ~]# ssh 192.168.126.1 -l root
root@192.168.126.1's password:
Last login: Sun Dec 10 07:05:59 2017 from 192.168.126.254
[root@director ~]# lsmod | grep kvm
kvm_intel             170200  0
kvm                   566604  1 kvm_intel
irqbypass              13503  1 kvm
[root@director ~]# lscpu
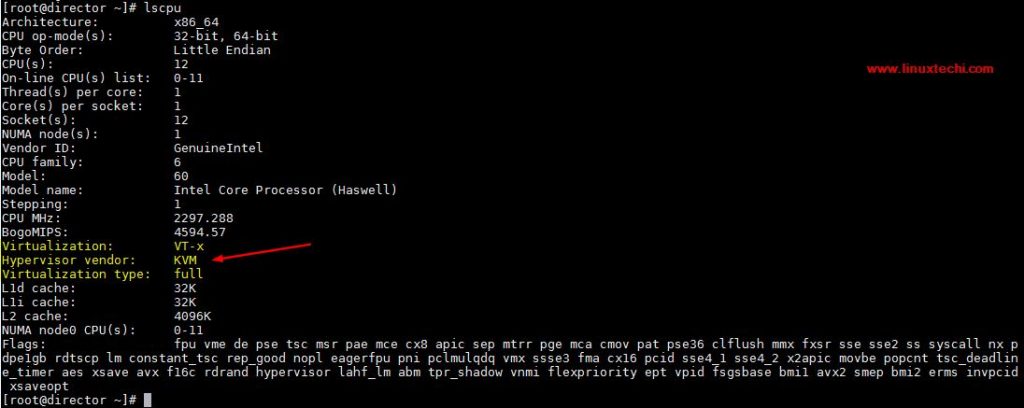 lscpu_command_rhel7_centos7
Let's try to create a virtual machine in the director virtual machine's virtual manager GUI or virt-install
command, in my case I usedvirt-install Order.
[root@director ~]# virt-install  -n Nested-VM  --description "Test Nested VM"  --os-type=Linux  --os-variant=rhel7  --ram=2048  --vcpus=2  --disk path=/var/lib/libvirt/images/nestedvm.img,bus=virtio,size=10  --graphics none  --location /var/lib/libvirt/images/CentOS-7-x86_64-DVD-1511.iso --extra-args console=ttyS0
Starting install...
Retrieving file .treeinfo...                                                   | 1.1 kB  00:00:00
Retrieving file vmlinuz...                                                     | 4.9 MB  00:00:00
Retrieving file initrd.img...                                                  |  37 MB  00:00:00
Allocating 'nestedvm.img'                                                      |  10 GB  00:00:00
Connected to domain Nested-VM
Escape character is ^]
[    0.000000] Initializing cgroup subsys cpuset
[    0.000000] Initializing cgroup subsys cpu
[    0.000000] Initializing cgroup subsys cpuacct
[    0.000000] Linux version 3.10.0-327.el7.x86_64 (builder@kbuilder.dev.centos.org) (gcc version 4.8.3 20140911 (Red Hat 4.8.3-9) (GCC) ) #1 SMP Thu Nov 19 22:10:57 UTC 2015
………………………………………………
 cli-installer-virt-install-command-kvm
This confirms that nested virtualization is successfully enabled, as we are able to create virtual machines within virtual machines.
The above is the detailed content of Enable nested virtualization on KVM on Centos7. For more information, please follow other related articles on the PHP Chinese website!

Hot AI Tools

Undresser.AI Undress
AI-powered app for creating realistic nude photos

AI Clothes Remover
Online AI tool for removing clothes from photos.

Undress AI Tool
Undress images for free

Clothoff.io
AI clothes remover

AI Hentai Generator
Generate AI Hentai for free.

Hot Article
Hot Tools

Notepad++7.3.1
Easy-to-use and free code editor

SublimeText3 Chinese version
Chinese version, very easy to use

Zend Studio 13.0.1
Powerful PHP integrated development environment

Dreamweaver CS6
Visual web development tools

SublimeText3 Mac version
God-level code editing software (SublimeText3)
Hot Topics
 1377
1377
 52
52

 Unable to log in to mysql as root
Apr 08, 2025 pm 04:54 PM
Unable to log in to mysql as root
Apr 08, 2025 pm 04:54 PM
The main reasons why you cannot log in to MySQL as root are permission problems, configuration file errors, password inconsistent, socket file problems, or firewall interception. The solution includes: check whether the bind-address parameter in the configuration file is configured correctly. Check whether the root user permissions have been modified or deleted and reset. Verify that the password is accurate, including case and special characters. Check socket file permission settings and paths. Check that the firewall blocks connections to the MySQL server.
 C language conditional compilation: a detailed guide for beginners to practical applications
Apr 04, 2025 am 10:48 AM
C language conditional compilation: a detailed guide for beginners to practical applications
Apr 04, 2025 am 10:48 AM
C language conditional compilation is a mechanism for selectively compiling code blocks based on compile-time conditions. The introductory methods include: using #if and #else directives to select code blocks based on conditions. Commonly used conditional expressions include STDC, _WIN32 and linux. Practical case: Print different messages according to the operating system. Use different data types according to the number of digits of the system. Different header files are supported according to the compiler. Conditional compilation enhances the portability and flexibility of the code, making it adaptable to compiler, operating system, and CPU architecture changes.
 【Rust Self-study】Introduction
Apr 04, 2025 am 08:03 AM
【Rust Self-study】Introduction
Apr 04, 2025 am 08:03 AM
1.0.1 Preface This project (including code and comments) was recorded during my self-taught Rust. There may be inaccurate or unclear statements, please apologize. If you benefit from it, it's even better. 1.0.2 Why is RustRust reliable and efficient? Rust can replace C and C, with similar performance but higher security, and does not require frequent recompilation to check for errors like C and C. The main advantages include: memory security (preventing null pointers from dereferences, dangling pointers, and data contention). Thread-safe (make sure multi-threaded code is safe before execution). Avoid undefined behavior (e.g., array out of bounds, uninitialized variables, or access to freed memory). Rust provides modern language features such as generics
 What are the 5 basic components of Linux?
Apr 06, 2025 am 12:05 AM
What are the 5 basic components of Linux?
Apr 06, 2025 am 12:05 AM
The five basic components of Linux are: 1. The kernel, managing hardware resources; 2. The system library, providing functions and services; 3. Shell, the interface for users to interact with the system; 4. The file system, storing and organizing data; 5. Applications, using system resources to implement functions.
 How to solve mysql cannot be started
Apr 08, 2025 pm 02:21 PM
How to solve mysql cannot be started
Apr 08, 2025 pm 02:21 PM
There are many reasons why MySQL startup fails, and it can be diagnosed by checking the error log. Common causes include port conflicts (check port occupancy and modify configuration), permission issues (check service running user permissions), configuration file errors (check parameter settings), data directory corruption (restore data or rebuild table space), InnoDB table space issues (check ibdata1 files), plug-in loading failure (check error log). When solving problems, you should analyze them based on the error log, find the root cause of the problem, and develop the habit of backing up data regularly to prevent and solve problems.
 Solutions to the errors reported by MySQL on a specific system version
Apr 08, 2025 am 11:54 AM
Solutions to the errors reported by MySQL on a specific system version
Apr 08, 2025 am 11:54 AM
The solution to MySQL installation error is: 1. Carefully check the system environment to ensure that the MySQL dependency library requirements are met. Different operating systems and version requirements are different; 2. Carefully read the error message and take corresponding measures according to prompts (such as missing library files or insufficient permissions), such as installing dependencies or using sudo commands; 3. If necessary, try to install the source code and carefully check the compilation log, but this requires a certain amount of Linux knowledge and experience. The key to ultimately solving the problem is to carefully check the system environment and error information, and refer to the official documents.
 Can mysql run on android
Apr 08, 2025 pm 05:03 PM
Can mysql run on android
Apr 08, 2025 pm 05:03 PM
MySQL cannot run directly on Android, but it can be implemented indirectly by using the following methods: using the lightweight database SQLite, which is built on the Android system, does not require a separate server, and has a small resource usage, which is very suitable for mobile device applications. Remotely connect to the MySQL server and connect to the MySQL database on the remote server through the network for data reading and writing, but there are disadvantages such as strong network dependencies, security issues and server costs.
 Where is the C language function library? How to add the C language function library?
Apr 03, 2025 pm 11:39 PM
Where is the C language function library? How to add the C language function library?
Apr 03, 2025 pm 11:39 PM
The C language function library is a toolbox containing various functions, which are organized in different library files. Adding a library requires specifying it through the compiler's command line options, for example, the GCC compiler uses the -l option followed by the abbreviation of the library name. If the library file is not under the default search path, you need to use the -L option to specify the library file path. Library can be divided into static libraries and dynamic libraries. Static libraries are directly linked to the program at compile time, while dynamic libraries are loaded at runtime.
