Teach you step by step how to create your own Rollup in 2 minutes
Abstract of this article:
Rollup as a Service (RaaS) is a new business model that allows anyone to create and deploy their own L2 Rollup without coding.
Conduit is a highly user-friendly RaaS provider. Below, you will see how using a few clicks can execute transactions swiftly on Layer 2 Rollup with remarkable efficiency.
When your Rollup is active, you can bridge ETH into it and deploy smart contracts and dapps, for example, I created a token called DOG and transferred it.
Conduit also sets up a block explorer for you so you can easily visualize everything on-chain.
Text
We have seen the growth of Ethereum L2 because the Ethereum mainnet has become too slow and expensive. Most of these are Rollups which I discussed before.
Creating your own Rollup requires a relatively deep understanding of blockchain, but the recent growth in “Rollup as a service” (RaaS) providers means you can deploy an L2 Rollup in minutes, Without writing a single line of code!
In this article, I will briefly explore the working principle of RaaS by observing Conduit.
Rollups and RaaS
As the Ethereum protocol continues to scale to handle more transactions per second, we study EVM L2, which has been deeply explored in the past literature.
Rollup is the most popular L2 type on Ethereum today. As a brief reminder, Rollup is a separate blockchain that performs transactions and then publishes the Rollup version back to the main chain.
There are hundreds of examples of L2 Rollups, as shown in the figure below.
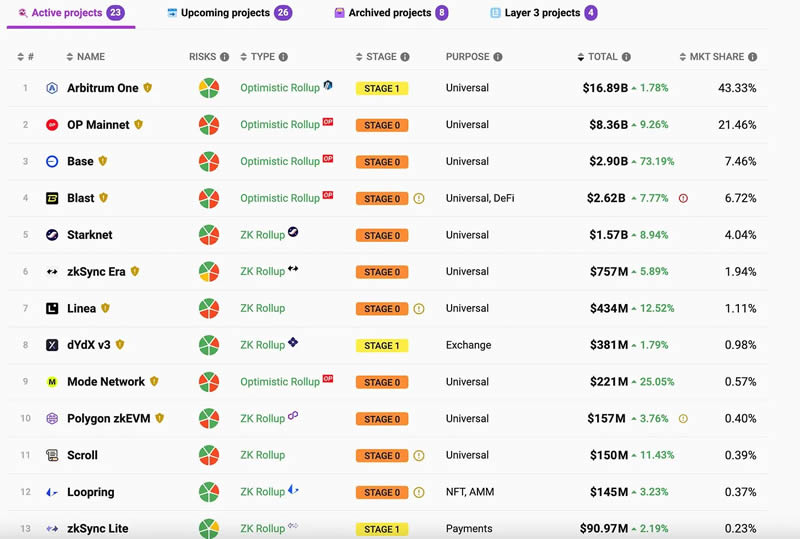
However, despite the emergence of chains such as Optimism and Arbitrum that have created their own toolkits to create L2 faster, creating your own L2 is still not a It's a small thing and requires some technical knowledge. Additionally, you need to run nodes to support L2, which can also get complicated.
This challenge has given rise to a new type of business, namely providing "Rollup as a Service" (RaaS). With RaaS, anyone can create and deploy their own Rollup in minutes by pressing a few buttons and start bridging ETH and running smart contracts and dapps on their own L2!
Below I will show you how easy it is to create a Rollup using RaaS.
Conduit
There are already many competitors in the RaaS field, including Astria, Caldera, AltLayer, Conduit, etc.
For this article, I chose to use Conduit, which I found to be very fast and easy to get started with.
According to them, Conduit allows you to: "Deploy a Rollup in minutes, not months." Offering "fully managed, production-grade, customizable Ethereum, Optimism, Arbitrum, Base , Mode and Zora's Rollup."

#Their landing page shows very clearly how fast and easy it is to create a Rollup using Conduit.
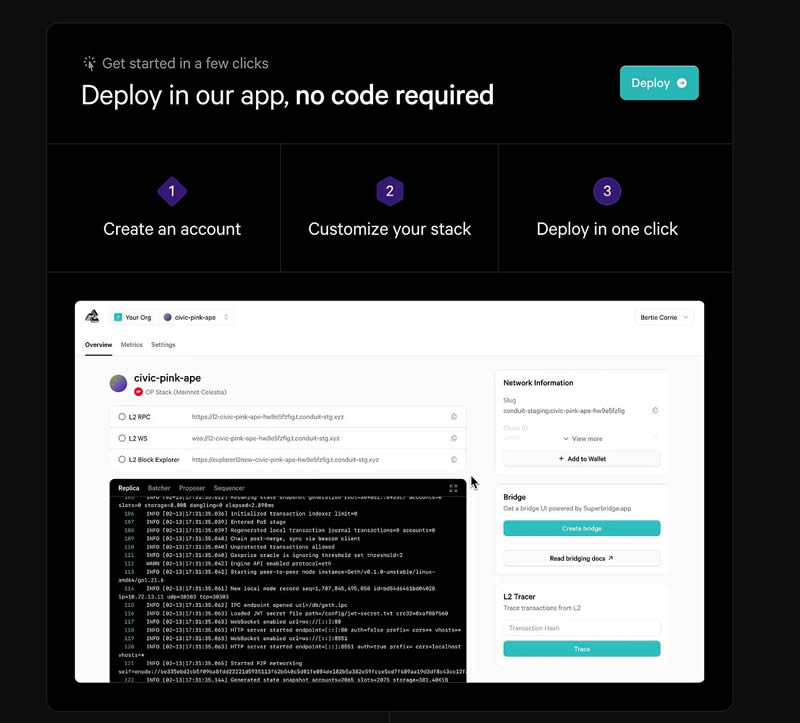
Let’s find out in the following steps.
Create a Rollup
First, select the Deploy button on the landing page, you will be asked to create an account and organization, and then immediately taken to the setup page to deploy your first Rollup .
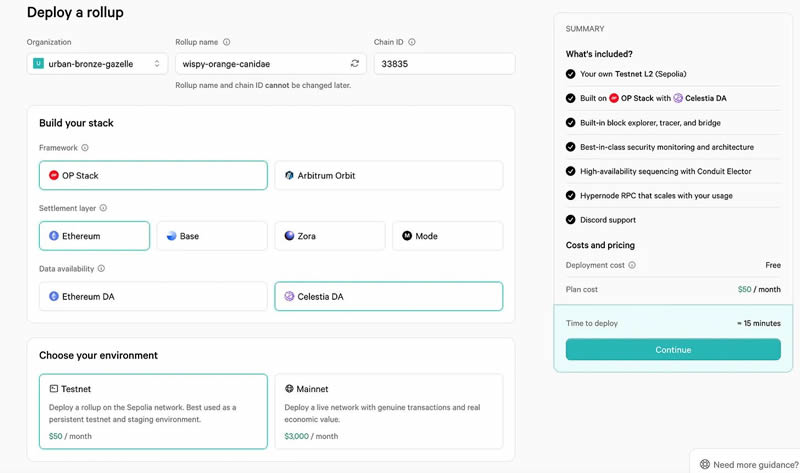
Using Conduit to create a mainnet rollup will cost $3,000 per month. Whether you need a mainnet rollup or not, you can still use a testnet rollup to get started. It only costs $3,000 per month. $50.
Conduit allows you to use Optimism's OP stack or Arbitrum's Orbit stack. If you select Orbit, you'll find that the subsequent options change accordingly.
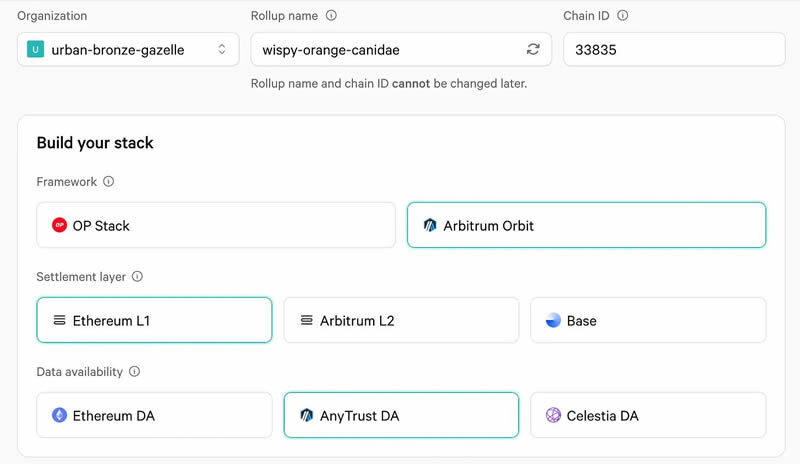
The settlement layer is the layer that guarantees the finality and security of transactions, while the data availability layer is the maintainer of the information needed to reconstruct the Rollup at any given moment.
Both are important, but as a simplified solution, settlement should really be on a more decentralized blockchain like Ethereum, with the highest financial security, while data availability can On a more centralized blockchain like Celestia, the blockchain supports storing more data at a lower cost.
In my testnet example, I stuck with the OP stack, using Ethereum as the settlement layer and Celestia as the DA. Nonetheless, Conduit allows you to mix and match these to find what works best for your specific use case.
When you continue, you will be asked to pay a monthly fee of $50.
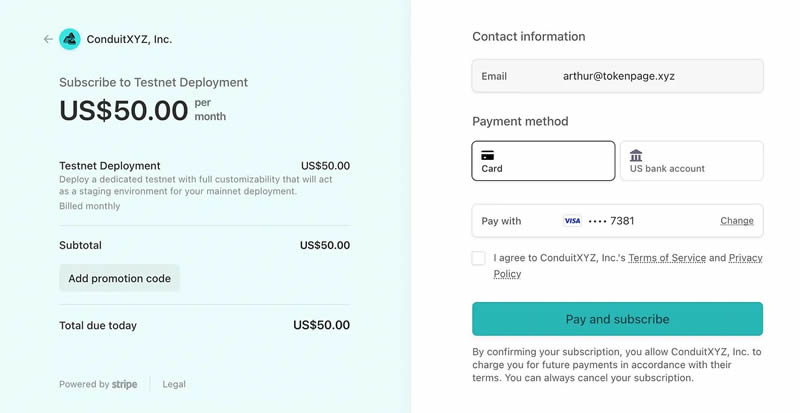
Once payment is completed, you are done! Within minutes, you have configured your first L2 Rollup.
You now only need to wait 15-20 minutes for Conduit to set everything up, and once complete, the deployment will appear as follows:
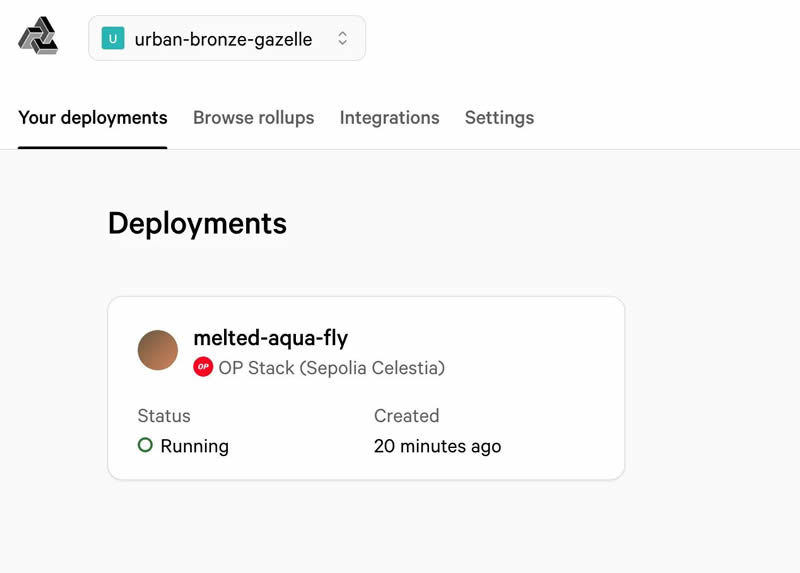
Your organization and The name of the Rollup can be edited. You can now start using your new L2 Rollup!
Start using your Rollup
After selecting your Rollup on the deployment page, the Rollup information will be displayed as follows:
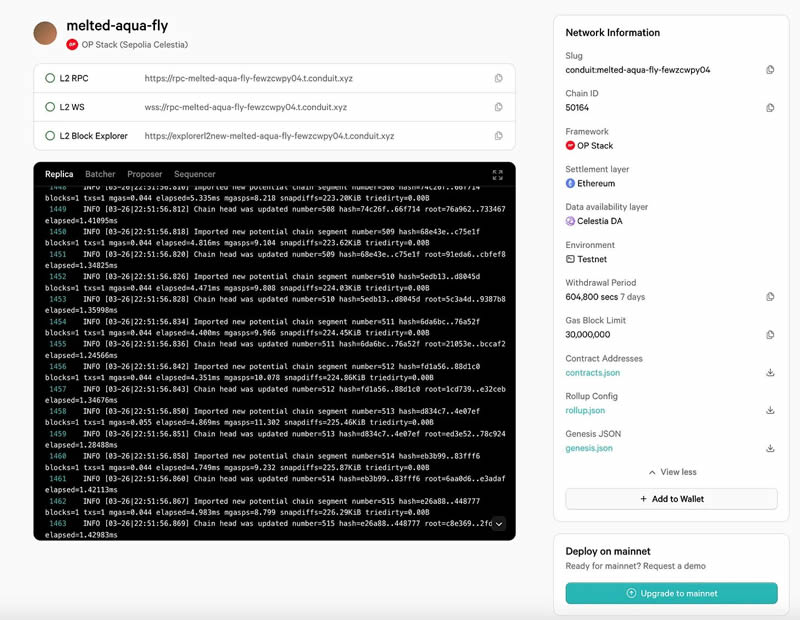
Rollup Configuration Settings Shown on the right, the output in the black terminal box indicates that L2 is running. At the moment you don't really need to understand what the output means, all you need to see is that it updates continuously.
You need to select "Add to Wallet" to add the network to your Metamask or equivalent wallet.
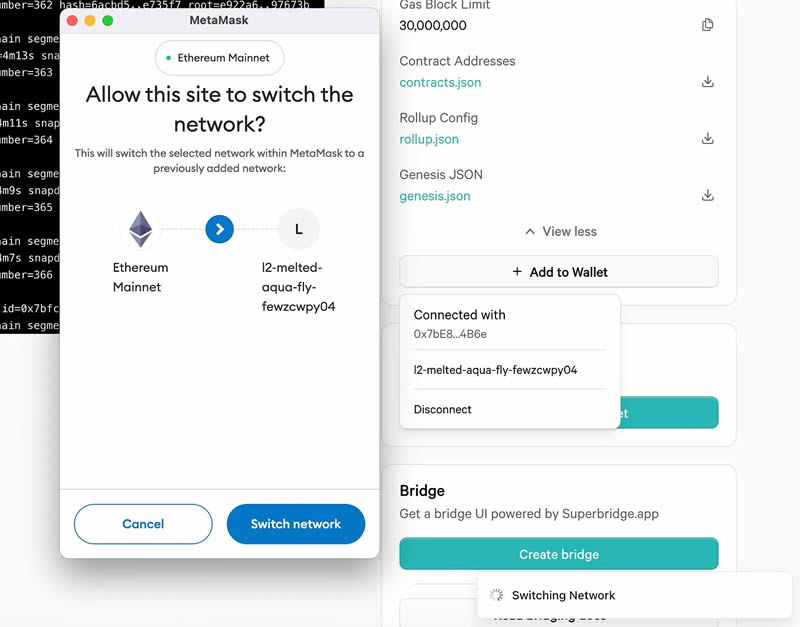
Then, you should click "Create Bridge" in the bridge section, which will open a bridge software called SuperBridge.
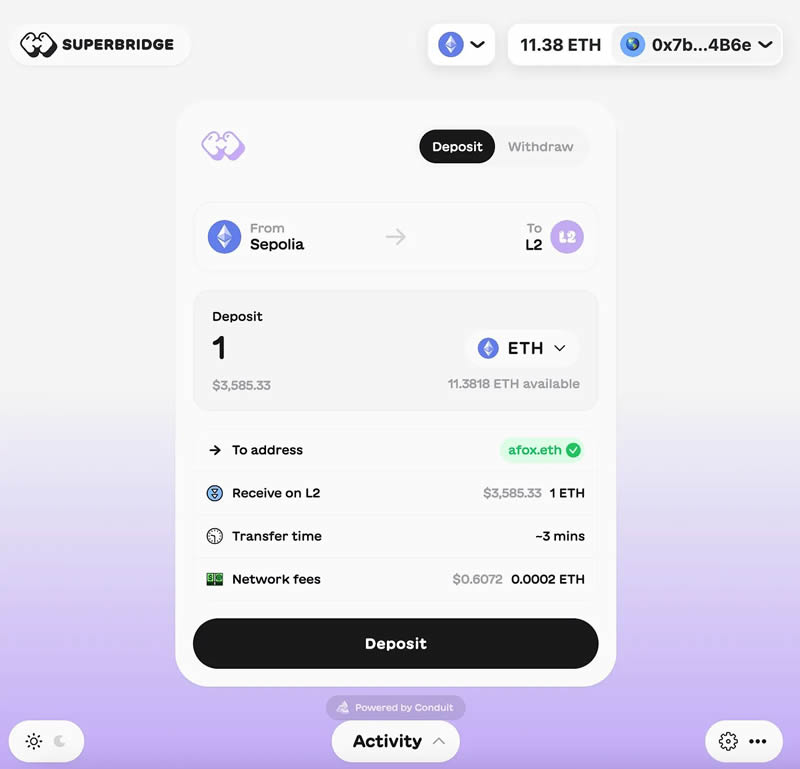
Since we are on the test network, you will be able to bridge Sepolia ETH onto your new Rollup. If you don't have any Sepolia ETH, you can get it from this faucet.
I bridged more than a few times 1 ETH and ended up with 2 testnet ETH on my new L2 Rollup, visible on my Metamask wallet!
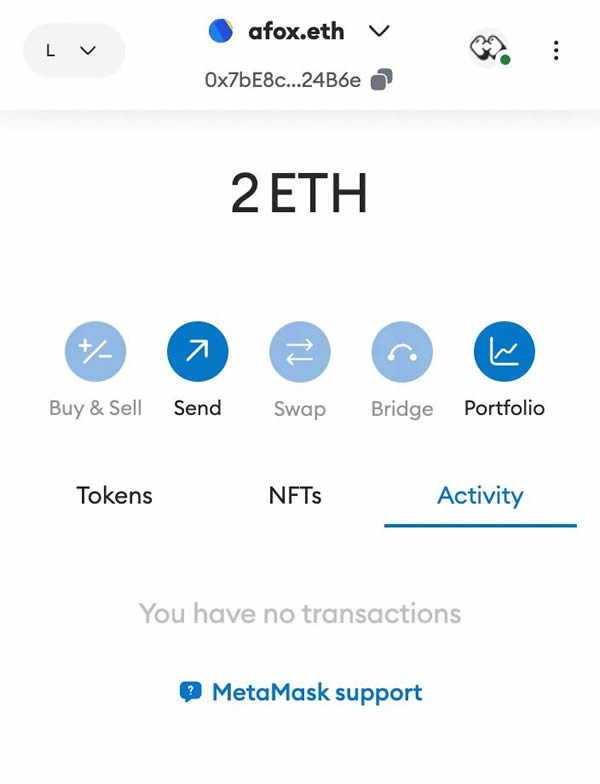
Now you have the test Network ETH is bridged to your new Rollup and you can start using it!
Further Use of Your Rollup
Now you have your own L2 Rollup that you can deploy code directly into .
First open the Remix IDE, I have explained how to use it in my tutorial called "Writing Your First Smart Contract".
Then copy the code below into a new file in Remix.
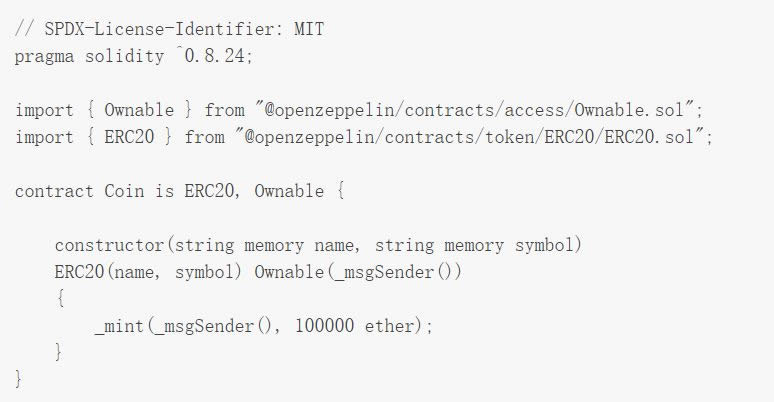
Update the environment to "Injected Provider" and set your Metamask to the new Rollup. Next to the orange deploy button give Your token name and symbol, in this case I wrote "Dog, DOG" and click deploy.
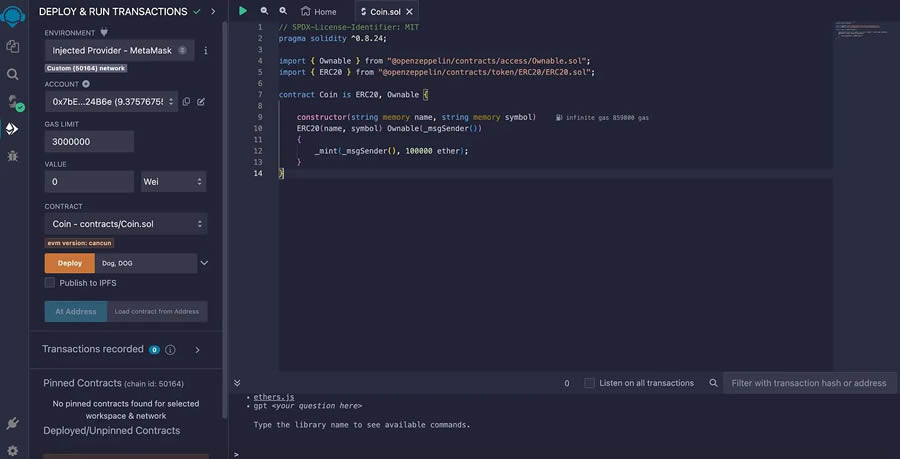
You will need to sign this in Metamask transaction, when the transaction is processed, you will have just created a new token on your new L2 Rollup, which is cool!
If I open Metamask, I can copy the contract address created in Remix Add the token to my wallet.
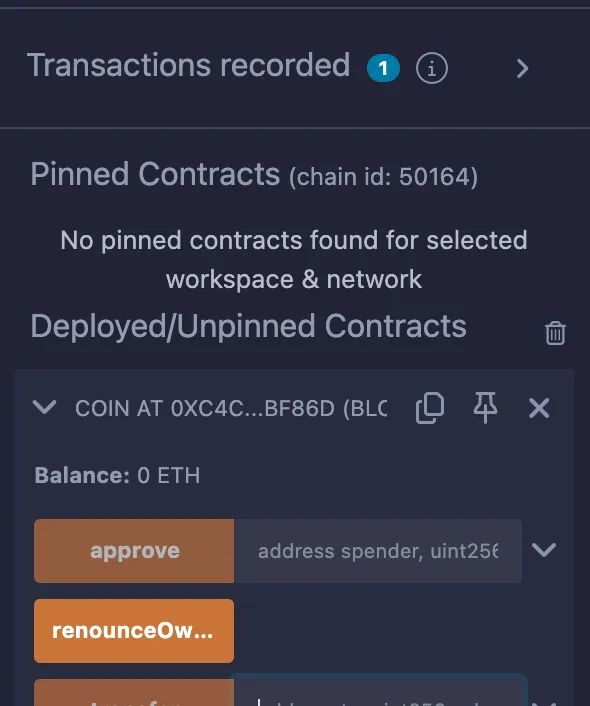
After doing this, I can see that my new Dog token has a balance of 100000 DOG. In Metamask, I can send 100 DOG to another address on the network.
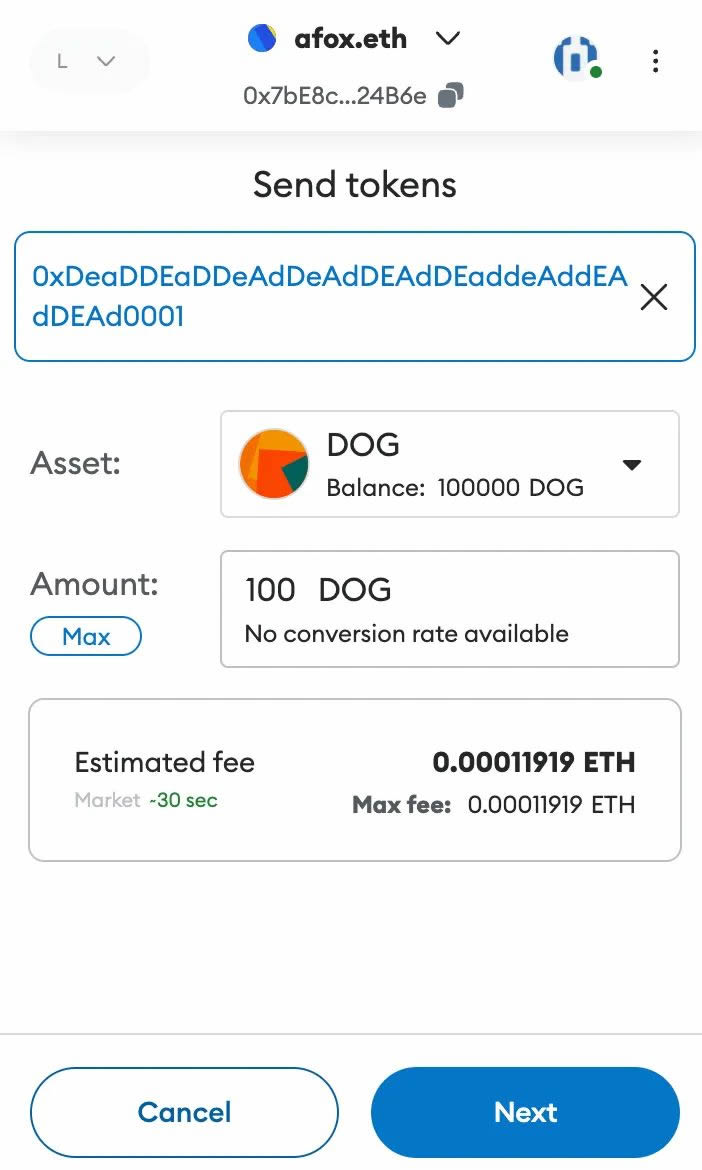
How amazing, not only did we just create our own Rollup, we also created it on this new blockchain We get our own Dog tokens and send them to another account on this new chain.
Integration
As you can see, you can Do anything you want on the chain, such as creating your own tokens, smart contracts and dapps.
You can have everything from simple tokens to complex AMMs like Sushiswap running on your Rollup, as We see it running the same on several chains.
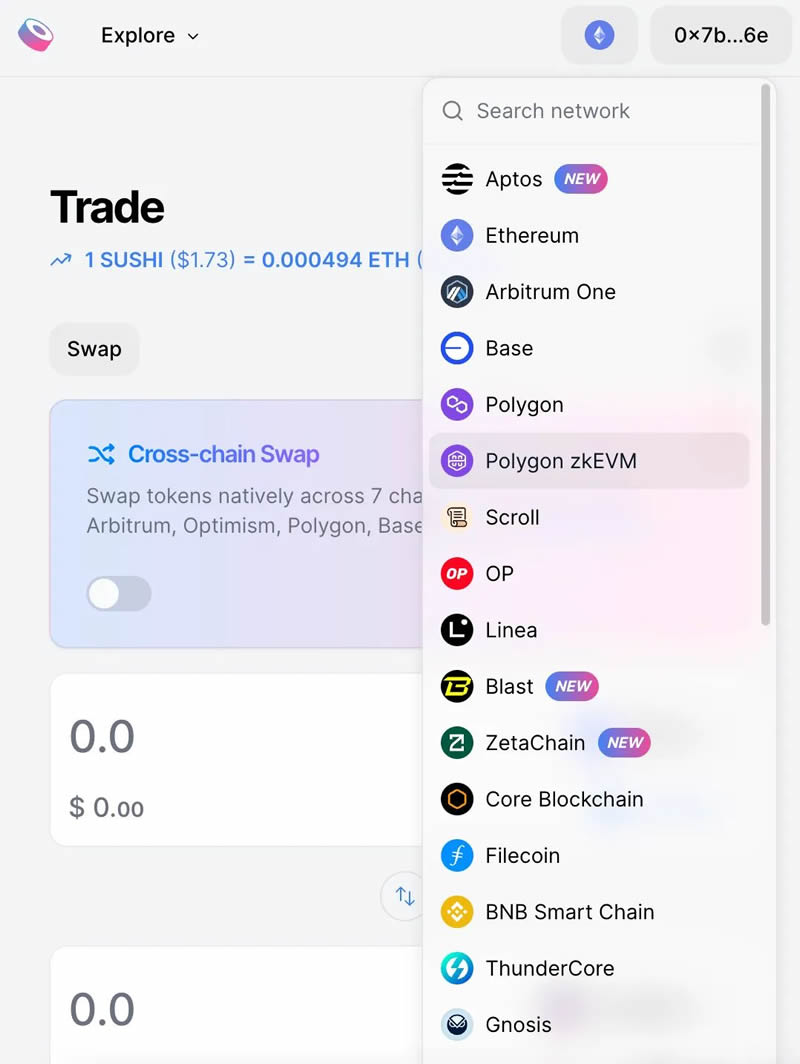
For this kind of integration with different projects, Conduit has an integration page to help you deploy these applications onto your new Rollup.
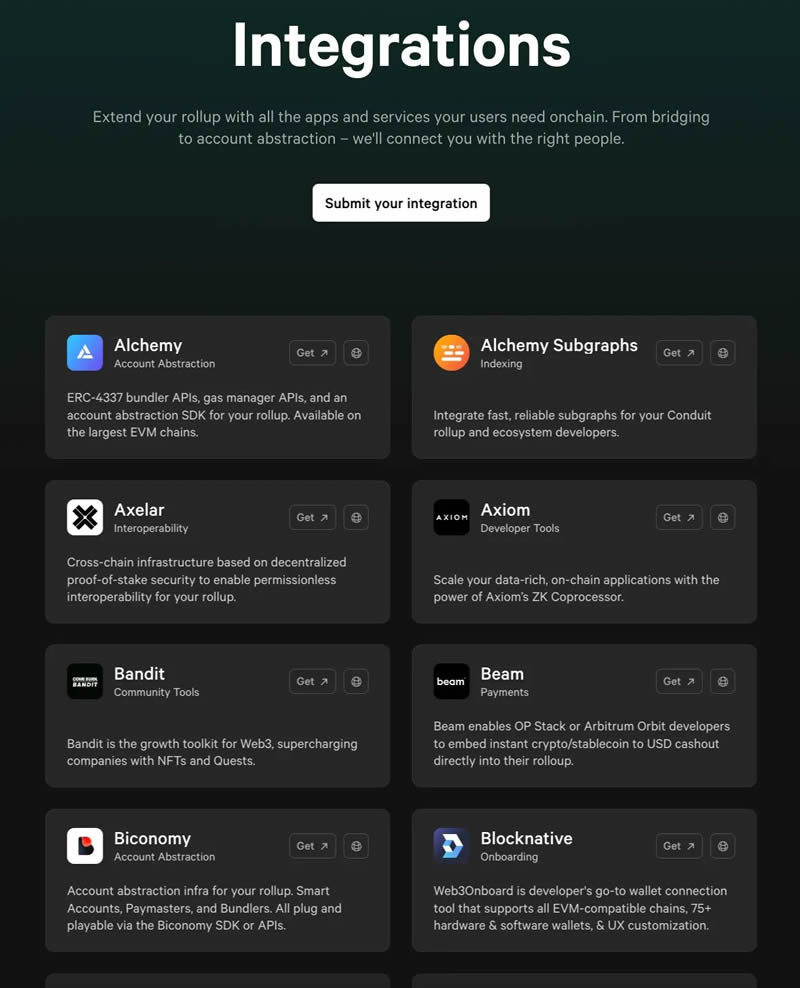
When you select "Get" on any dapp on this page, a type form will pop up where you can explain why you want to integrate this dapp with your Rollup.
Having such a simple interface to communicate with one of dozens of the most popular dapps is a very helpful thing when starting a brand new Rollup.
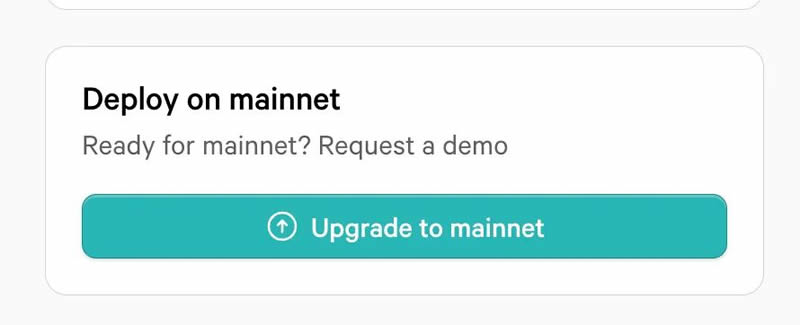
When you are satisfied with everything you have tested, you can migrate the Rollup to the mainnet. However, the upgrade costs $3,000 per month, and you'll need to schedule a demo with Conduit for it to work.
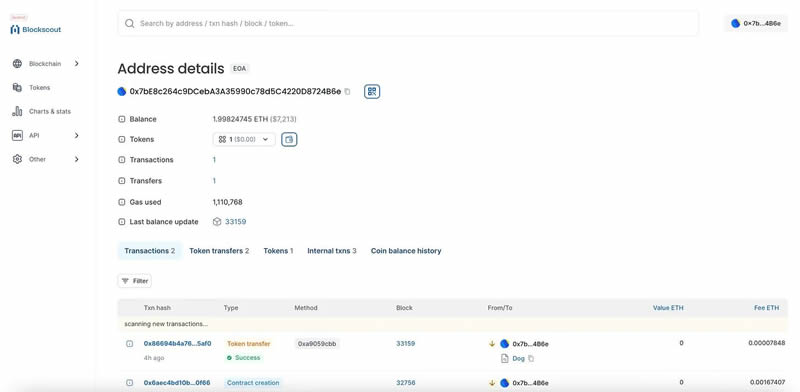
Confirm what we did on Explorer
After trying out my new testnet Rollup, I was able to do this for you by jumping into Conduit too Set up a block explorer to confirm everything that happened.
For example, I can go back to the browser and view my address to see completed transactions and the coins I own.
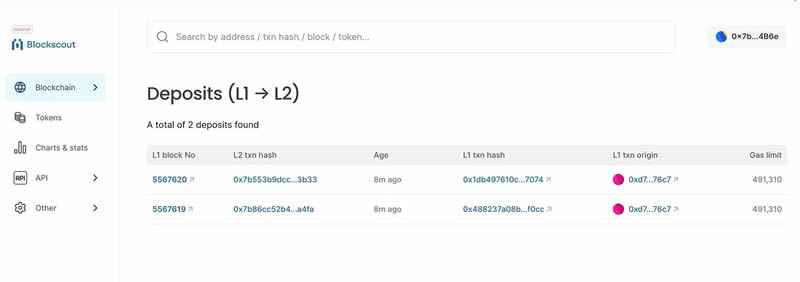
I can get more specific by selecting the blockchain tab on the left and clicking on an option like "Deposits (L1->L2)" Information about the blockchain, in this case you can see my bridged Sepolia ETH.
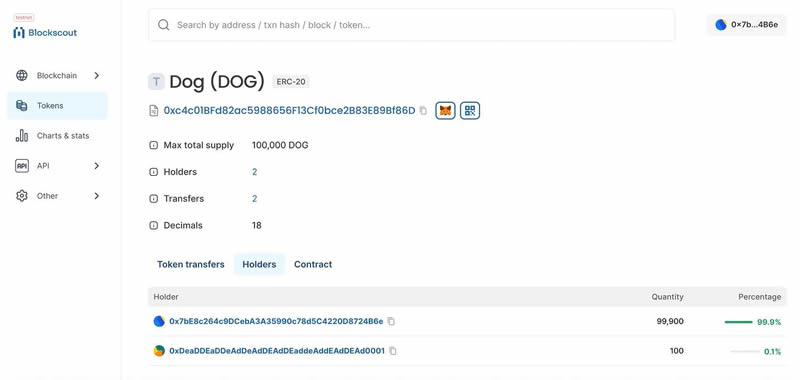
After selecting the token, I can also see the new DOG token I deployed.

We can dig deeper into this token and see that there are two holders since I sent 100 DOG to another account on the network.
I believe it's obvious that I've only scratched the surface of what it's possible to have your own new Rollup. In future posts I may delve into different use cases.
What’s most fascinating is that since it has become so easy to create Rollups using RaaS, L2 is likely to become ubiquitous and there will be hundreds or thousands of them.
So, the real question will be how to distinguish your L2 Rollup from other Rollups?
The above is the detailed content of Teach you step by step how to create your own Rollup in 2 minutes. For more information, please follow other related articles on the PHP Chinese website!

Hot AI Tools

Undresser.AI Undress
AI-powered app for creating realistic nude photos

AI Clothes Remover
Online AI tool for removing clothes from photos.

Undress AI Tool
Undress images for free

Clothoff.io
AI clothes remover

AI Hentai Generator
Generate AI Hentai for free.

Hot Article

Hot Tools

Notepad++7.3.1
Easy-to-use and free code editor

SublimeText3 Chinese version
Chinese version, very easy to use

Zend Studio 13.0.1
Powerful PHP integrated development environment

Dreamweaver CS6
Visual web development tools

SublimeText3 Mac version
God-level code editing software (SublimeText3)

Hot Topics
 What is Ouyi for? What is Ouyi
Apr 01, 2025 pm 03:18 PM
OKX is a global digital asset trading platform. Its main functions include: 1. Buying and selling digital assets (spot trading), 2. Trading between digital assets, 3. Providing market conditions and data, 4. Providing diversified trading products (such as derivatives), 5. Providing asset value-added services, 6. Convenient asset management.
 What are the recommended websites for virtual currency app software?
Mar 31, 2025 pm 09:06 PM
This article recommends ten well-known virtual currency-related APP recommendation websites, including Binance Academy, OKX Learn, CoinGecko, CryptoSlate, CoinDesk, Investopedia, CoinMarketCap, Huobi University, Coinbase Learn and CryptoCompare. These websites not only provide information such as virtual currency market data, price trend analysis, etc., but also provide rich learning resources, including basic blockchain knowledge, trading strategies, and tutorials and reviews of various trading platform APPs, helping users better understand and make use of them
 How to roll positions in digital currency? What are the digital currency rolling platforms?
Mar 31, 2025 pm 07:36 PM
Digital currency rolling positions is an investment strategy that uses lending to amplify trading leverage to increase returns. This article explains the digital currency rolling process in detail, including key steps such as selecting trading platforms that support rolling (such as Binance, OKEx, gate.io, Huobi, Bybit, etc.), opening a leverage account, setting a leverage multiple, borrowing funds for trading, and real-time monitoring of the market and adjusting positions or adding margin to avoid liquidation. However, rolling position trading is extremely risky, and investors need to operate with caution and formulate complete risk management strategies. To learn more about digital currency rolling tips, please continue reading.
 On which platform is web3 transaction?
Mar 31, 2025 pm 07:54 PM
This article lists the top ten well-known Web3 trading platforms, including Binance, OKX, Gate.io, Kraken, Bybit, Coinbase, KuCoin, Bitget, Gemini and Bitstamp. The article compares the characteristics of each platform in detail, such as the number of currencies, trading types (spot, futures, options, NFT, etc.), handling fees, security, compliance, user groups, etc., aiming to help investors choose the most suitable trading platform. Whether it is high-frequency traders, contract trading enthusiasts, or investors who focus on compliance and security, they can find reference information from it.
 Tutorial on how to register, use and cancel Ouyi okex account
Mar 31, 2025 pm 04:21 PM
This article introduces in detail the registration, use and cancellation procedures of Ouyi OKEx account. To register, you need to download the APP, enter your mobile phone number or email address to register, and complete real-name authentication. The usage covers the operation steps such as login, recharge and withdrawal, transaction and security settings. To cancel an account, you need to contact Ouyi OKEx customer service, provide necessary information and wait for processing, and finally obtain the account cancellation confirmation. Through this article, users can easily master the complete life cycle management of Ouyi OKEx account and conduct digital asset transactions safely and conveniently.
 How to calculate the transaction fee of gate.io trading platform?
Mar 31, 2025 pm 09:15 PM
The handling fees of the Gate.io trading platform vary according to factors such as transaction type, transaction pair, and user VIP level. The default fee rate for spot trading is 0.15% (VIP0 level, Maker and Taker), but the VIP level will be adjusted based on the user's 30-day trading volume and GT position. The higher the level, the lower the fee rate will be. It supports GT platform coin deduction, and you can enjoy a minimum discount of 55% off. The default rate for contract transactions is Maker 0.02%, Taker 0.05% (VIP0 level), which is also affected by VIP level, and different contract types and leverages
 Binance binance computer version entrance Binance binance computer version PC official website login entrance
Mar 31, 2025 pm 04:36 PM
This article provides a complete guide to login and registration on Binance PC version. First, we explained in detail the steps for logging in Binance PC version: search for "Binance Official Website" in the browser, click the login button, enter the email and password (enable 2FA to enter the verification code) to log in. Secondly, the article explains the registration process: click the "Register" button, fill in the email address, set a strong password, and verify the email address to complete the registration. Finally, the article also emphasizes account security, reminding users to pay attention to the official domain name, network environment, and regularly updating passwords to ensure account security and better use of various functions provided by Binance PC version, such as viewing market conditions, conducting transactions and managing assets.
 Sesame Exchange gate web version enters Sesame Exchange official web version click to enter
Mar 31, 2025 pm 06:18 PM
Sesame Exchange Gate.io web version is convenient to log in. Just enter "gate.io" in the browser address bar and press Enter to access the official website. The concise homepage provides clear "Login" and "Register" options, and users can choose to log in to a registered account or register a new account according to their own situation. After registering or logging in, you can enter the main trading interface to conduct cryptocurrency trading, check market conditions and account management. Gate.io has a friendly interface and is easy to operate, suitable for beginners and professional traders.


