
 Web Front-end
JS Tutorial
Summary of solutions to why png cannot be transparent under IE6_javascript techniques
Web Front-end
JS Tutorial
Summary of solutions to why png cannot be transparent under IE6_javascript techniques
Summary of solutions to why png cannot be transparent under IE6_javascript techniques

FF and IE7 already directly support transparent PNG images. The following is mainly used to solve the problem of gray background in transparent PNG images under IE6
style="FILTER: progid:DXImageTransform.Microsoft.AlphaImageLoader(src=images/fl.png')"
Syntax:
filter : progid:DXImageTransform.Microsoft.AlphaImageLoader ( enabled=bEnabled , sizingMethod=sSize , src=sURL )
enabled : Optional. Boolean. Sets or retrieves whether the filter is active. true | false true : Default value. Filter activated.
false : filter is disabled.
sizingMethod : Optional. String. Sets or retrieves how the image of the filtered object is displayed within the boundaries of the object container. crop : Crops the image to fit the object dimensions.
image: Default value. Increase or decrease the object's size bounds to fit the dimensions of the picture.
scale : Scale the image to fit within the object's size boundaries.
src: required. String. Specify the background image using an absolute or relative url address. If this parameter is omitted, the filter will have no effect.
Features:
Enabled: Readable and writable. Boolean. See enabled attribute.
sizingMethod: Readable and writable. String. See the sizingMethod property.
src: readable and writable. String. See the src attribute.
Description:
Displays an image between the object's background and content, within the bounds of the object's container. And provide operations for cutting and resizing this image. If the PNG (Portable Network Graphics) format is loaded, 0%-100% transparency is also provided.
The transparency of images in PNG (Portable Network Graphics) format does not prevent you from selecting text. In other words, you can choose to display the content behind the completely transparent area of the image in PNG (Portable Network Graphics) format.
Example: Solve the problem of png transparency failure under IE6.
CSS style:
.png{
_background: url(images/angel.png) no-repeat !important;
filter: progid:DXImageTransform.Microsoft.AlphaImageLoader(enabled=true, sizingMethod=noscale, src="images/angel.png");
background:none;
width:118px;height:133px;
}

.png div{position:relative;}
HTML code:
<div class="png">
<div>
CSS 背景PNG透明 及 链接失效问题解决
</div>
</div>
/*
Compatible with IE6.0, IE7.0, FF,
IE7.0 and the new version of FF can actually make it transparent without adding a filter.
*/
================================================== ==============================
Method 1: Define a style. After applying this style to a certain div, the transparent png background image of the div will automatically become transparent. (Note that the paths of the two images are written differently. In this example, the icon_home.png image and the html file are in the same directory)
<!DOCTYPE html PUBLIC "-//W3C//DTD XHTML 1.0 Transitional//EN" "http://www.w3.org/TR/xhtml1/DTD/xhtml1-transitional.dtd">
<html xmlns="http://www.w3.org/1999/xhtml">
<head>
<meta http-equiv="Content-Type" content="text/html; charset=gb2312" />
<title>无标题文档</title>
<style type="text/css">
<!--
.qq {
height: 90px;
width: 90px;
background-image: url(icon_home.png)!important;/* FF IE7 */
background-repeat: no-repeat;

_filter: progid:DXImageTransform.Microsoft.AlphaImageLoader(src='icon_home.png'); /* IE6 */
_ background-image: none; /* IE6 */
}
-->
</style>
</head>

<body>

<div class="qq"></div>

</body>
</html>
Method 2: Define the style for img, and all transparent PNGs on the page will be automatically transparent. (This method is only valid for directly inserted pictures, not for background pictures) Note that you need to prepare a small transparent picture transparent.gif, the size is not limited. Must be placed in the same directory as html
Please do not use it in large quantities, otherwise it will cause the page to open very slowly!!!)
<!DOCTYPE html PUBLIC "-//W3C//DTD XHTML 1.0 Transitional//EN" "http://www.w3.org/TR/xhtml1/DTD/xhtml1-transitional.dtd">
<html xmlns="http://www.w3.org/1999/xhtml">
<head>
<meta http-equiv="Content-Type" content="text/html; charset=gb2312" />
<title>无标题文档</title>
<style type="text/css">
.mypng img {
azimuth: expression(
this.pngSet?this.pngSet=true:(this.nodeName == "IMG" && this.src.toLowerCase().indexOf('.png')>-1?(this.runtimeStyle.backgroundImage = "none",
this.runtimeStyle.filter = "progid:DXImageTransform.Microsoft.AlphaImageLoader(src='" + this.src + "', sizingMethod='image')",
this.src = "transparent.gif"):(this.origBg = this.origBg? this.origBg :this.currentStyle.backgroundImage.toString().replace('url("','').replace('")',''),
this.runtimeStyle.filter = "progid:DXImageTransform.Microsoft.AlphaImageLoader(src='" + this.origBg + "', sizingMethod='crop')",
this.runtimeStyle.backgroundImage = "none")),this.pngSet=true);
}
</style>
</head>
<body>
换成你的png图片
<div class="mypng">
<img src="icon_face_07.png" width="30" height="30" />
<img src="icon_face_10.png" width="30" height="30" />
<img src="icon_face_08.png" width="30" height="30" />
</div>
</body>
</html>
Method 3: Use JS to implement it. After adding a piece of js code, all inserted transparent pngs will automatically become transparent. (Note that this method is only valid for directly inserted images, not for background images. )
<!DOCTYPE html PUBLIC "-//W3C//DTD XHTML 1.0 Transitional//EN" "http://www.w3.org/TR/xhtml1/DTD/xhtml1-transitional.dtd">
<html xmlns="http://www.w3.org/1999/xhtml">
<head>
<meta http-equiv="Content-Type" content="text/html; charset=gb2312" />
<title>无标题文档</title>
<script language="JavaScript">
function correctPNG() // correctly handle PNG transparency in Win IE 5.5 & 6.
{
var arVersion = navigator.appVersion.split("MSIE")
var version = parseFloat(arVersion[1])
if ((version >= 5.5) && (document.body.filters))
{
for(var j=0; j<document.images.length; j++)
{
var img = document.images[j]
var imgName = img.src.toUpperCase()
if (imgName.substring(imgName.length-3, imgName.length) == "PNG")
{
var imgID = (img.id) ? "id='" + img.id + "' " : ""
var imgClass = (img.className) ? "class='" + img.className + "' " : ""
var imgTitle = (img.title) ? "title='" + img.title + "' " : "title='" + img.alt + "' "
var imgStyle = "display:inline-block;" + img.style.cssText
if (img.align == "left") imgStyle = "float:left;" + imgStyle
if (img.align == "right") imgStyle = "float:right;" + imgStyle
if (img.parentElement.href) imgStyle = "cursor:hand;" + imgStyle
var strNewHTML = "<span " + imgID + imgClass + imgTitle
+ " style=\"" + "width:" + img.width + "px; height:" + img.height + "px;" + imgStyle + ";"
+ "filter:progid:DXImageTransform.Microsoft.AlphaImageLoader"
+ "(src=\'" + img.src + "\', sizingMethod='scale');\"></span>"
img.outerHTML = strNewHTML
j = j-1
}
}
}
}
window.attachEvent("onload", correctPNG);
</script>
<style type="text/css">
<!--
body {
}
-->
</style></head>
<body>
把图片换成你自己的图片
<img src="img/icon_face_03.png" width="30" height="30" /><!--把图片换成你自己的图片 -->
<img src="img/icon_face_05.png" width="30" height="30" />
<img src="img/menu_title_over.png" width="130" height="36" />
</body>
</html>
Method 4
<script language="javascript">
// 修复 IE 下 PNG 图片不能透明显示的问题
function fixPNG(myImage) {
var arVersion = navigator.appVersion.split("MSIE");
var version = parseFloat(arVersion[1]);
if ((version >= 5.5) && (version < 7) && (document.body.filters))
{
var imgID = (myImage.id) ? "id='" + myImage.id + "' " : "";
var imgClass = (myImage.className) ? "class='" + myImage.className + "' " : "";
var imgTitle = (myImage.title) ? "title='" + myImage.title + "' " : "title='" + myImage.alt + "' ";
var imgStyle = "display:inline-block;" + myImage.style.cssText;
var strNewHTML = "<span " + imgID + imgClass + imgTitle
+ " style=\"" + "width:" + myImage.width
+ "px; height:" + myImage.height
+ "px;" + imgStyle + ";"
+ "filter:progid:DXImageTransform.Microsoft.AlphaImageLoader"
+ "(src=\'" + myImage.src + "\', sizingMethod='scale');\"></span>";
myImage.outerHTML = strNewHTML;
} }
window.onload=function(){
document.getElementById("top").style.height=screen.height/5+"px";
}//
</script>
Usage is as follows:
The above is the entire content of this article, I hope you all like it.

Hot AI Tools

Undresser.AI Undress
AI-powered app for creating realistic nude photos

AI Clothes Remover
Online AI tool for removing clothes from photos.

Undress AI Tool
Undress images for free

Clothoff.io
AI clothes remover

AI Hentai Generator
Generate AI Hentai for free.

Hot Article
Hot Tools

Notepad++7.3.1
Easy-to-use and free code editor

SublimeText3 Chinese version
Chinese version, very easy to use

Zend Studio 13.0.1
Powerful PHP integrated development environment

Dreamweaver CS6
Visual web development tools

SublimeText3 Mac version
God-level code editing software (SublimeText3)
Hot Topics
 1376
1376
 52
52

 How to convert PNG to JPG on Windows 11
May 12, 2023 pm 03:55 PM
How to convert PNG to JPG on Windows 11
May 12, 2023 pm 03:55 PM
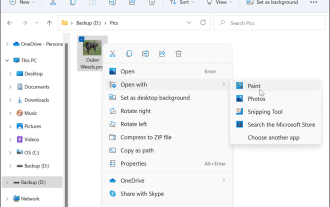
How to Convert PNG to JPG on Windows 11 On Windows 10 and 11, you can use Microsoft's built-in Paint app to quickly convert image files. To convert a PNG image to JPG on Windows 11, use the following steps: Open File Explorer and navigate to the PNG image you want to convert. Right-click the image and select Open With > Draw from the menu. Your photo or image opens in the Paint app. Note the file size at the bottom of the screen. To convert a file from PNG to JPG, click File and select Save As > JPEG Image from the menu. When the file resource
 How to solve the black line problem of win11 transparent taskbar
Dec 22, 2023 pm 10:04 PM
How to solve the black line problem of win11 transparent taskbar
Dec 22, 2023 pm 10:04 PM
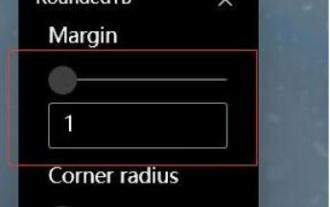
After many friends used translucenttb to set up a transparent taskbar, they found that there was a black line in the win11 transparent taskbar, which looked very uncomfortable. How should I solve it at this time? In fact, it can be solved in the software. There is a black line in the win11 transparent taskbar: Method 1: 1. According to user feedback, you can right-click translucenttb and open settings. 2. Then set the "margin" of the icon option to "1" to solve the problem. Method 2: 1. If it still doesn't work, you can right-click the blank space to open "Personalization" 2. Then select the system default theme to change it. Method three: 1. If all else fails, it is recommended that you uninstall translucenttb. 2. Then replace
 How to solve the problem of a line on the taskbar transparency in Win11?
Jan 29, 2024 pm 12:12 PM
How to solve the problem of a line on the taskbar transparency in Win11?
Jan 29, 2024 pm 12:12 PM
Many Win11 users will set their taskbar to be transparent when running the system, but many users will see a black line appear on the taskbar after setting it up. So what is going on? Users can use third-party software to set it up. Let this website carefully introduce to users the solution to the problem of a transparent line on the win11 taskbar. Solution to the problem of a transparent line on the win11 taskbar. Method 1: 1. According to user feedback, you can right-click translucenttb and open settings. 2. Then set the margin of the icon option to 1 to solve the problem. 2. Then select the system default theme and change it to solve the problem.
 How to set transparency in CSS
Nov 01, 2023 am 10:00 AM
How to set transparency in CSS
Nov 01, 2023 am 10:00 AM
CSS methods for setting transparency include opacity attribute, rgba color value, background-color attribute, using pseudo elements, etc. Detailed introduction: 1. Opacity attribute, by setting the opacity attribute of the element to achieve a transparent effect, the value range of this attribute is 0 to 1, 0 means completely transparent, 1 means completely opaque; 2. RGB color value, by setting the element's opacity The background color or text color is an rgba color value to achieve a transparent effect. The rgba color value consists of red, green, blue, transparency, etc.
 Graphical tutorial on making the win7 taskbar transparent
Jul 20, 2023 am 09:49 AM
Graphical tutorial on making the win7 taskbar transparent
Jul 20, 2023 am 09:49 AM
Today, a group of users asked why their computers had no transparency effect after reinstalling Windows 7. In fact, this is caused by your computer not updating the graphics card driver in time and adjusting the Windows 7 Aero theme. You can set it up in the following ways. 1. First, you need to make sure that your computer has a new graphics card driver installed. You can use Driver Wizard or 360 Driver Master to update the graphics card driver online. . 2. Facing a blank space on the desktop, right-click, select Personalize and open. 3. Find the Aero theme here and select it. Under normal circumstances, you should be able to see the transparent glass effect. Do you understand the tutorial on how to make your win7 taskbar transparent? Students who don’t know how to do it, please do it quickly.
 How to set terminal transparency in Linux system?
Jan 07, 2024 am 10:21 AM
How to set terminal transparency in Linux system?
Jan 07, 2024 am 10:21 AM
When Linux executes commands in the terminal, in order to make it difficult to see other help documents, such as PDFs, web pages, etc., you can set the terminal transparency. How to set it? Let’s take a look at the detailed tutorial below. . 1. Turn on window special effects 1. To set the transparency of the terminal, you need to turn on the window special effects first. First, click "Control Center" on the taskbar. 2. Click "Display" in the Control Center. 3. In "Display", make sure the "Turn on window effects" button is turned on. 4. In addition, you can also use the shortcut keys shift+win+tab to quickly open or close window effects. 2. Set transparency
 How to rename the extension of all files within a folder, including subfolders
Apr 14, 2023 pm 12:22 PM
How to rename the extension of all files within a folder, including subfolders
Apr 14, 2023 pm 12:22 PM
Suppose you need to rename the extension of a file from one extension to another, say jpg to png. It's easy, of course! But what if you have multiple files whose extensions need to be changed? Or worse, what if these multiple files are also located in multiple folders and subfolders, within a single folder? Well, for a normal person, this can be a nightmare. But for a geek, absolutely not. The question now is, are you a geek? Well, with the help of Geek Page, you definitely are! In this article, we explain how to easily rename the extension of all files within a folder, including subfolders of your choice, from one extension to another through a batch script method. Notice:
 How to adjust the transparency of the Win11 taskbar
Jan 01, 2024 am 11:17 AM
How to adjust the transparency of the Win11 taskbar
Jan 01, 2024 am 11:17 AM
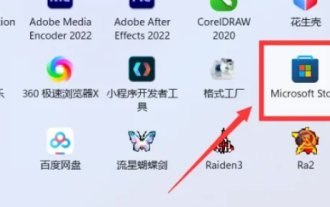
Many users like the transparent version of the page. Under the win11 system, users can also set up a transparent taskbar through some methods, so that the operation and appearance will look better. How to set the win11 taskbar to be transparent 1. Click the Start menu and then open the Microsoft Store. 2. Search for "TranslucentTB", then find the corresponding one and download it. 3. Click here to install. 4. After opening, select "desktop" and then click "clear".
