 Mobile Tutorial
 iPhone
 Detailed explanation of the whole process of iPhone face-to-face data migration
Detailed explanation of the whole process of iPhone face-to-face data migration
php editor Zimo brings you a detailed analysis of the entire process of iPhone face-to-face migration data. When using a new iPhone, we all hope to be able to completely migrate the data on the old phone to the new device. If you have tried this process, you may have found it quite difficult. Don't worry, though, we'll provide you with a detailed solution, including steps to back up and restore your data, as well as how to set up and use Face ID or Touch ID to ensure security. This article will help you fully understand the methods and steps of iPhone face-to-face data migration, so that you can save more worry and effort when using your new iPhone!
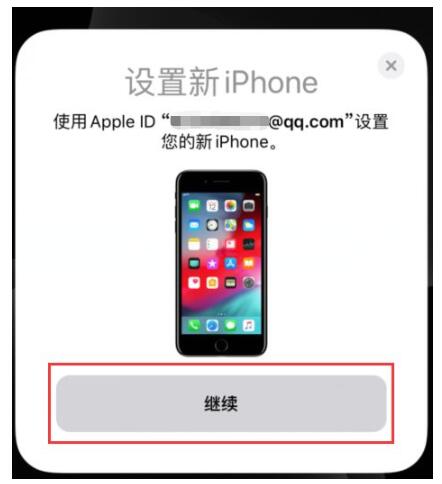
1. Turn on the new iPhone and place it next to the current iPhone running iOS 12.4 or higher. The Quick Start screen appears on your current iPhone and offers the option to set up a new iPhone using your Apple ID. Make sure this is the Apple ID you want to use, then tap Continue. If you don't see this option and can't continue on your current device, make sure Bluetooth is turned on.

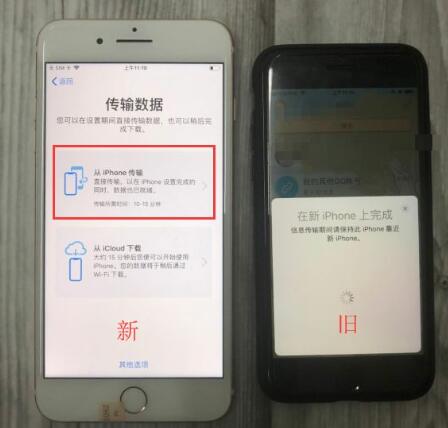
2. Wait for the animation to appear on the new iPhone. Lift your current iPhone over the new iPhone, then center the animation in the viewfinder. Wait for the message "Done on new iPhone" to appear. If you can't use your current iPhone's camera, tap Manual Verification and follow the steps that appear.
3. When prompted, enter the password of the current iPhone on the new iPhone.
4. Follow the instructions to set up Face ID or Touch ID on your new iPhone.
5. Tap "Transfer from iPhone" to start transferring data from the old iPhone to the new iPhone. You can also choose whether to transfer certain settings from your old iPhone to your new iPhone, such as Apple Pay and Siri. .

6. If you have an Apple Watch and are setting up a new iPhone, you will be asked if you want to transfer your Apple Watch data and settings.
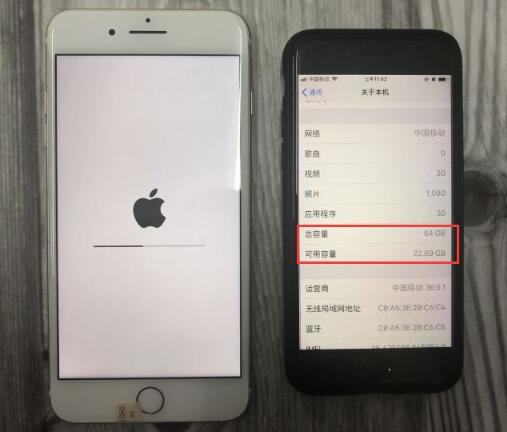
7. Place the two devices next to each other and plug them in until the iPhone data migration process is completed. Transfer time depends on several factors, such as the type of connection you are using, network conditions, and the amount of data being transferred.
Note: You can transfer data from your old device to your new device in two ways, one is wirelessly and the other is using Lightning to USB 3 Camera Adapter and Lightning to USB at this time Cable to connect the device.
After you transfer your data to your new iOS device, you may need to complete a few more steps to complete the phone's setup process. This includes checking settings for Mail, Contacts, and Calendar, turning on notifications for apps, pairing Bluetooth accessories, adding cards to Apple Pay, managing subscriptions, and more.

The above is the detailed content of Detailed explanation of the whole process of iPhone face-to-face data migration. For more information, please follow other related articles on the PHP Chinese website!

Hot AI Tools

Undresser.AI Undress
AI-powered app for creating realistic nude photos

AI Clothes Remover
Online AI tool for removing clothes from photos.

Undress AI Tool
Undress images for free

Clothoff.io
AI clothes remover

AI Hentai Generator
Generate AI Hentai for free.

Hot Article

Hot Tools

Notepad++7.3.1
Easy-to-use and free code editor

SublimeText3 Chinese version
Chinese version, very easy to use

Zend Studio 13.0.1
Powerful PHP integrated development environment

Dreamweaver CS6
Visual web development tools

SublimeText3 Mac version
God-level code editing software (SublimeText3)

Hot Topics
 1382
1382
 52
52
 iPhone 16 Pro and iPhone 16 Pro Max official with new cameras, A18 Pro SoC and larger screens
Sep 10, 2024 am 06:50 AM
Apple has finally lifted the covers off its new high-end iPhone models. The iPhone 16 Pro and iPhone 16 Pro Max now come with larger screens compared to their last-gen counterparts (6.3-in on the Pro, 6.9-in on Pro Max). They get an enhanced Apple A1
 iPhone parts Activation Lock spotted in iOS 18 RC — may be Apple\'s latest blow to right to repair sold under the guise of user protection
Sep 14, 2024 am 06:29 AM
Earlier this year, Apple announced that it would be expanding its Activation Lock feature to iPhone components. This effectively links individual iPhone components, like the battery, display, FaceID assembly, and camera hardware to an iCloud account,
 iPhone parts Activation Lock may be Apple\'s latest blow to right to repair sold under the guise of user protection
Sep 13, 2024 pm 06:17 PM
Earlier this year, Apple announced that it would be expanding its Activation Lock feature to iPhone components. This effectively links individual iPhone components, like the battery, display, FaceID assembly, and camera hardware to an iCloud account,
 Gate.io trading platform official app download and installation address
Feb 13, 2025 pm 07:33 PM
This article details the steps to register and download the latest app on the official website of Gate.io. First, the registration process is introduced, including filling in the registration information, verifying the email/mobile phone number, and completing the registration. Secondly, it explains how to download the Gate.io App on iOS devices and Android devices. Finally, security tips are emphasized, such as verifying the authenticity of the official website, enabling two-step verification, and being alert to phishing risks to ensure the safety of user accounts and assets.
 Multiple iPhone 16 Pro users report touchscreen freezing issues, possibly linked to palm rejection sensitivity
Sep 23, 2024 pm 06:18 PM
If you've already gotten your hands on a device from the Apple's iPhone 16 lineup — more specifically, the 16 Pro/Pro Max — chances are you've recently faced some kind of issue with the touchscreen. The silver lining is that you're not alone—reports
 Anbi app official download v2.96.2 latest version installation Anbi official Android version
Mar 04, 2025 pm 01:06 PM
Binance App official installation steps: Android needs to visit the official website to find the download link, choose the Android version to download and install; iOS search for "Binance" on the App Store. All should pay attention to the agreement through official channels.
 How to solve the problem of 'Undefined array key 'sign'' error when calling Alipay EasySDK using PHP?
Mar 31, 2025 pm 11:51 PM
Problem Description When calling Alipay EasySDK using PHP, after filling in the parameters according to the official code, an error message was reported during operation: "Undefined...
 Beats adds phone cases to its lineup: unveils a MagSafe case for the iPhone 16 series
Sep 11, 2024 pm 03:33 PM
Beats is known for launching audio products such as Bluetooth speakers and headphones, but in what can best be described as a surprise, the Apple-owned company has branched into making phone cases, starting with the iPhone 16 series. The Beats iPhone


