 Web Front-end
 JS Tutorial
 Detailed explanation of using JQuery upload plug-in Uploadify in AspNet_jquery
Detailed explanation of using JQuery upload plug-in Uploadify in AspNet_jquery
首先按下面的步骤来实现一个简单的上传功能。
1 创建Web项目,命名为JQueryUploadDemo,从官网上下载最新的版本解压后添加到项目中。
2 在项目中添加UploadHandler.ashx文件用来处理文件的上传。
3 在项目中添加UploadFile文件夹,用来存放上传的文件。
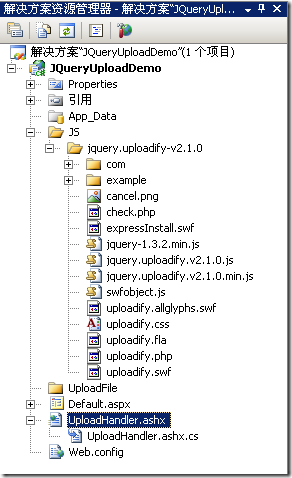
进行完上面三步后项目的基本结构如下图:

4 Default.aspx的html页的代码修改如下:
<html xmlns="http://www.w3.org/1999/xhtml">
<head runat="server">
  <title>Uploadify</title>
  <link href="JS/jquery.uploadify-v2.1.0/example/css/default.css"
   rel="stylesheet" type="text/css" />
  <link href="JS/jquery.uploadify-v2.1.0/uploadify.css"
   rel="stylesheet" type="text/css" />

  <script type="text/javascript"
   src="JS/jquery.uploadify-v2.1.0/jquery-1.3.2.min.js"></script>

  <script type="text/javascript"
   src="JS/jquery.uploadify-v2.1.0/swfobject.js"></script>

  <script type="text/javascript"
  src="JS/jquery.uploadify-v2.1.0/jquery.uploadify.v2.1.0.min.js"></script>

  <script type="text/javascript">
    $(document).ready(function()
    {
      $("#uploadify").uploadify({
        'uploader': 'JS/jquery.uploadify-v2.1.0/uploadify.swf',
        'script': 'UploadHandler.ashx',
        'cancelImg': 'JS/jquery.uploadify-v2.1.0/cancel.png',
        'folder': 'UploadFile',
        'queueID': 'fileQueue',
        'auto': false,
        'multi': true
      });
    });
  </script>

</head>
<body>
  <div id="fileQueue"></div>
  <input type="file" name="uploadify" id="uploadify" />
  <p>
   <a href="javascript:$('#uploadify').uploadifyUpload()">上传</a>|
   <a href="javascript:$('#uploadify').uploadifyClearQueue()">取消上传</a>
  </p>
</body>
</html>
5 UploadHandler类的ProcessRequest方法代码如下:
public void ProcessRequest(HttpContext context)
{
  context.Response.ContentType = "text/plain";
  context.Response.Charset = "utf-8";

  HttpPostedFile file = context.Request.Files["Filedata"];
  string uploadPath =
    HttpContext.Current.Server.MapPath(@context.Request["folder"])+"\\";

  if (file != null)
  {
    if (!Directory.Exists(uploadPath))
    {
      Directory.CreateDirectory(uploadPath);
    }
    file.SaveAs(uploadPath + file.FileName);
    //下面这句代码缺少的话,上传成功后上传队列的显示不会自动消失
    context.Response.Write("1");
  }
  else
  {
    context.Response.Write("0");
  }
}
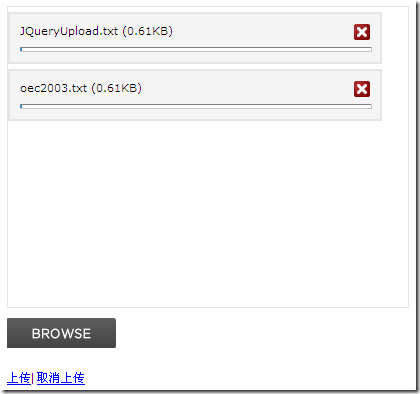
6 运行后效果如下图:

7 选择了两个文件后,点击上传,就可以看到UploadFile文件夹中会增加这两个文件。
上面简单地实现了一个上传的功能,依靠函数uploadify实现,uploadify函数的参数为json格式,可以对json对象的key值的修改来进行自定义的设置,如multi设置为true或false来控制是否可以进行多文件上传,下面就来介绍下这些key值的意思:
uploader : uploadify.swf 文件的相对路径,该swf文件是一个带有文字BROWSE的按钮,点击后淡出打开文件对话框,默认值:uploadify.swf。
script : 后台处理程序的相对路径 。默认值:uploadify.php
checkScript :用来判断上传选择的文件在服务器是否存在的后台处理程序的相对路径
fileDataName :设置一个名字,在服务器处理程序中根据该名字来取上传文件的数据。默认为Filedata
method : 提交方式Post 或Get 默认为Post
scriptAccess :flash脚本文件的访问模式,如果在本地测试设置为always,默认值:sameDomain
folder : 上传文件存放的目录 。
queueID : 文件队列的ID,该ID与存放文件队列的div的ID一致。
queueSizeLimit : 当允许多文件生成时,设置选择文件的个数,默认值:999 。
multi : 设置为true时可以上传多个文件。
auto : 设置为true当选择文件后就直接上传了,为false需要点击上传按钮才上传 。
fileDesc : 这个属性值必须设置fileExt属性后才有效,用来设置选择文件对话框中的提示文本,如设置fileDesc为“请选择rar doc pdf文件”,打开文件选择框效果如下图:

fileExt : 设置可以选择的文件的类型,格式如:'*.doc;*.pdf;*.rar' 。
sizeLimit : 上传文件的大小限制 。
simUploadLimit : 允许同时上传的个数 默认值:1 。
buttonText : 浏览按钮的文本,默认值:BROWSE 。
buttonImg : 浏览按钮的图片的路径 。
hideButton : 设置为true则隐藏浏览按钮的图片 。
rollover : 值为true和false,设置为true时当鼠标移到浏览按钮上时有反转效果。
width : 设置浏览按钮的宽度 ,默认值:110。
height : 设置浏览按钮的高度 ,默认值:30。
wmode : 设置该项为transparent 可以使浏览按钮的flash背景文件透明,并且flash文件会被置为页面的最高层。 默认值:opaque 。
cancelImg :选择文件到文件队列中后的每一个文件上的关闭按钮图标,如下图:

上面介绍的key值的value都为字符串或是布尔类型,比较简单,接下来要介绍的key值的value为一个函数,可以在选择文件、出错或其他一些操作的时候返回一些信息给用户。
onInit : 做一些初始化的工作。
onSelect :选择文件时触发,该函数有三个参数
event:事件对象。
queueID:文件的唯一标识,由6为随机字符组成。
fileObj:选择的文件对象,有name、size、creationDate、modificationDate、type 5个属性。
代码如下:
$(document).ready(function()
{
  $("#uploadify").uploadify({
    'uploader': 'JS/jquery.uploadify-v2.1.0/uploadify.swf',
    'script': 'UploadHandler.ashx',
    'cancelImg': 'JS/jquery.uploadify-v2.1.0/cancel.png',
    'folder': 'UploadFile',
    'queueID': 'fileQueue',
    'auto': false,
    'multi': true,
    'onInit':function(){alert("1");},
    'onSelect': function(e, queueId, fileObj)
    {
      alert("唯一标识:" + queueId + "\r\n" +
         "文件名:" + fileObj.name + "\r\n" +
         "文件大小:" + fileObj.size + "\r\n" +
         "创建时间:" + fileObj.creationDate + "\r\n" +
         "最后修改时间:" + fileObj.modificationDate + "\r\n" +
         "文件类型:" + fileObj.type
      );

    }
  });
});
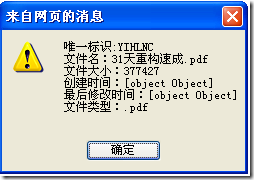
当选择一个文件后弹出的消息如下图:

onSelectOnce :在单文件或多文件上传时,选择文件时触发。该函数有两个参数event,data,data对象有以下几个属性:
fileCount:选择文件的总数。
filesSelected:同时选择文件的个数,如果一次选择了3个文件该属性值为3。
filesReplaced:如果文件队列中已经存在A和B两个文件,再次选择文件时又选择了A和B,该属性值为2。
allBytesTotal:所有选择的文件的总大小。
onCancel : 当点击文件队列中文件的关闭按钮或点击取消上传时触发。该函数有event、queueId、fileObj、data四个参数,前三个参数同onSelect 中的三个参数,data对象有两个属性fileCount和allBytesTotal。
fileCount:取消一个文件后,文件队列中剩余文件的个数。
allBytesTotal:取消一个文件后,文件队列中剩余文件的大小。
onClearQueue :当调用函数fileUploadClearQueue时触发。有event和data两个参数,同onCancel 中的两个对应参数。
onQueueFull :当设置了queueSizeLimit并且选择的文件个数超出了queueSizeLimit的值时触发。该函数有两个参数event和queueSizeLimit。
onError :当上传过程中发生错误时触发。该函数有event、queueId、fileObj、errorObj四个参数,其中前三个参数同上,errorObj对象有type和info两个属性。
type:错误的类型,有三种‘HTTP', ‘IO', or ‘Security'
info:错误的描述
onOpen :点击上传时触发,如果auto设置为true则是选择文件时触发,如果有多个文件上传则遍历整个文件队列。该函数有event、queueId、fileObj三个参数,参数的解释同上。
onProgress :点击上传时触发,如果auto设置为true则是选择文件时触发,如果有多个文件上传则遍历整个文件队列,在onOpen之后触发。该函数有event、queueId、fileObj、data四个参数,前三个参数的解释同上。data对象有四个属性percentage、bytesLoaded、allBytesLoaded、speed:
percentage:当前完成的百分比
bytesLoaded:当前上传的大小
allBytesLoaded:文件队列中已经上传完的大小
speed:上传速率 kb/s
onComplete:文件上传完成后触发。该函数有四个参数event、queueId、fileObj、response、data五个参数,前三个参数同上。response为后台处理程序返回的值,在上面的例子中为1或0,data有两个属性fileCount和speed
fileCount:剩余没有上传完成的文件的个数。
speed:文件上传的平均速率 kb/s
注:fileObj对象和上面讲到的有些不太一样,onComplete 的fileObj对象有个filePath属性可以取出上传文件的路径。
onAllComplete:文件队列中所有的文件上传完成后触发。该函数有event和data两个参数,data有四个属性,分别为:
filesUploaded :上传的所有文件个数。
errors :出现错误的个数。
allBytesLoaded :所有上传文件的总大小。
speed :平均上传速率 kb/s
相关函数介绍
在上面的例子中已经用了uploadifyUpload和uploadifyClearQueue两个函数,除此之外还有几个函数:
uploadifySettings:可以动态修改上面介绍的那些key值,如下面代码
$('#uploadify').uploadifySettings('folder','JS');
如果上传按钮的事件写成下面这样,文件将会上传到uploadifySettings定义的目录中
<a href="javascript:$('#uploadify').uploadifySettings('folder','JS');
$('#uploadify').uploadifyUpload()">上传</a>
uploadifyCancel:该函数接受一个queueID作为参数,可以取消文件队列中指定queueID的文件。
$('#uploadify').uploadifyCancel(id);
花了一个晚上,终于写完了,对JQuery这个上传插件也基本了解了,希望对大家有所帮助,不对之处还望大家指正。
以上所述就是本文的全部内容了,希望大家能够喜欢。

Hot AI Tools

Undresser.AI Undress
AI-powered app for creating realistic nude photos

AI Clothes Remover
Online AI tool for removing clothes from photos.

Undress AI Tool
Undress images for free

Clothoff.io
AI clothes remover

AI Hentai Generator
Generate AI Hentai for free.

Hot Article

Hot Tools

Notepad++7.3.1
Easy-to-use and free code editor

SublimeText3 Chinese version
Chinese version, very easy to use

Zend Studio 13.0.1
Powerful PHP integrated development environment

Dreamweaver CS6
Visual web development tools

SublimeText3 Mac version
God-level code editing software (SublimeText3)

Hot Topics
 Detailed explanation of jQuery reference methods: Quick start guide
Feb 27, 2024 pm 06:45 PM
Detailed explanation of jQuery reference method: Quick start guide jQuery is a popular JavaScript library that is widely used in website development. It simplifies JavaScript programming and provides developers with rich functions and features. This article will introduce jQuery's reference method in detail and provide specific code examples to help readers get started quickly. Introducing jQuery First, we need to introduce the jQuery library into the HTML file. It can be introduced through a CDN link or downloaded
 How to remove the height attribute of an element with jQuery?
Feb 28, 2024 am 08:39 AM
How to remove the height attribute of an element with jQuery? In front-end development, we often encounter the need to manipulate the height attributes of elements. Sometimes, we may need to dynamically change the height of an element, and sometimes we need to remove the height attribute of an element. This article will introduce how to use jQuery to remove the height attribute of an element and provide specific code examples. Before using jQuery to operate the height attribute, we first need to understand the height attribute in CSS. The height attribute is used to set the height of an element
 How to use PUT request method in jQuery?
Feb 28, 2024 pm 03:12 PM
How to use PUT request method in jQuery? In jQuery, the method of sending a PUT request is similar to sending other types of requests, but you need to pay attention to some details and parameter settings. PUT requests are typically used to update resources, such as updating data in a database or updating files on the server. The following is a specific code example using the PUT request method in jQuery. First, make sure you include the jQuery library file, then you can send a PUT request via: $.ajax({u
 jQuery Tips: Quickly modify the text of all a tags on the page
Feb 28, 2024 pm 09:06 PM
Title: jQuery Tips: Quickly modify the text of all a tags on the page In web development, we often need to modify and operate elements on the page. When using jQuery, sometimes you need to modify the text content of all a tags in the page at once, which can save time and energy. The following will introduce how to use jQuery to quickly modify the text of all a tags on the page, and give specific code examples. First, we need to introduce the jQuery library file and ensure that the following code is introduced into the page: <
 In-depth analysis: jQuery's advantages and disadvantages
Feb 27, 2024 pm 05:18 PM
jQuery is a fast, small, feature-rich JavaScript library widely used in front-end development. Since its release in 2006, jQuery has become one of the tools of choice for many developers, but in practical applications, it also has some advantages and disadvantages. This article will deeply analyze the advantages and disadvantages of jQuery and illustrate it with specific code examples. Advantages: 1. Concise syntax jQuery's syntax design is concise and clear, which can greatly improve the readability and writing efficiency of the code. for example,
 Use jQuery to modify the text content of all a tags
Feb 28, 2024 pm 05:42 PM
Title: Use jQuery to modify the text content of all a tags. jQuery is a popular JavaScript library that is widely used to handle DOM operations. In web development, we often encounter the need to modify the text content of the link tag (a tag) on the page. This article will explain how to use jQuery to achieve this goal, and provide specific code examples. First, we need to introduce the jQuery library into the page. Add the following code in the HTML file:
 How to tell if a jQuery element has a specific attribute?
Feb 29, 2024 am 09:03 AM
How to tell if a jQuery element has a specific attribute? When using jQuery to operate DOM elements, you often encounter situations where you need to determine whether an element has a specific attribute. In this case, we can easily implement this function with the help of the methods provided by jQuery. The following will introduce two commonly used methods to determine whether a jQuery element has specific attributes, and attach specific code examples. Method 1: Use the attr() method and typeof operator // to determine whether the element has a specific attribute
 Understand the role and application scenarios of eq in jQuery
Feb 28, 2024 pm 01:15 PM
jQuery is a popular JavaScript library that is widely used to handle DOM manipulation and event handling in web pages. In jQuery, the eq() method is used to select elements at a specified index position. The specific usage and application scenarios are as follows. In jQuery, the eq() method selects the element at a specified index position. Index positions start counting from 0, i.e. the index of the first element is 0, the index of the second element is 1, and so on. The syntax of the eq() method is as follows: $("s


