
 Software Tutorial
Computer Software
How to record multiple windows at the same time in OBS Studio_How to record multiple windows at the same time in OBS Studio
Software Tutorial
Computer Software
How to record multiple windows at the same time in OBS Studio_How to record multiple windows at the same time in OBS Studio
How to record multiple windows at the same time in OBS Studio_How to record multiple windows at the same time in OBS Studio

php Editor Banana shares how to use OBS Studio to record multiple windows. OBS Studio is a free and open source live broadcast and recording software that supports multiple platforms such as Windows, macOS, and Linux. To record multiple windows at the same time, you can use the "Window Capture" function to achieve this. First open OBS Studio, click the " " sign to add a new "Window Capture" source, and then select the window you want to record. You can repeat this step to add multiple window sources. After adjusting the size and position of the window source, you can start recording multiple windows. Using OBS Studio to record multiple windows, you can easily create presentations, teaching videos and other content.
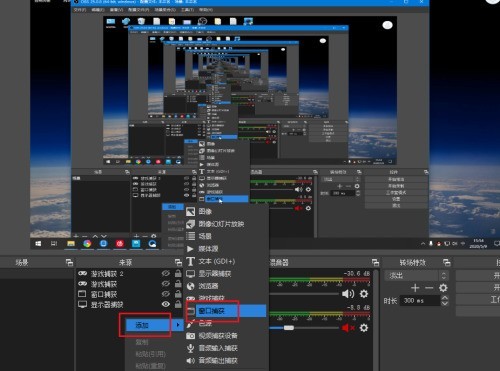
1. First, click to enter the OBS Studio recording software.

2. Then click Add directly at the source and select the window type to be added.
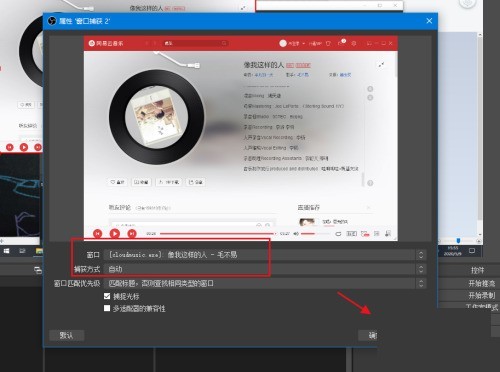
3. Then select a window to be added.
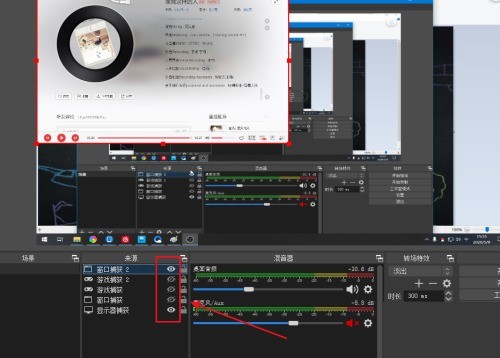
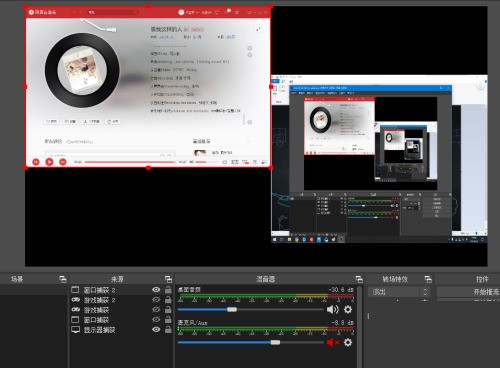
4. After adding multiple windows, you can click the eye icon behind the source to turn on or off the display.
5. Click on the added window, a red border will appear, and you can drag and zoom.
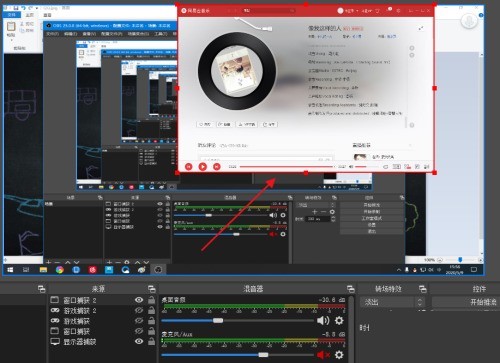
6. Finally, drag and zoom the multiple added windows to the required positions to record multiple windows at the same time.
The above is the detailed content of How to record multiple windows at the same time in OBS Studio_How to record multiple windows at the same time in OBS Studio. For more information, please follow other related articles on the PHP Chinese website!

Hot AI Tools

Undresser.AI Undress
AI-powered app for creating realistic nude photos

AI Clothes Remover
Online AI tool for removing clothes from photos.

Undress AI Tool
Undress images for free

Clothoff.io
AI clothes remover

AI Hentai Generator
Generate AI Hentai for free.

Hot Article
Hot Tools

Notepad++7.3.1
Easy-to-use and free code editor

SublimeText3 Chinese version
Chinese version, very easy to use

Zend Studio 13.0.1
Powerful PHP integrated development environment

Dreamweaver CS6
Visual web development tools

SublimeText3 Mac version
God-level code editing software (SublimeText3)
Hot Topics
 1378
1378
 52
52

 How to open macos terminal
Apr 12, 2025 pm 05:39 PM
How to open macos terminal
Apr 12, 2025 pm 05:39 PM
Open a file in a macOS terminal: Open the terminal to navigate to the file directory: cd ~/Desktop Use open command: open test.txtOther options: Use the -a option to specify that a specific application uses the -R option to display files only in Finder
 How to open a terminal for macos
Apr 12, 2025 pm 05:30 PM
How to open a terminal for macos
Apr 12, 2025 pm 05:30 PM
The following five methods can be used to open a macOS terminal: Use Spotlight Search through application folders Use Launchpad to use shortcut keys Command Shift U through terminal menus
 How to view the system name of macos
Apr 12, 2025 pm 05:24 PM
How to view the system name of macos
Apr 12, 2025 pm 05:24 PM
How to view system name in macOS: 1. Click the Apple menu; 2. Select "About Native"; 3. The "Device Name" field displayed in the "Overview" tab is the system name. System name usage: identify Mac, network settings, command line, backup. To change the system name: 1. Access About Native Machine; 2. Click the "Name" field; 3. Enter a new name; 4. Click "Save".
 How to take screenshots of macos
Apr 12, 2025 pm 05:36 PM
How to take screenshots of macos
Apr 12, 2025 pm 05:36 PM
There are four screenshot methods on macOS: shortcut keys, touch bars, preview apps, and third-party apps. After the screenshot, the image will be automatically saved to PNG format on the desktop, and you can adjust the format, delay, save position, and floating thumbnail settings through System Preferences.
 What to do if the apache80 port is occupied
Apr 13, 2025 pm 01:24 PM
What to do if the apache80 port is occupied
Apr 13, 2025 pm 01:24 PM
When the Apache 80 port is occupied, the solution is as follows: find out the process that occupies the port and close it. Check the firewall settings to make sure Apache is not blocked. If the above method does not work, please reconfigure Apache to use a different port. Restart the Apache service.
 How to install fonts for macos
Apr 12, 2025 pm 05:21 PM
How to install fonts for macos
Apr 12, 2025 pm 05:21 PM
Steps to install fonts in macOS: Download the font file from a reliable source. Use the font preview program or terminal to install it into the system font folder (the sudo command is required to share it by users). Verify the installation in Font Book. Select the installed font to use in the application.
 How to record macos screen
Apr 12, 2025 pm 05:33 PM
How to record macos screen
Apr 12, 2025 pm 05:33 PM
macOS has a built-in "Screen Recording" application that can be used to record screen videos. Steps: 1. Start the application; 2. Select the recording range (the entire screen or a specific application); 3. Enable/disable the microphone; 4. Click the "Record" button; 5. Click the "Stop" button to complete. Save the recording file in .mov format in the "Movies" folder.
 How to start apache
Apr 13, 2025 pm 01:06 PM
How to start apache
Apr 13, 2025 pm 01:06 PM
The steps to start Apache are as follows: Install Apache (command: sudo apt-get install apache2 or download it from the official website) Start Apache (Linux: sudo systemctl start apache2; Windows: Right-click the "Apache2.4" service and select "Start") Check whether it has been started (Linux: sudo systemctl status apache2; Windows: Check the status of the "Apache2.4" service in the service manager) Enable boot automatically (optional, Linux: sudo systemctl
