 System Tutorial
 Windows Series
 Can the boot partition be deleted? How to fix the accidentally deleted boot partition in Win10
Can the boot partition be deleted? How to fix the accidentally deleted boot partition in Win10
php Editor Strawberry In the Win10 system, sometimes it is necessary to delete the boot partition to free up disk space or perform system repairs. However, you need to be careful when deleting the boot partition. If you are not careful, the system may not start. This article will introduce in detail how to safely delete the boot partition repair method in Win10 system, allowing you to easily deal with disk space problems.
EFI system partition (abbreviated as ESP) is a partition on a computer hard drive or solid-state drive based on UEFI (Unified Extensible Firmware Interface). This partition contains the boot loader and device driver files. The firmware will be These files are used when booting.
The System Reserved Partition is a hidden partition on BIOS-based computers that consists of two parts, including the boot manager and boot configuration data (BCD), the startup file used for BitLocker drive encryption.
Delete boot partition in Windows 10?
Either the EFI system partition or the system reserved partition can help you boot the installed operating system, both contain boot files that will be used by the firmware when Windows boots. Once you accidentally delete the boot partition in Windows 10 or the boot file is missing/corrupted, your computer will not boot. In short, do not delete the boot partition on your computer easily.
What should I do if the boot partition is deleted?
As mentioned above, the boot partition is very important, it can help you start the Window system. Without a boot partition, the computer cannot start. However, if you accidentally deleted the Windows boot partition, then you must want to know how to recover deleted boot partition in Windows 11/10/8/7. See below and learn how to recover a partition through three different methods.
Method 1. Use partition software to repair the boot partition
Here, I will introduce you to a partition recovery software - AOMEI Partition Assistant. With it, you can easily recover deleted Windows partition as long as you don't do anything to the boot partition after deletion. Moreover, you can use it to recover lost partition in Windows (all versions).
In addition, AOMEI Partition Assistant is also a multifunctional partition manager, you can use it to do more things, such as resizing the system partition, moving unallocated space to the left or On the right, you can expand your NTFS system drive without rebooting, remove write protection from your hard drive, and more.
Step 1. Make a bootable USB disk on another working computer
Because the boot partition was accidentally deleted, the computer cannot start, so all we need to do on another working computer is Create a bootable disk on a Windows computer.
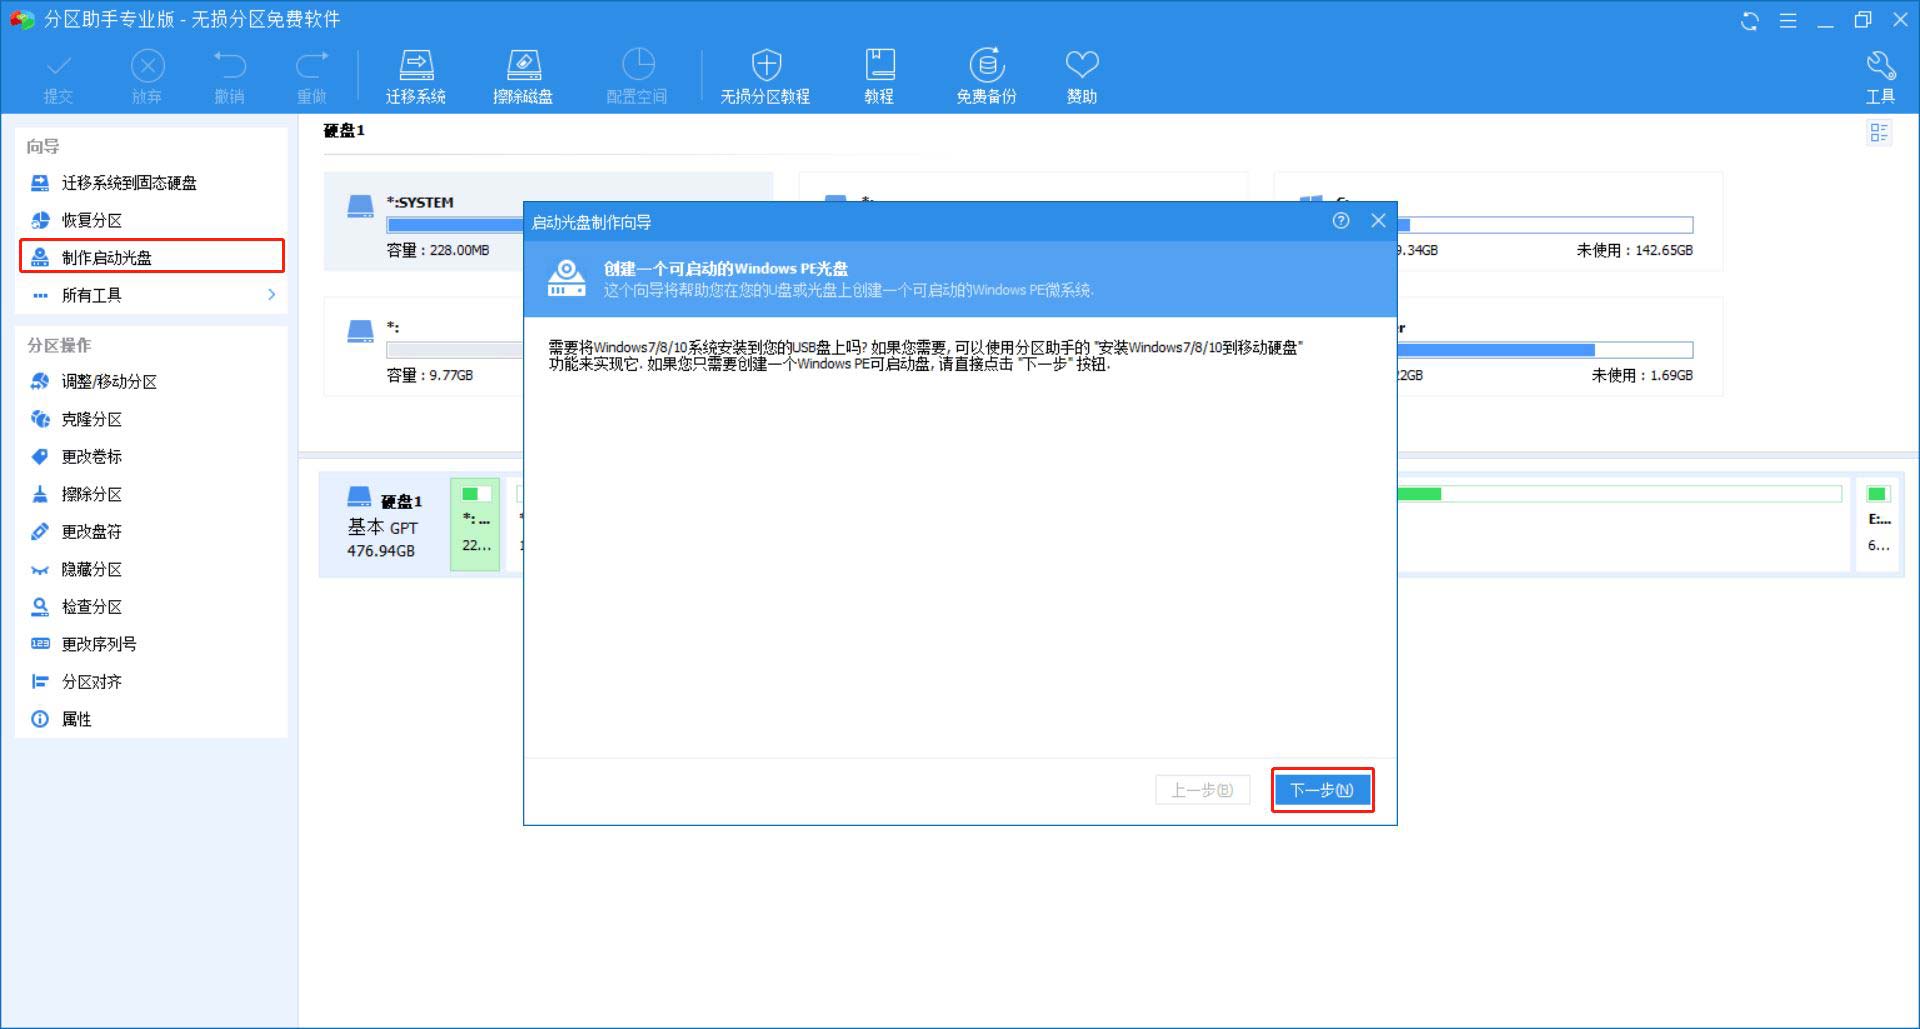
1. Connect an empty USB flash drive to a working Windows computer, install and start AOMEI Partition Assistant on this computer. Click "Make Bootable Disc" on the left panel and "Next" on the next screen.
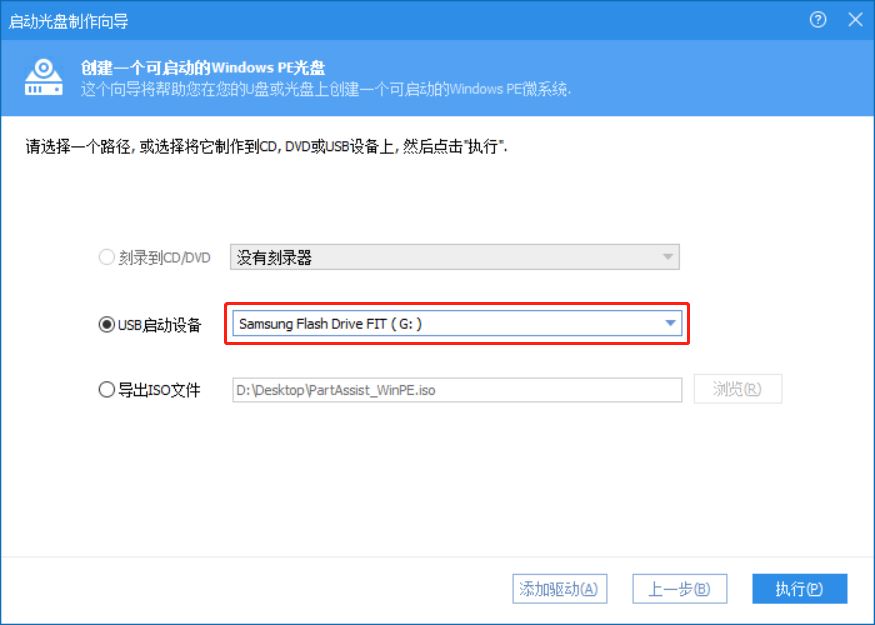
#2. Check "USB boot device" in the following window, and then click "Execute" to start the pending operation.
Step 2. Recover the partition in WinPE mode
After the boot U disk is successfully created (Aomei Partition Assistant is pre-installed), you can connect to the deletion system Windows computer that cannot boot after partitioning. Restart it and keep pressing F1, F2, F12 or other function keys to enter the BIOS. You need to change the boot order and set the USB disk as the priority to start the computer.
After starting the computer, you will see AOMEI Partition Assistant running. Then do the following:
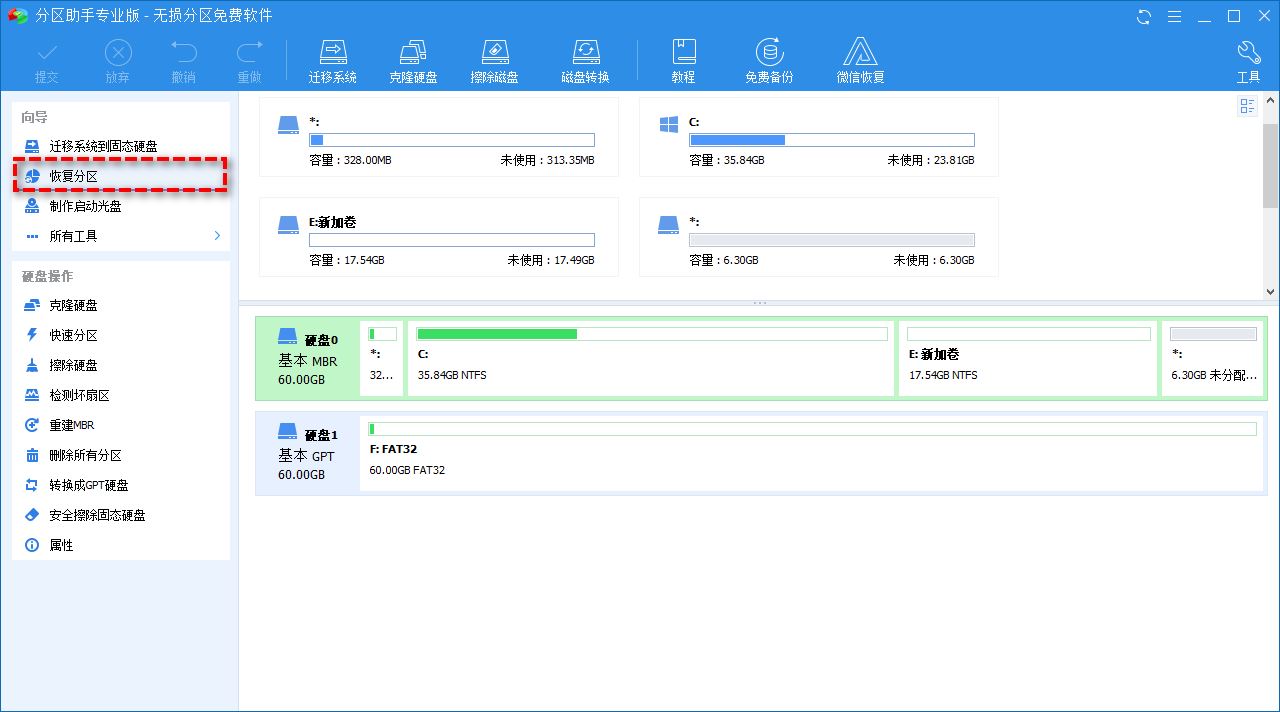
1. Click "Recover Partition" on the left panel.
#2. Select the disk containing the deleted boot partition.
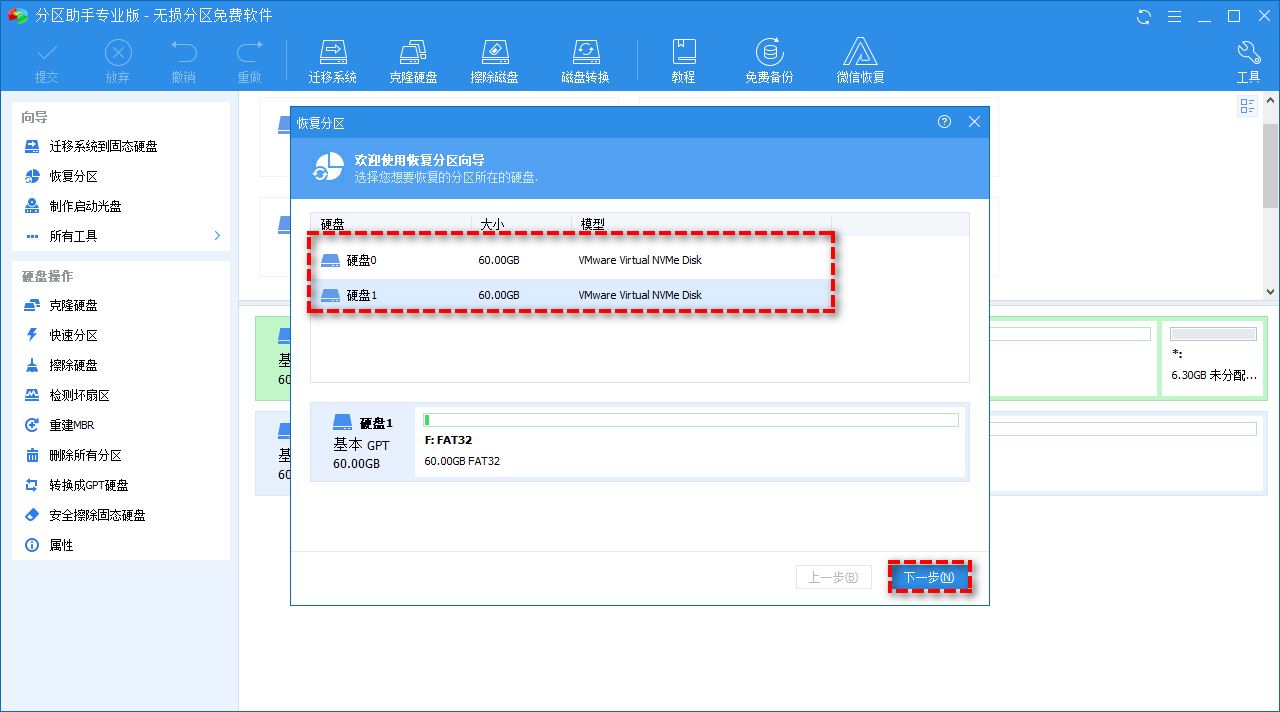
#3. Select "Quick Search" for the first time and click "Next". This method takes less time. If you cannot find the deleted partition, you can choose "Full Search" later.
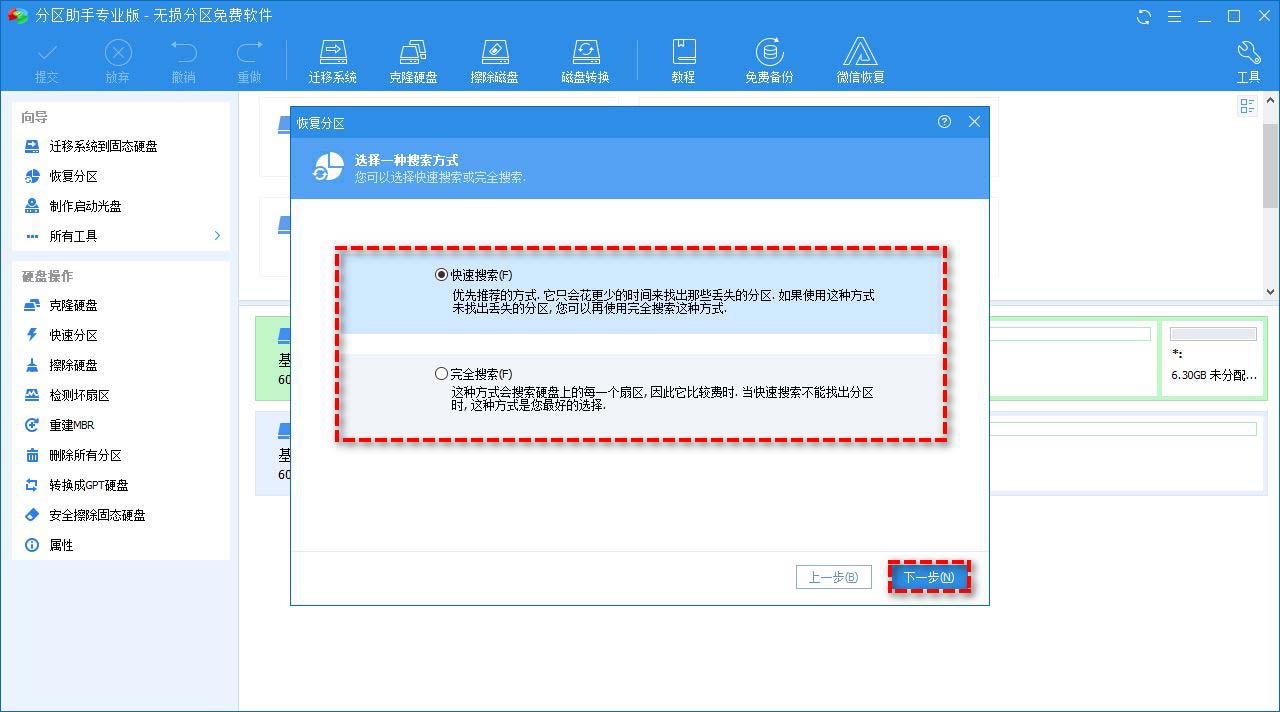
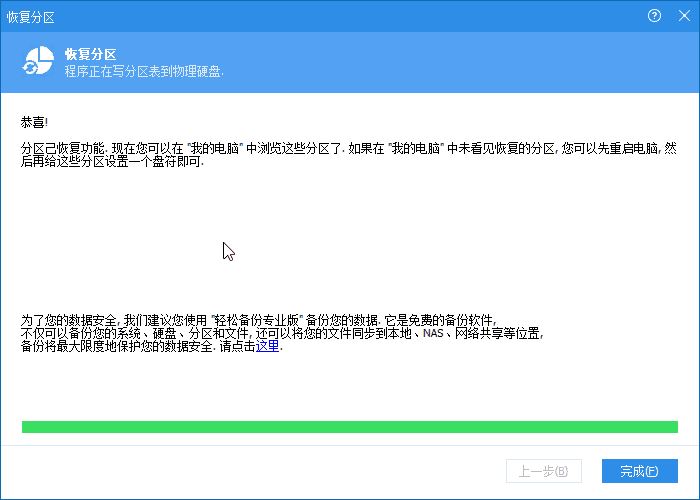
#4. Select the deleted boot partition in the following list and click Continue. Wait for the process to complete and click "Finish" when the message that the partition has been successfully recovered appears.
Method 2. Use CMD to repair the boot partition
Given that recovering deleted EFI system partition and system reserved partition are different, I will tell you how to recover deleted partition respectively. Before recovering the partition, you need to download the Windows 10 Media Creation Tool from Microsoft and follow the instructions to create an installation disk for your computer.
Type 1: Recover accidentally deleted EFI system partition in Windows 10
1. Insert the installation disk into your computer and boot from it.
2. In the first screen, press “Shift F10” to invoke the command prompt.
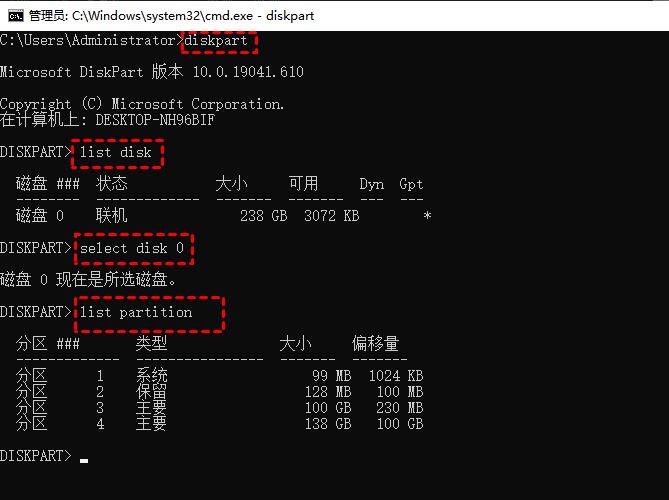
3. Type the following commands and press Enter after each command.
diskpartlist diskselect disk n(n指的是包含已删除EFI System 分区的磁盘。)list partition
create partition efiformat quick fs=fat32list partitionlist volume(查找属于已安装 Windows 操作系统的卷号。)exit(退出磁盘部分)
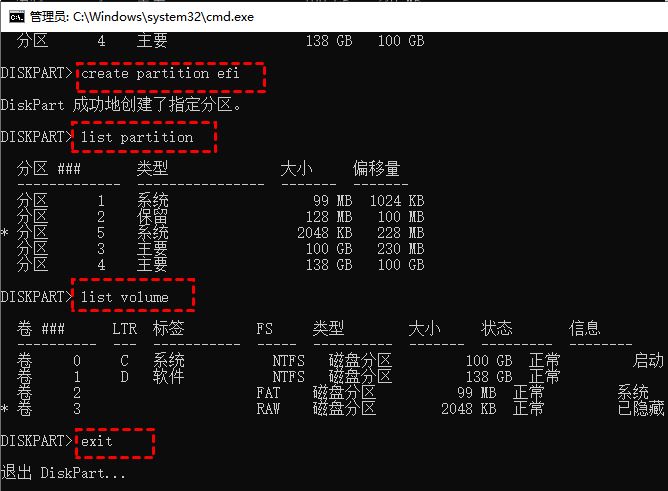
bcdboot m:\windows(m指已安装的Windows操作系统的卷号。)

Note: The "bcdboot m:\windows" command will delete the startup file Copy from Windows partition to EFI system partition and create BCD storage in that partition.
4. Remove the installation disk and restart the computer
Type 2: Recover accidentally deleted system reserved partition in Windows 10
1. Boot from the installation drive and Use "Shift F10" to summon the command prompt.
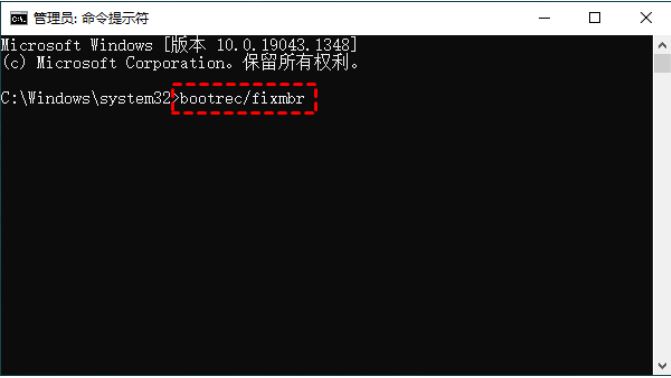
2. Type the following command at the command prompt and press "Enter".
bootrec /fixmbr
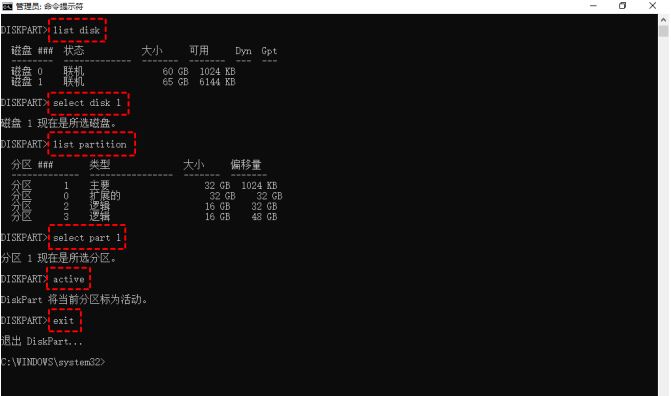
diskpartselect disk 0list partitionselect partition n(n是 Windows 操作系统分区)activeexit(退出磁盘部分)
bootrec /fixbootbootrec /rebuildbcd

NOTE: You can boot from a repaired drive. If you receive a message like bootmgr is missing, you need to copy the bootmgr file from the Windows installation drive to the Windows operating system partition root directory.
3. Type the following commands in order, and then press "Enter".
Diskpartlist volume(查找并记住 DVD-ROM 的卷号)exit(退出磁盘部分)
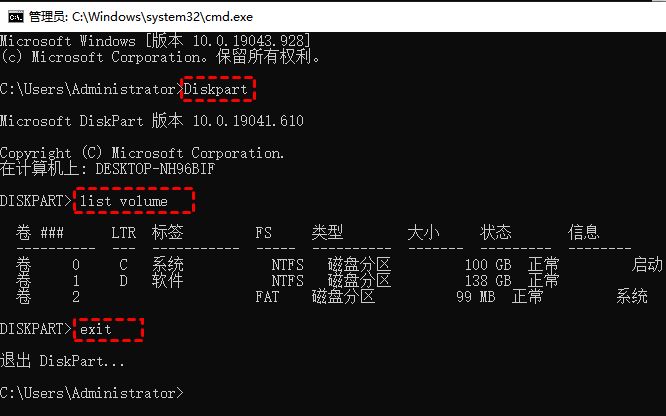
4. Copy the bootmgr file to the root directory of the Windows operating system partition. You can type the following command and press enter.
copy n:\bootmgr C:\(n: 指 DVD-ROM 的卷号)

Method 3. Repair the boot partition by reinstalling Windows 10
If you created a Windows 10 recovery disk, you can use it to restore your computer. Additionally, if you have an installation drive, you can reinstall Windows 10 from an installation USB flash drive.
Before reinstalling, you need to connect the U disk to the computer. Set the U disk as the priority boot through BIOS settings, then restart the computer and press any key to boot from the U disk.
Use detailed steps to reinstall your computer.
1. Wait for the Windows 10 installation files to load.
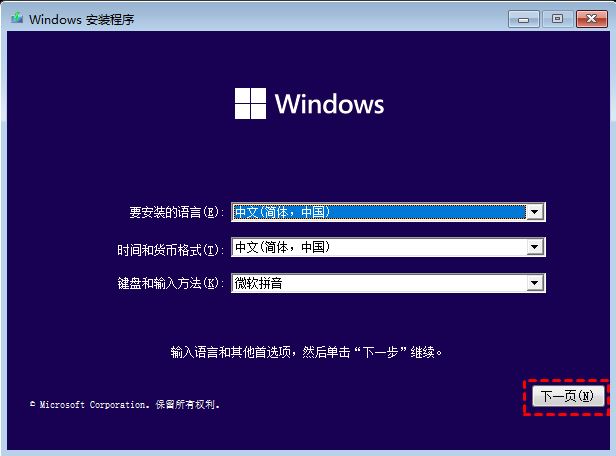
2. Set the language and other preferences, then click Next and Install Now.
3. Click I don’t have a product key and Next. If the product key is already activated on your computer, the product key will reactivate itself after reinstallation.
4. Select your operating system and click Next.
5. Accept the license terms and click Next.
6. Select Windows 10 installation type: Custom: Install Windows only (Advanced).
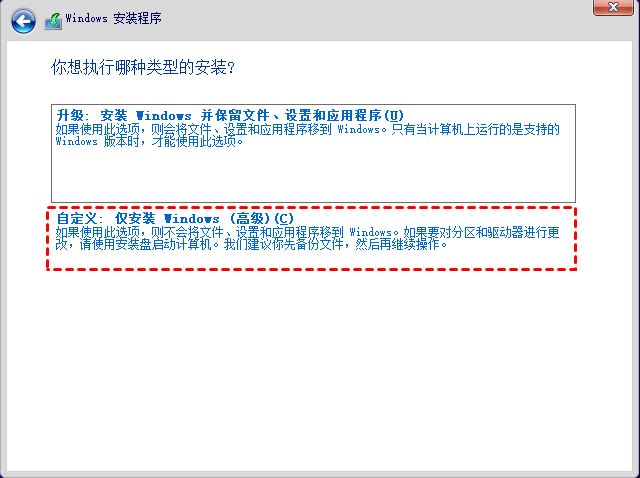
#7. Click on the drive options and you will see some options at the bottom (eg: Delete, Format, Extend).
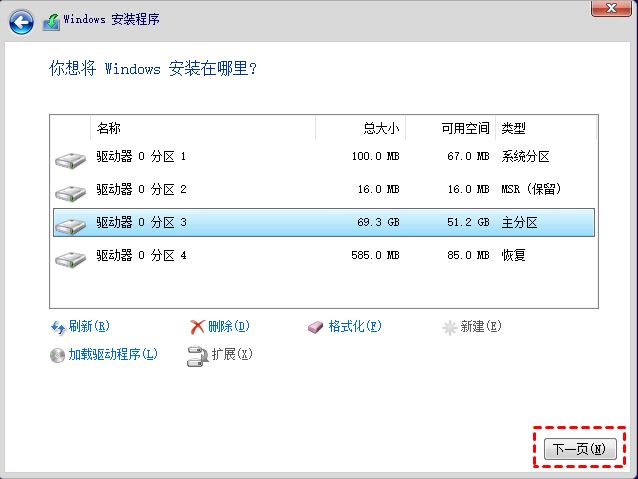
8. Right-click the system partition and operating system-related partitions, and click "Delete".
9. Select Unallocated Space and click Next to install your Windows.
Conclusion
To recover an accidentally deleted boot partition in Windows 10, you can use the partition recovery software AOMEI Partition Assistant. It is simple to operate and can be easily completed by beginners. It only requires a normal working computer. computer, and then follow the on-screen instructions.
Also, you can use CMD to recover deleted Windows partition in Windows 10 for free. It's very useful, but its complicated command line makes it a bit difficult to operate.
If you have a recovery disk or installation media, reinstalling Windows 10 from a USB flash drive is also a good choice, but in this case you will need to reinstall all applications again and will lose files.
The above is the detailed content of Can the boot partition be deleted? How to fix the accidentally deleted boot partition in Win10. For more information, please follow other related articles on the PHP Chinese website!

Hot AI Tools

Undresser.AI Undress
AI-powered app for creating realistic nude photos

AI Clothes Remover
Online AI tool for removing clothes from photos.

Undress AI Tool
Undress images for free

Clothoff.io
AI clothes remover

AI Hentai Generator
Generate AI Hentai for free.

Hot Article

Hot Tools

Notepad++7.3.1
Easy-to-use and free code editor

SublimeText3 Chinese version
Chinese version, very easy to use

Zend Studio 13.0.1
Powerful PHP integrated development environment

Dreamweaver CS6
Visual web development tools

SublimeText3 Mac version
God-level code editing software (SublimeText3)

Hot Topics
 1378
1378
 52
52
 System Restore prompts that you must enable system protection on this drive
Jun 19, 2024 pm 12:23 PM
The computer has a restore point, and when the system is restored, it prompts "You must enable system protection on this drive." This usually means that the system protection function is not turned on. System protection is a feature provided by the Windows operating system that can create system restore points to back up system files and settings. That way, if something goes wrong, you can revert to a previous state. When the system fails and you cannot enter the desktop to start it, you can only try the following method: Troubleshooting-Advanced Options-Command Prompt Command 1 netstartvssrstrui.exe/offline:C:\windows=active Command 2 cd%windir%\system32 \configrenSYSTEMsy
 What should I do if win10 does not switch users? Win10 login interface does not have the option to switch users. Solution
Jun 25, 2024 pm 05:21 PM
A problem that Windows 10 users may encounter is that they cannot find the switch user option on the login interface. So what should I do if there is no switch user option on the win10 login interface? Let this site give users a detailed explanation of the problem of not switching user options in the win10 login interface. Detailed solution to the problem of switching user options on the Win10 login interface: Check user account settings: First, make sure you have multiple user accounts on your computer and that these accounts are enabled. You can check and enable the account by following these steps: a. Press Win+I keys to open Settings and select "Accounts". b. Select "Family & Others" or &ld in the left navigation bar
 How to permanently turn off real-time protection in win10? How to disable real-time protection function in win10 computer 0
Jun 05, 2024 pm 09:46 PM
Although the comprehensive anti-virus software that comes with Windows 10 system can continuously protect the security of your personal computer, sometimes it may also affect certain downloaded files. For some users, it may be more appropriate to temporarily turn off the real-time protection function. But many users don’t know how to permanently turn off the real-time protection feature on win10 system. 1. First, press the "Win+R" keys to open the run window, enter the "gpedit.msc" command to open the local Group Policy Editor interface; 2. Then, in the opened interface, click "Computer Configuration/Administrative Templates/ Windows Components/MicrosoftDef
 How to restore the default wallpaper in win10? One trick to quickly restore the default wallpaper in Windows 10 system
Jun 02, 2024 pm 02:07 PM
In Windows 10 system, if you want to return to the system default wallpaper, you can follow the following steps: 1. Right-click a blank space on the desktop and select Personalize in the pop-up menu. 2. This will open the Personalization window in Settings. In the left menu, click Background. 3. Under the "Background" settings, find and click the drop-down menu next to "Choosepicture", and then select Windows Default (Windows Default) or directly select a picture that looks like the default wallpaper in the picture preview below ( if there are multiple options). 4. If your system has multiple versions
 What should I do if Win10 takes a screenshot and crashes? How to solve the problem of Win10 flashing and then disappearing after taking a screenshot?
Jun 02, 2024 pm 12:48 PM
There are many reasons why the screenshot disappears after taking a screenshot in Win10. Users can first check the screenshot save location or adjust the screenshot settings, or check the animation effect to check it. If it really doesn't work, you can also choose to update the driver and operating system to perform the operation. Let this website carefully introduce to users the analysis of the problem of Win10 disappearing after taking a screenshot. Analysis of the problem after win10 takes a picture and it flashes and disappears 1. Check where the screenshot is saved: When you use the Win+PrtSc (PrintScreen) key combination to take a screenshot, the screenshot is usually saved in the C:\Users\YourUsername\Pictures\Screenshots folder. please
 Windows cannot start the Windows Audio service Error 0x80070005
Jun 19, 2024 pm 01:08 PM
The guy's computer appears: Windows cannot start the WindowsAudio service (located on the local computer). Error 0x8007005: Access denied. This situation is usually caused by user permissions. You can try the following methods to fix it. Method 1: Modify the registry to add permissions through batch processing, create a new text document on the desktop, save it as .bat, and right-click the administrator to go far. Echo==========================EchoProcessingRegistryPermission.Pleasewait...Echo================== ========subinacl/subkey
 What to do if the Win10 Task Manager crashes? How to fix the Win10 Task Manager crash?
Jun 25, 2024 pm 04:31 PM
Hello everyone, have you ever encountered the situation where the Windows 10 Task Manager keeps crashing? This function helps us a lot, allowing us to quickly see all running tasks, which is very convenient to use, right? However, some friends said that they encountered this problem and didn’t know how to solve it, so let me share with you the specific solution! Solution to Win10 Task Manager crash 1. First, press and hold the "Win" + "R" keys on the keyboard to open Run, enter "regedit" and press the Enter key. 2. Expand the folders and find "HKEY_CURRENT_USERSoftwareMicros
 How to turn off popular searches in Windows 10 system? List of methods to close popular searches in Windows 10 system
Jun 03, 2024 pm 08:46 PM
In win10 system, hot search is one of the more practical methods, but sometimes it can cause certain troubles. So how to turn off hot search? Let’s take a look below! Step 1: Open the Settings app First, click on the Windows icon in the lower left corner of the screen and select the Settings app. Step 2: Enter "Personalization" settings In the "Settings" app, click the "Personalization" option. Step 3: Select the “Search” option In the “Personalization” settings, select the “Search” option. Step 4: Turn off popular searches. In the "Search" option, find the option "Show popular searches in search" and turn it off. Professional Tool Recommendation 1. Xiaozhi Soso Xiaozhi Soso—Quick Search and One-Click Positioning—Professional Computer Search Tool


