Detailed steps for drawing a dolphin in Solidworks
SolidworksThe detailed steps for drawing a dolphin is a delicate job and requires professional software support. PHP editor Banana will introduce you in detail every step of drawing dolphins using Solidworks software to help you easily master the drawing skills. In this tutorial, you will learn how to model, render and complete the final design through Solidworks, allowing you to appreciate the exquisite dolphin design works while learning Solidworks drawing skills.
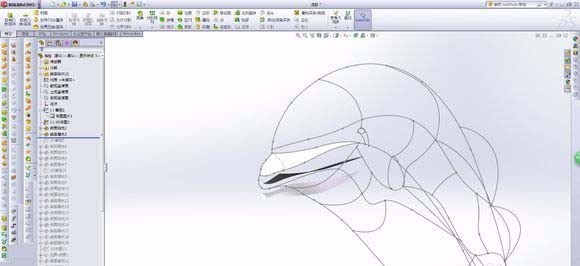
1. 3D sketch. First, you need to prepare an approximate side view of a dolphin. Use the spline curve of the 2D sketch to draw its lateral anatomical line. This will serve as the baseline for the following steps. Create a new 3D sketch based on this picture and subdivide the dolphin according to the volume and shadow relationship in the picture. surface, so we get the sketch above.


#2. Hide the sketch of the picture and leave the 3D sketch and the sketch of the lateral anatomy line. The next step is to use 3D sketches to project the edges one by one, and fill them with surface filling/boundary surfaces. There is no need for any tangent relationship, as long as the surfaces are in contact with each other. Sometimes the slender 3-cornered surfaces like this cannot be generated as desired. For the surface, it is necessary to draw another sketch, as shown by the dotted line in the picture. After segmentation, generate them one by one.

3. Continue to fill in the curved surface. There are muscles in the abdomen and back of the dolphin. If the subdivision is not accurate, which side will protrude and which side will be concave will inevitably affect the overall appearance. , that is, the question of likeness and dissimilarity.

4. The front fin simply uses a closed spline curve (the front is rounded and the back is thin and flat) and two other open-loop curves, and the boundary surface is used to generate a smooth surface. This needs to be planned in advance in the first 3D sketch.

5. Next, fill in the curved surface of the abdomen and the surface of the tail. Since the dolphin’s tail is not round, and there are obvious breaking points between the abdomen and the tail, here we simply create the original 3D Just divide it in the sketch.


#6. Complete the tail, just like the front fin, the tail fin is also treated in the same way.

7. Now trace the outline of the dorsal fin, and draw a slightly bulging curve at the bottom toward the direction you are looking at, and then draw a central guide line for surface filling, otherwise If you fill it directly, the concave part cannot be made.

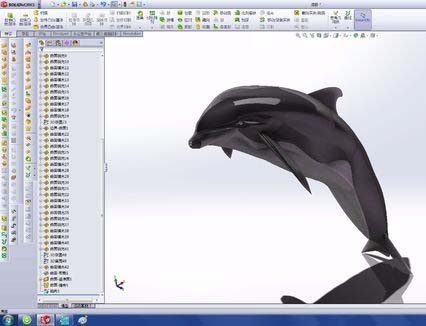
8. Create a flat area with the original side section line and tail fin, cut the two curved surfaces of the tail fin and back, and sew them together to create a solid body. The dolphin has no legs, so there is no need for symmetry. Fortunately, the mirror image does not have much impact on the overall dolphin. Just paint the separated faces.

9. Hide the sketch, change the display to not display the edges, and you are done.

The above is the detailed content of Detailed steps for drawing a dolphin in Solidworks. For more information, please follow other related articles on the PHP Chinese website!

Hot AI Tools

Undresser.AI Undress
AI-powered app for creating realistic nude photos

AI Clothes Remover
Online AI tool for removing clothes from photos.

Undress AI Tool
Undress images for free

Clothoff.io
AI clothes remover

AI Hentai Generator
Generate AI Hentai for free.

Hot Article

Hot Tools

Notepad++7.3.1
Easy-to-use and free code editor

SublimeText3 Chinese version
Chinese version, very easy to use

Zend Studio 13.0.1
Powerful PHP integrated development environment

Dreamweaver CS6
Visual web development tools

SublimeText3 Mac version
God-level code editing software (SublimeText3)

Hot Topics
 1378
1378
 52
52
![[PROVEN] Steam Error e87 Fix: Get Gaming Again in Minutes!](https://img.php.cn/upload/article/202503/18/2025031817560457401.jpg?x-oss-process=image/resize,m_fill,h_207,w_330) [PROVEN] Steam Error e87 Fix: Get Gaming Again in Minutes!
Mar 18, 2025 pm 05:56 PM
[PROVEN] Steam Error e87 Fix: Get Gaming Again in Minutes!
Mar 18, 2025 pm 05:56 PM
Article discusses causes of Steam Error e87, including network issues, security software, server problems, outdated clients, and corrupted files. Offers prevention and solution strategies.[159 characters]
 Steam Error e87: What It Is & How to Fix It
Mar 18, 2025 pm 05:51 PM
Steam Error e87 occurs during Steam client updates or launches due to connection issues. Fix it by restarting devices, checking server status, changing DNS, disabling security software, clearing cache, or reinstalling Steam.
 Easy Fix: Steam Error e87 Explained & Solved
Mar 18, 2025 pm 05:53 PM
Steam Error e87, caused by connectivity issues, can be fixed without reinstalling by restarting, checking internet, and clearing cache. Adjusting Steam settings helps prevent future occurrences.
 How to Fix Steam Error Code e87: The ULTIMATE Guide
Mar 18, 2025 pm 05:51 PM
Article discusses fixing Steam Error Code e87, caused by network issues, corrupt files, or client problems. Provides troubleshooting steps and prevention tips.
 Steam Error e87: Why It Happens & 5 Ways to Fix It
Mar 18, 2025 pm 05:55 PM
Steam Error e87 disrupts gaming on Steam due to connectivity issues. The article discusses causes like unstable internet and server overload, and offers fixes like restarting Steam and checking for updates.
 Steam Error Code e87: Get Back to Gaming FAST!
Mar 18, 2025 pm 05:52 PM
The article discusses Steam Error Code e87, its causes like network issues, server problems, and corrupted files, and provides fixes and preventive measures to avoid it.Character count: 159
 How to fix: err_response_headers_multiple_access_control_allow_origin error in Google Chrome
Mar 21, 2025 pm 06:19 PM
Article discusses fixing "err_response_headers_multiple_access_control_allow_origin" error in Chrome by addressing multiple Access-Control-Allow-Origin headers.
 Steam Error e87 SOLVED! Quick Fix Guide for 2024
Mar 18, 2025 pm 05:49 PM
Article discusses Steam Error e87, offering solutions like restarting Steam, clearing cache, and updating. Preventive measures and community solutions are also covered.


