Tutorial on creating auxiliary views in Solidworks
php Xiaobian Strawberry introduces you to the tutorial on how to create an auxiliary view in Solidworks: Solidworks auxiliary view is a thumbnail generated through the main view, which is convenient for displaying the details and specific parts of the object. In Solidworks software, you can create auxiliary views through simple operations to improve work efficiency. Next, we will introduce in detail how to create auxiliary views in Solidworks to make you more comfortable in engineering design.
1. As shown in the figure, open the saved Solidworks drawing and you can see the next two views.
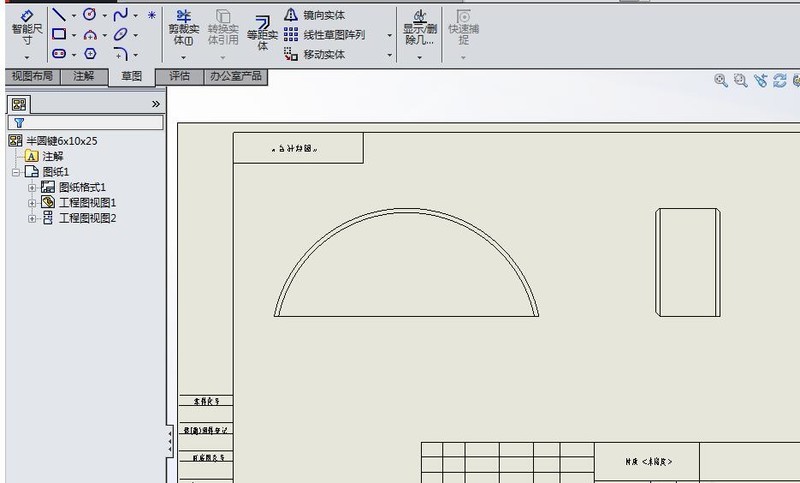
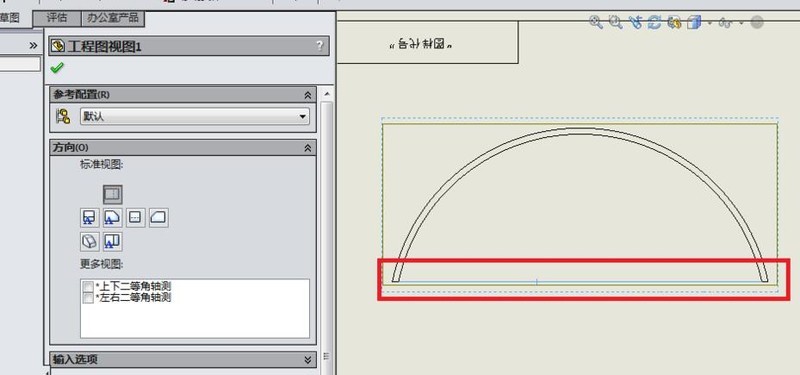
2. As shown in the picture, if you select this discolored straight line with the mouse, it will automatically pop up Project View 1. You don’t need to worry about Project View 1.
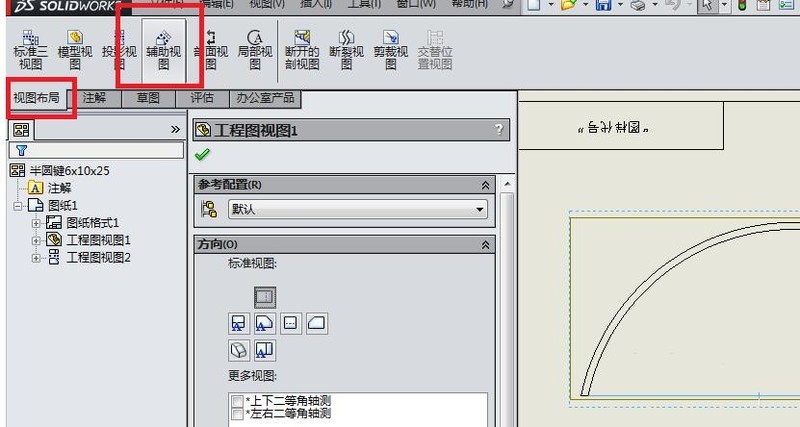
3. As shown in the picture, click [View Layout], find [Auxiliary View] in the toolbar of the view layout, and click it.
4. As shown in the figure, the [Auxiliary View] dialog box pops up, and the preview effect in the engineering drawing appears at the same time.
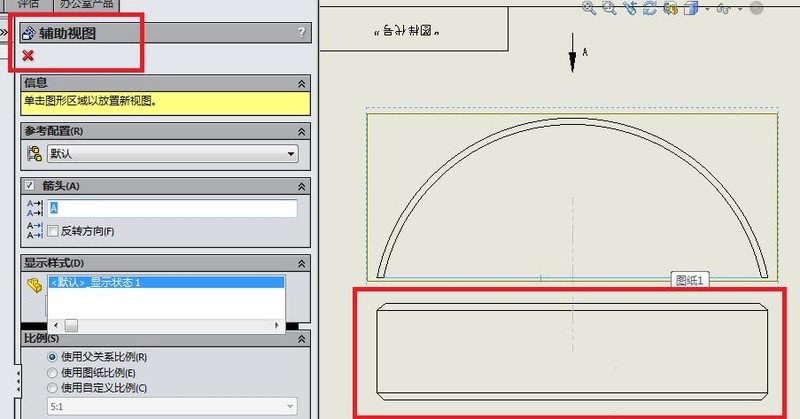
5. As shown in the picture, select the location and place the auxiliary view. When you click on the engineering drawing with the mouse, the auxiliary view is placed, which means the auxiliary view is created successfully. As shown in the figure, the [Auxiliary View] dialog box disappears, leaving only the [Engineering Drawing View].
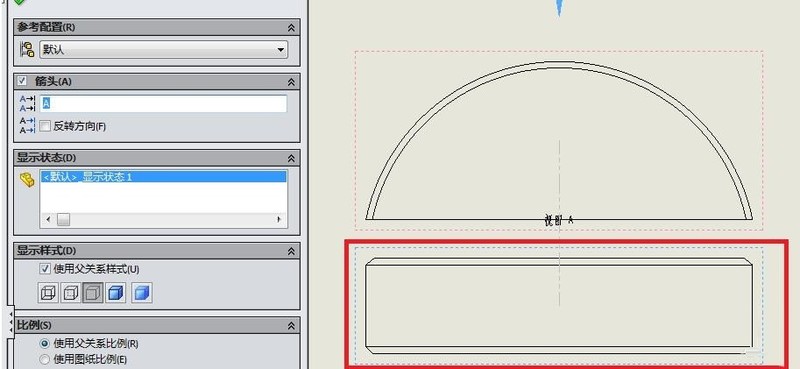
6. As shown in the figure, close the [Engineering Drawing View] dialog box, leaving only the graphics. The method to close the [Engineering Drawing View] dialog box is very simple. You can click the √ in the upper left corner, or you can directly click the left mouse button in the blank space of the engineering drawing.
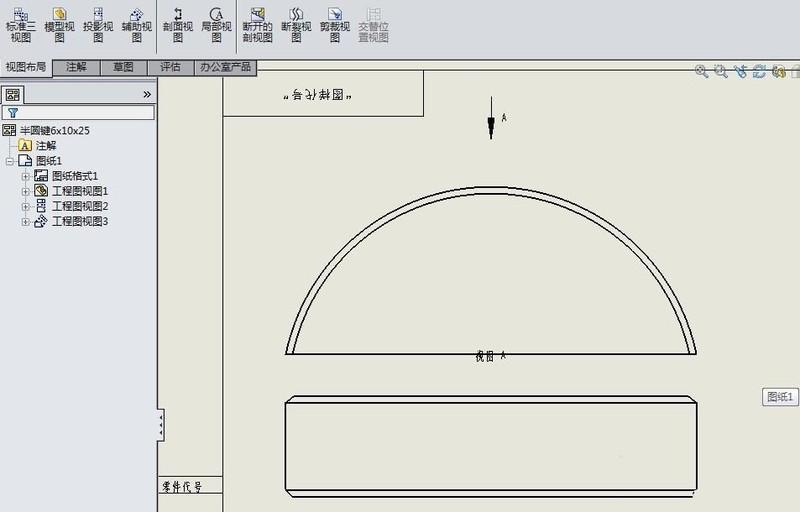
The above is the detailed content of Tutorial on creating auxiliary views in Solidworks. For more information, please follow other related articles on the PHP Chinese website!

Hot AI Tools

Undresser.AI Undress
AI-powered app for creating realistic nude photos

AI Clothes Remover
Online AI tool for removing clothes from photos.

Undress AI Tool
Undress images for free

Clothoff.io
AI clothes remover

AI Hentai Generator
Generate AI Hentai for free.

Hot Article

Hot Tools

Notepad++7.3.1
Easy-to-use and free code editor

SublimeText3 Chinese version
Chinese version, very easy to use

Zend Studio 13.0.1
Powerful PHP integrated development environment

Dreamweaver CS6
Visual web development tools

SublimeText3 Mac version
God-level code editing software (SublimeText3)

Hot Topics
 1382
1382
 52
52
![[PROVEN] Steam Error e87 Fix: Get Gaming Again in Minutes!](https://img.php.cn/upload/article/202503/18/2025031817560457401.jpg?x-oss-process=image/resize,m_fill,h_207,w_330) [PROVEN] Steam Error e87 Fix: Get Gaming Again in Minutes!
Mar 18, 2025 pm 05:56 PM
[PROVEN] Steam Error e87 Fix: Get Gaming Again in Minutes!
Mar 18, 2025 pm 05:56 PM
Article discusses causes of Steam Error e87, including network issues, security software, server problems, outdated clients, and corrupted files. Offers prevention and solution strategies.[159 characters]
 Easy Fix: Steam Error e87 Explained & Solved
Mar 18, 2025 pm 05:53 PM
Steam Error e87, caused by connectivity issues, can be fixed without reinstalling by restarting, checking internet, and clearing cache. Adjusting Steam settings helps prevent future occurrences.
 Steam Error e87: What It Is & How to Fix It
Mar 18, 2025 pm 05:51 PM
Steam Error e87 occurs during Steam client updates or launches due to connection issues. Fix it by restarting devices, checking server status, changing DNS, disabling security software, clearing cache, or reinstalling Steam.
 How to Fix Steam Error Code e87: The ULTIMATE Guide
Mar 18, 2025 pm 05:51 PM
Article discusses fixing Steam Error Code e87, caused by network issues, corrupt files, or client problems. Provides troubleshooting steps and prevention tips.
 Steam Error e87: Why It Happens & 5 Ways to Fix It
Mar 18, 2025 pm 05:55 PM
Steam Error e87 disrupts gaming on Steam due to connectivity issues. The article discusses causes like unstable internet and server overload, and offers fixes like restarting Steam and checking for updates.
 Steam Error Code e87: Get Back to Gaming FAST!
Mar 18, 2025 pm 05:52 PM
The article discusses Steam Error Code e87, its causes like network issues, server problems, and corrupted files, and provides fixes and preventive measures to avoid it.Character count: 159
 How to fix: err_response_headers_multiple_access_control_allow_origin error in Google Chrome
Mar 21, 2025 pm 06:19 PM
Article discusses fixing "err_response_headers_multiple_access_control_allow_origin" error in Chrome by addressing multiple Access-Control-Allow-Origin headers.
 How much does Microsoft PowerToys cost?
Apr 09, 2025 am 12:03 AM
Microsoft PowerToys is free. This collection of tools developed by Microsoft is designed to enhance Windows system functions and improve user productivity. By installing and using features such as FancyZones, users can customize window layouts and optimize workflows.


