

MSI z390 motherboard bios settings


MSI motherboard z390 bios interface is gray
The safe boot option of MSI motherboard is gray, which usually means that the feature is currently unavailable or disabled. There are several situations that may cause the Secure Boot option to be grayed out: BIOSUEFI version not supported: Some older MSI motherboards may not support the Secure Boot feature.
Press the computer startup shortcut key F2part and other keys to enter the BIOS settings. Enter the BIOS setting method for each brand of computer; find the default value for operating system optimization and set it to disabled or other operating systems; if it is still gray, Then reset the default charging settings.
When entering the BIOS, you must enter the admin password, or the administrator password; you can then enter the BIOS interface, but the various BIOS settings are locked, so most of them are gray and cannot be changed. If you want to change BIOS settings, you also need to enter the user password.
This means that the password you entered when entering the BIOS is not the administrator password. Therefore, many of the options you see are gray; in addition, it is possible that the gray options are automatically determined based on the upper-level project and do not need to be set.
The CPU frequency cannot be adjusted in the MSI motherboard BIOS. The possible reasons are: 1. The motherboard does not support adjusting the CPU frequency (overclocking). For example: Among the motherboards currently supporting the Intel LGA1151-pin 9th generation Core series platform, only the Z370Z390 has the CPU overclocking function, and other motherboard models can only view the CPU frequency.
First start the computer and press the DEL key to enter the motherboard BIOS setting interface. Select Soft Menu III Setup from the BIOS, this is the SoftMenu overclocking function of ABIT motherboard. After entering this function, we can see that the system automatically recognizes the CPU as 1800.
It is invalid to enable virtualization on MSI z390
1. Reason: Because DOCT is turned on. Workaround: Reset to resolve this issue. For reference as follows: Turn on the computer power, and continue to press the F2 key after booting to enter the BIOS interface, as shown below. Enter the advanced management interface by moving the cursor, as shown below.
2. This situation is normal. The operating system is actually bound to the motherboard. After replacing the motherboard, you will definitely need to reinstall the operating system. Even repairing the operating system cannot guarantee 100% compatibility or normal use. Reinstalling the operating system may resolve the issue.
3. The z390ud motherboard reset method is as follows: The first method: Step 1: Keep pressing the Delete key (usually the F2 key for notebooks) when the computer is turned on to enter the BIOS setting interface. Step 2: Select under the menu and press Enter. After selecting, press Enter again.
4. Restart the computer: Before starting the detection, it is best to restart the computer first. Sometimes, virtualization technology settings need to take effect after the system is restarted. Enter BIOSUEFI settings: When the computer is turned on, press the corresponding key (usually Del, FF10 or Esc) to enter the BIOSUEFI settings interface.
5. Advanced mode" and press Enter or press F7. Enter advanced mode, select "OC" and press Enter. Enter the "oc" interface and scroll down to find "CPU Features" and press Enter. After entering the CPU features Find "Intel Virtualization Technology", press Enter, and select "Allow". After saving, restart, and virtualization will be enabled.
6. Virtualization is a resource management technology, which is used for CPU virtualization. To enable it, not only does the CPU need to support it, but the motherboard itself also needs to support the virtualization function. , restart and press DEL to enter the BIOS, press F7 to enter the advanced mode, and click the option to enter Settings.
2. The specific steps to enter safe mode in win10 are as follows: First, we open the computer desktop, and then we enter the system. Go to the menu options, select Troubleshooting and then select Advanced Options. Then press the shortcut key on the computer to open the "Run" window. 3. msiclickbios5 sets the safe startup button. del key. According to the official website of msiclickbios5, when the motherboard interface appears, press the del key to enter the BIOS settings, then enter the advanced settings, set the security TrustedComputing, and then save the settings, so msiclickbios5 sets the safe boot and press the del key.
##4. If the motherboard model is indeed H310M S2, first enter the BIOS, then find "CSM Support" in the "BIOS" menu bar, change it to disabled, and then the safe boot mode option will appear below. (Secure Boot), just turn on the option according to your needs. 5. Click the Start menu button---Settings, as shown in the figure below. Select "Update and Security" in the settings dialog box. and select the "Restore" option in the security dialog box, as shown in the figure. Select the "Restart Now" button under "Advanced Startup" How to set up pcie on MSI z3901. Insert the disk into the USB interface and restart the computer. After seeing the MSI logo, press the "del" key to enter the setting interface. First, click on the language bar in the upper right corner and set it to Chinese - click "SETTINGS". 2. First open. Turn on the computer and press the DEI key on the keyboard to enter the bios. Next, find the PCIe interface location of the graphics card and finally activate the PCIe socket on the motherboard, and then save the settings.3. First of all, you need to make sure that the computer hard disk, especially the hard disk where the system is located, is not faulty. This screen may appear if the hard disk is started.
4. After finding the startup priority, select the first startup item as U disk startup, save and leave after completion. Since SATA and M. 2NVME is in two-choice mode, so motherboards including Z390 and Z490 are M when plugged into the SATA56 port. Disk 2 may not be recognized, so insert M first. 2, the SATA56 port will not be recognized either.
5. Gigabyte Z490 motherboard supports 11th generation U and can unlock PCIe0. All Gigabyte Z490 motherboards have reserved PCIe0 functions.
6. First of all, I don’t know which model of Gigabyte Z390 it is, so I’ll just give you an example.
z390ud motherboard reset
1. After restarting the computer and the screen lights up, press the buttons prompted on the screen. Keep pressing the "Del" key to enter the BIOS page. After entering the BIOS page, find the "BIOS Features" - "Intel Virtual Technology" and "VT-d" options, and change both "Disabled" to "Enabled".
2. Of course there are common problems. The memory support of ATX at this price can be said to be very bad. The official website states that it can support 4266MHz (OC), which basically means that the possible limit of plugging in A2B2 is 4000MHz. , for the Z390, I have to say that this upper limit is annoying, but when I look back at the price, everything is relieved.
3. In the hardware and sound of the control panel, if you use headphones, set the sound of the speaker to 0, so that there will be no current sound, and then you can turn on the noise suppression, echo cancellation and microphone. bunching. In addition, if the recording sound is relatively low, you can try adjusting the recording sound in the microphone column.
The above is the detailed content of MSI z390 motherboard bios settings. For more information, please follow other related articles on the PHP Chinese website!

Hot AI Tools

Undresser.AI Undress
AI-powered app for creating realistic nude photos

AI Clothes Remover
Online AI tool for removing clothes from photos.

Undress AI Tool
Undress images for free

Clothoff.io
AI clothes remover

AI Hentai Generator
Generate AI Hentai for free.

Hot Article
Hot Tools

Notepad++7.3.1
Easy-to-use and free code editor

SublimeText3 Chinese version
Chinese version, very easy to use

Zend Studio 13.0.1
Powerful PHP integrated development environment

Dreamweaver CS6
Visual web development tools

SublimeText3 Mac version
God-level code editing software (SublimeText3)
Hot Topics
 1376
1376
 52
52

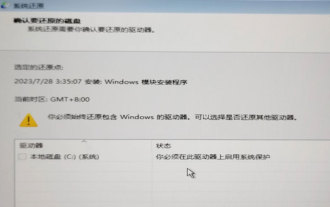 System Restore prompts that you must enable system protection on this drive
Jun 19, 2024 pm 12:23 PM
System Restore prompts that you must enable system protection on this drive
Jun 19, 2024 pm 12:23 PM
The computer has a restore point, and when the system is restored, it prompts "You must enable system protection on this drive." This usually means that the system protection function is not turned on. System protection is a feature provided by the Windows operating system that can create system restore points to back up system files and settings. That way, if something goes wrong, you can revert to a previous state. When the system fails and you cannot enter the desktop to start it, you can only try the following method: Troubleshooting-Advanced Options-Command Prompt Command 1 netstartvssrstrui.exe/offline:C:\windows=active Command 2 cd%windir%\system32 \configrenSYSTEMsy
 What should I do if win10 does not switch users? Win10 login interface does not have the option to switch users. Solution
Jun 25, 2024 pm 05:21 PM
What should I do if win10 does not switch users? Win10 login interface does not have the option to switch users. Solution
Jun 25, 2024 pm 05:21 PM
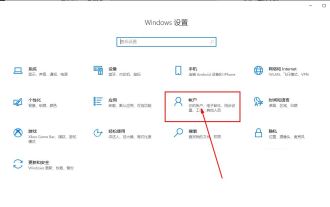
A problem that Windows 10 users may encounter is that they cannot find the switch user option on the login interface. So what should I do if there is no switch user option on the win10 login interface? Let this site give users a detailed explanation of the problem of not switching user options in the win10 login interface. Detailed solution to the problem of switching user options on the Win10 login interface: Check user account settings: First, make sure you have multiple user accounts on your computer and that these accounts are enabled. You can check and enable the account by following these steps: a. Press Win+I keys to open Settings and select "Accounts". b. Select "Family & Others" or &ld in the left navigation bar
 How to permanently turn off real-time protection in win10? How to disable real-time protection function in win10 computer 0
Jun 05, 2024 pm 09:46 PM
How to permanently turn off real-time protection in win10? How to disable real-time protection function in win10 computer 0
Jun 05, 2024 pm 09:46 PM
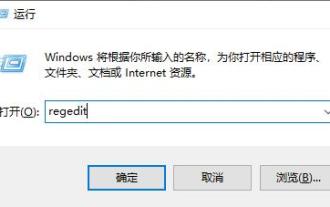
Although the comprehensive anti-virus software that comes with Windows 10 system can continuously protect the security of your personal computer, sometimes it may also affect certain downloaded files. For some users, it may be more appropriate to temporarily turn off the real-time protection function. But many users don’t know how to permanently turn off the real-time protection feature on win10 system. 1. First, press the "Win+R" keys to open the run window, enter the "gpedit.msc" command to open the local Group Policy Editor interface; 2. Then, in the opened interface, click "Computer Configuration/Administrative Templates/ Windows Components/MicrosoftDef
 How to restore the default wallpaper in win10? One trick to quickly restore the default wallpaper in Windows 10 system
Jun 02, 2024 pm 02:07 PM
How to restore the default wallpaper in win10? One trick to quickly restore the default wallpaper in Windows 10 system
Jun 02, 2024 pm 02:07 PM
In Windows 10 system, if you want to return to the system default wallpaper, you can follow the following steps: 1. Right-click a blank space on the desktop and select Personalize in the pop-up menu. 2. This will open the Personalization window in Settings. In the left menu, click Background. 3. Under the "Background" settings, find and click the drop-down menu next to "Choosepicture", and then select Windows Default (Windows Default) or directly select a picture that looks like the default wallpaper in the picture preview below ( if there are multiple options). 4. If your system has multiple versions
 What should I do if Win10 takes a screenshot and crashes? How to solve the problem of Win10 flashing and then disappearing after taking a screenshot?
Jun 02, 2024 pm 12:48 PM
What should I do if Win10 takes a screenshot and crashes? How to solve the problem of Win10 flashing and then disappearing after taking a screenshot?
Jun 02, 2024 pm 12:48 PM
There are many reasons why the screenshot disappears after taking a screenshot in Win10. Users can first check the screenshot save location or adjust the screenshot settings, or check the animation effect to check it. If it really doesn't work, you can also choose to update the driver and operating system to perform the operation. Let this website carefully introduce to users the analysis of the problem of Win10 disappearing after taking a screenshot. Analysis of the problem after win10 takes a picture and it flashes and disappears 1. Check where the screenshot is saved: When you use the Win+PrtSc (PrintScreen) key combination to take a screenshot, the screenshot is usually saved in the C:\Users\YourUsername\Pictures\Screenshots folder. please
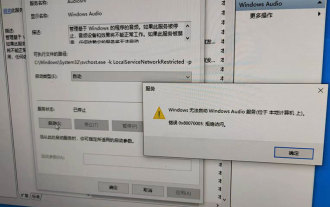 Windows cannot start the Windows Audio service Error 0x80070005
Jun 19, 2024 pm 01:08 PM
Windows cannot start the Windows Audio service Error 0x80070005
Jun 19, 2024 pm 01:08 PM
The guy's computer appears: Windows cannot start the WindowsAudio service (located on the local computer). Error 0x8007005: Access denied. This situation is usually caused by user permissions. You can try the following methods to fix it. Method 1: Modify the registry to add permissions through batch processing, create a new text document on the desktop, save it as .bat, and right-click the administrator to go far. Echo==========================EchoProcessingRegistryPermission.Pleasewait...Echo================== ========subinacl/subkey
 What to do if the Win10 Task Manager crashes? How to fix the Win10 Task Manager crash?
Jun 25, 2024 pm 04:31 PM
What to do if the Win10 Task Manager crashes? How to fix the Win10 Task Manager crash?
Jun 25, 2024 pm 04:31 PM
Hello everyone, have you ever encountered the situation where the Windows 10 Task Manager keeps crashing? This function helps us a lot, allowing us to quickly see all running tasks, which is very convenient to use, right? However, some friends said that they encountered this problem and didn’t know how to solve it, so let me share with you the specific solution! Solution to Win10 Task Manager crash 1. First, press and hold the "Win" + "R" keys on the keyboard to open Run, enter "regedit" and press the Enter key. 2. Expand the folders and find "HKEY_CURRENT_USERSoftwareMicros
 How to turn off popular searches in Windows 10 system? List of methods to close popular searches in Windows 10 system
Jun 03, 2024 pm 08:46 PM
How to turn off popular searches in Windows 10 system? List of methods to close popular searches in Windows 10 system
Jun 03, 2024 pm 08:46 PM
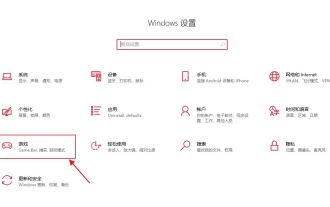
In win10 system, hot search is one of the more practical methods, but sometimes it can cause certain troubles. So how to turn off hot search? Let’s take a look below! Step 1: Open the Settings app First, click on the Windows icon in the lower left corner of the screen and select the Settings app. Step 2: Enter "Personalization" settings In the "Settings" app, click the "Personalization" option. Step 3: Select the “Search” option In the “Personalization” settings, select the “Search” option. Step 4: Turn off popular searches. In the "Search" option, find the option "Show popular searches in search" and turn it off. Professional Tool Recommendation 1. Xiaozhi Soso Xiaozhi Soso—Quick Search and One-Click Positioning—Professional Computer Search Tool
