
 Software Tutorial
Computer Software
Detailed method of making square tool using Geometric Sketchpad
Software Tutorial
Computer Software
Detailed method of making square tool using Geometric Sketchpad
Detailed method of making square tool using Geometric Sketchpad

php editor Strawberry will introduce you in detail the correct method of making a geometric drawing board. How to determine the size and position of drawing objects, techniques for drawing basic geometric shapes such as lines, circles, and polygons, and how to use tools for accurate measurement and calibration. Through the guidance of this article, you will be able to master the skills of making a standardized geometric drawing board, helping you to draw geometric figures more effectively.
1. Draw a square
Open the Geometric Sketchpad, create a new blank file, save the file to the Tool Folder of the Geometric Sketchpad installation folder, and name the file [Plane Tool].
Use the [Line Segment] tool to draw a line segment in the workspace and label it A and B.
Select point A, click the menu [Transform]-[Mark Center], (the faster way to complete this step is to double-click point A with the selection tool).
Explanation: Mark a certain point as the center because the rotation and scaling operations must be based on a certain center point. We will use rotation in the following operations, so we need to mark the center.
Use the [Select] tool to select point B and line segment AB (be careful not to select point A), click the menu [Transform] - [Rotate], a dialog box will pop up, click [Rotate] directly .
Note: The default rotation method is to rotate the selected object 900 (counterclockwise) around point A. You can preview the result in the workspace (this is an improvement over 3.0 and can improve production efficiency). Just use the default rotation method for this step.
Use the [Select] tool to double-click point B, mark the new center, select point A and line segment AB, select [Transform]---[Rotate] from the menu, a rotation dialog box will pop up, and change the rotation angle to -90 degree, (that is, rotate 90 degrees clockwise around point B).
Finally connect the line segments between the two endpoints to obtain a square as shown below.

2. Create Square Tool
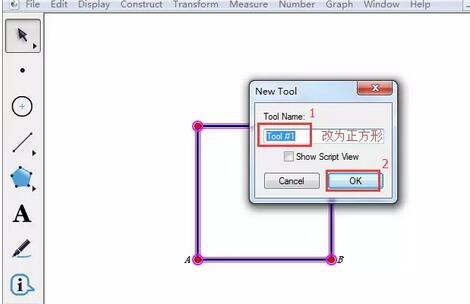
Use the [Select] tool to draw a dotted frame in the workspace to frame all the drawn squares (sides and vertices) , and select all the objects that make up the square.
Click the [Custom Tool] button, select [Create New Tool] from the pop-up options, and make the following settings in the [New Tool] dialog box that pops up, as shown in the figure.
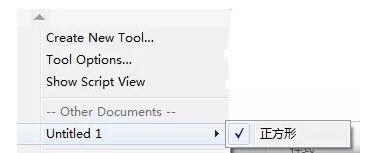
3. Use of the Square Tool
In other geometric sketchpad files, press and hold the custom tool button, and select the Square Tool in the pop-up shortcut option.
Click to match the first point in the workspace, move to another position, and click to match the second point, so that a square has been drawn (as shown in the figure below) . If the size and position are wrong, you can drag the vertices to change them.

The above is the detailed content of Detailed method of making square tool using Geometric Sketchpad. For more information, please follow other related articles on the PHP Chinese website!

Hot AI Tools

Undresser.AI Undress
AI-powered app for creating realistic nude photos

AI Clothes Remover
Online AI tool for removing clothes from photos.

Undress AI Tool
Undress images for free

Clothoff.io
AI clothes remover

AI Hentai Generator
Generate AI Hentai for free.

Hot Article
Hot Tools

Notepad++7.3.1
Easy-to-use and free code editor

SublimeText3 Chinese version
Chinese version, very easy to use

Zend Studio 13.0.1
Powerful PHP integrated development environment

Dreamweaver CS6
Visual web development tools

SublimeText3 Mac version
God-level code editing software (SublimeText3)
Hot Topics
 1386
1386
 52
52

 How to fix: err_response_headers_multiple_access_control_allow_origin error in Google Chrome
Mar 21, 2025 pm 06:19 PM
How to fix: err_response_headers_multiple_access_control_allow_origin error in Google Chrome
Mar 21, 2025 pm 06:19 PM
Article discusses fixing "err_response_headers_multiple_access_control_allow_origin" error in Chrome by addressing multiple Access-Control-Allow-Origin headers.
 How much does Microsoft PowerToys cost?
Apr 09, 2025 am 12:03 AM
How much does Microsoft PowerToys cost?
Apr 09, 2025 am 12:03 AM
Microsoft PowerToys is free. This collection of tools developed by Microsoft is designed to enhance Windows system functions and improve user productivity. By installing and using features such as FancyZones, users can customize window layouts and optimize workflows.
 How to fix: err_incomplete_chunked_encoding error in Google Chrome
Mar 21, 2025 pm 06:02 PM
How to fix: err_incomplete_chunked_encoding error in Google Chrome
Mar 21, 2025 pm 06:02 PM
The article discusses the "err_incomplete_chunked_encoding" error in Google Chrome, offering fixes like reloading the page, clearing cache, and disabling extensions. It also explores common causes and preventive measures.
 What is the purpose of PowerToys?
Apr 03, 2025 am 12:10 AM
What is the purpose of PowerToys?
Apr 03, 2025 am 12:10 AM
PowerToys is a free collection of tools launched by Microsoft to enhance productivity and system control for Windows users. It provides features through standalone modules such as FancyZones management window layout and PowerRename batch renaming files, making user workflow smoother.
 How to fix: err_response_headers_multiple_location error in Google Chrome
Mar 21, 2025 pm 06:05 PM
How to fix: err_response_headers_multiple_location error in Google Chrome
Mar 21, 2025 pm 06:05 PM
The article discusses the "err_response_headers_multiple_location" error in Google Chrome, caused by servers sending multiple Location headers. It provides solutions like refreshing the page, clearing cache, disabling extensions, and checki
 Does PowerToys need to be running?
Apr 02, 2025 pm 04:41 PM
Does PowerToys need to be running?
Apr 02, 2025 pm 04:41 PM
PowerToys needs to be run in the background to achieve its full functionality. 1) It relies on system-level hooks and event listening, such as FancyZones monitoring window movement. 2) Reasonable resource usage, usually 50-100MB of memory, and almost zero CPU usage when idle. 3) You can set up power-on and use PowerShell scripts to implement it. 4) When encountering problems, check the log files, disable specific tools, and ensure that they are updated to the latest version. 5) Optimization suggestions include disabling infrequently used tools, adjusting settings, and monitoring resource usage.
 How to fix: err_timed_out error in Google Chrome
Mar 26, 2025 am 11:45 AM
How to fix: err_timed_out error in Google Chrome
Mar 26, 2025 am 11:45 AM
Article discusses fixing "err_timed_out" error in Google Chrome, caused by poor internet, server issues, DNS problems, and more. Offers solutions like checking connection, clearing cache, and resetting settings.
 What is the best alternative to PowerToys?
Apr 08, 2025 am 12:17 AM
What is the best alternative to PowerToys?
Apr 08, 2025 am 12:17 AM
ThebestalternativestoPowerToysforWindowsusersareAutoHotkey,WindowGrid,andWinaeroTweaker.1)AutoHotkeyoffersextensivescriptingforautomation.2)WindowGridprovidesintuitivegrid-basedwindowmanagement.3)WinaeroTweakerallowsdeepcustomizationofWindowssettings
