

Operation process of making arrow pattern using PPT

When designing slides, arrow patterns are common elements used to guide the audience to focus on key points. In order to help users create beautiful arrow patterns, PHP editor Xiaoxin will introduce its operation process in detail. The following content will guide you step by step, from selecting the shape tool to customizing the arrow style, covering all steps of using PPT to create arrow patterns.
Many times we need to express the process of an event or the steps of an operation. At this time, we can try the step arrow.
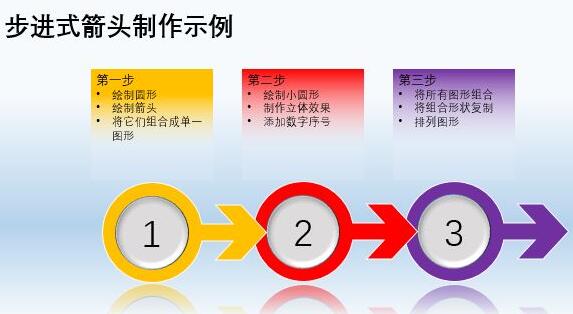
The picture above looks beautiful, but it is not complicated to actually make. Let’s implement it step by step. After starting PPT, switch to the [Insert] tab, click [Shape], and choose to draw a perfect circle. When drawing, you can hold down the Shift key.
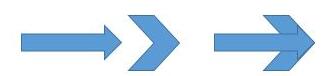
Please draw an ordinary arrow and an isolinear arrow without a tail in this editor. Here, I first draw a normal arrow and an isolinear arrow without a tail, then bring them together, and merge them into a single shape through [Merge Shapes] under the [Drawing Tools-Format] tab. The final shape is a special arrowhead, consisting of a normal arrowhead and an isolinear arrowhead without a tail.
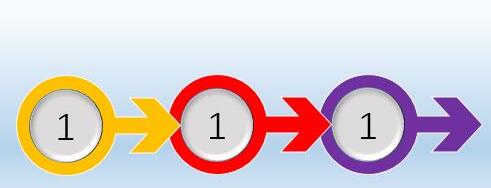
Combine the arrow and the previously drawn circle, and also combine them into a single shape through [Merge Shapes → Union].

Make some decorations. Draw another perfect circle, a little smaller than the center of the original circle, and overlap the two circles. Fill the circle drawn later with gray, and then in the [Drawing Tools-Format] tab, click [Shape Effect → Prism] and select a three-dimensional effect. Finally, mark the circle with a numerical sequence.

Copy this shape and paste two more, then set different fill colors for them and stack them together. After arranging the positions, modify the number in the middle.
Finally add a gradient background to the entire slide, then add [Image] reflection effects to the three arrow graphics produced, add text, etc., and you will get the example at the beginning of this article It works.
Three-dimensional arrow
Next, I will demonstrate a three-dimensional arrow making method, and let’s take a look at the effect first.
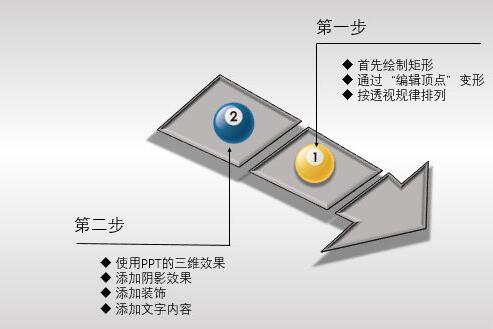
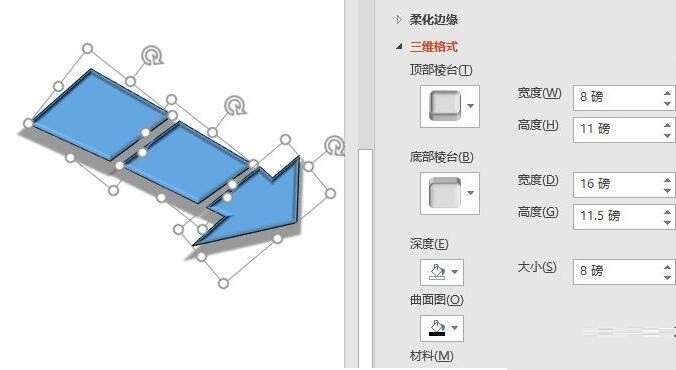
In order to generate a perspective effect, we need to make some line changes to the normally drawn rectangle. Draw a rectangle, rotate it at a certain angle, then right-click the rectangle and select [Edit Vertices]. At this time, you can drag the positions of the four vertices of the rectangle at will, and set the shape according to the perspective rules of near, far, and small.
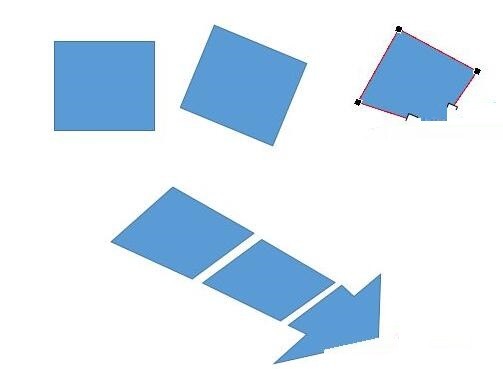
Select all graphics, switch to the [Drawing Tools-Format] tab, and click the [Soft Circle] effect under [Shape Effect → Prism]. Right-click the graphic, select [Format Shape], open the settings pane on the right, and switch to the [Effect] item (pentagon icon). Set various parameters of the three-dimensional here, such as width, height, depth, etc. Then expand [Shadow] to set the three-dimensional projection effect.
Finally set the background of the entire slide, add other decorations, and add text content to get the effect picture shown above.
The above is the detailed content of Operation process of making arrow pattern using PPT. For more information, please follow other related articles on the PHP Chinese website!

Hot AI Tools

Undresser.AI Undress
AI-powered app for creating realistic nude photos

AI Clothes Remover
Online AI tool for removing clothes from photos.

Undress AI Tool
Undress images for free

Clothoff.io
AI clothes remover

AI Hentai Generator
Generate AI Hentai for free.

Hot Article
Hot Tools

Notepad++7.3.1
Easy-to-use and free code editor

SublimeText3 Chinese version
Chinese version, very easy to use

Zend Studio 13.0.1
Powerful PHP integrated development environment

Dreamweaver CS6
Visual web development tools

SublimeText3 Mac version
God-level code editing software (SublimeText3)
Hot Topics


 How to check traffic on Apple mobile phone
May 09, 2024 pm 06:00 PM
How to check traffic on Apple mobile phone
May 09, 2024 pm 06:00 PM
How to check data usage on Apple 1. The specific steps to check data usage on Apple mobile phone are as follows: Open the settings of the phone. Click the Cellular button. Scroll down on the cellular network page to see the specific data usage of each application. Click Apply to also set allowed networks. 2. Turn on the phone, find the settings option on the phone desktop, and click to enter. In the settings interface, find "Cellular Network" in the taskbar below and click to enter. In the cellular network interface, find the "Usage" option on the page and click to enter. 3. Another way is to check the traffic by yourself through the mobile phone, but the mobile phone can only see the total usage and will not display the remaining traffic: turn on the iPhone, find the "Settings" option and open it. Select "Bee"
 How to disable snapshot layout in Windows 11_ Tips for not using snapshot layout in win11
May 08, 2024 pm 06:46 PM
How to disable snapshot layout in Windows 11_ Tips for not using snapshot layout in win11
May 08, 2024 pm 06:46 PM
Win11 system announced the new [Snapshot Layout], which provides users with various window layout options through the [Maximize] button, so that users can choose from multiple layout templates to display two, three or four on the screen. open applications. This is an improvement over dragging multiple windows to the sides of the screen and then adjusting everything manually. [SnapGroups] will save the collection of apps the user is using and their layout, allowing the user to easily return to that setting when they have to stop and deal with other things. If someone is using a monitor that the user must unplug, when re-docking, the previously used snapshot layout will also be restored. To use snapshot layout, we can use the keyboard shortcut WindowsKey+Z to start
 How to sort the list page alphabetically in vscode How to sort the list page alphabetically in vscode
May 09, 2024 am 09:40 AM
How to sort the list page alphabetically in vscode How to sort the list page alphabetically in vscode
May 09, 2024 am 09:40 AM
1. First, after opening the vscode interface, click the settings icon button in the lower left corner of the page 2. Then, click the Settings option in the drop-down page column 3. Then, find the Explorer option in the jumped window 4. Finally, on the right side of the page Click the OpenEditorsnaming option, select the alphabetical button from the drop-down page and save the settings to complete the alphabetical sorting
 How to view travel records on Amap
May 05, 2024 pm 05:21 PM
How to view travel records on Amap
May 05, 2024 pm 05:21 PM
Steps to view travel records on Amap: 1. Log in to Amap; 2. Enter "My" → "My Travel"; 3. View the list of travel records; 4. Click to view details; 5. Export records (optional) .
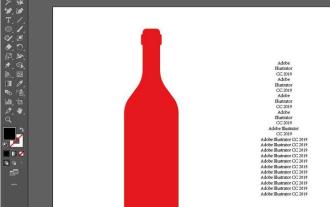 The operation process of creating bottle type text layout effect with AI
May 06, 2024 pm 02:28 PM
The operation process of creating bottle type text layout effect with AI
May 06, 2024 pm 02:28 PM
1. Open the material picture of a bottle in AI and type the text content that needs to be produced on the side. 2. Cancel the fill color of the bottle and only stroke it to form a hollow closed path. 3. Adjust the font size, font and line spacing of the text, and arrange the bottle layers to the top. 4. Select the text and the bottle at the same time, click Object-Envelope Distortion-Create with top-level object, and you will get a bottle-shaped text group. 5. Double-click the text to enter the isolation mode, and you can modify the text content and change the color. After the modification, the bottle shape will not be affected when exiting isolation mode. The final effect is as follows:
 How to use matplotlib to generate charts in python
May 05, 2024 pm 07:54 PM
How to use matplotlib to generate charts in python
May 05, 2024 pm 07:54 PM
To use Matplotlib to generate charts in Python, follow these steps: Install the Matplotlib library. Import Matplotlib and use the plt.plot() function to generate the plot. Customize charts, set titles, labels, grids, colors and markers. Use the plt.savefig() function to save the chart to a file.
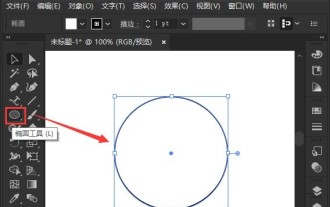 How to set ring text in ai - specific method of setting ring text in ai
May 06, 2024 pm 05:58 PM
How to set ring text in ai - specific method of setting ring text in ai
May 06, 2024 pm 05:58 PM
1. First, after opening the interface, click the Ellipse tool to draw a perfect circle 2. Click the Path Text tool button on the left and enter text along the circular frame 3. Select the letter with the mouse, open the character panel, and set the font size to 20.7 pt4. Select the circle, click 3D options in the effect menu, and select the rotation button 5. In the opened 3D rotation option settings, set the position option to custom rotation effect, modify the parameters and click OK to save 6. Finally, it is a ring Just add a red fill effect to the text
 Can I plug in a wireless network card when assembling a computer?
May 08, 2024 am 09:13 AM
Can I plug in a wireless network card when assembling a computer?
May 08, 2024 am 09:13 AM
Can I plug in a wireless network card when assembling a computer? First of all, the wireless network card you are talking about here should be a 2G/3G/4G wireless network card, that is, a wireless network card, right? My answer is yes. However, you also need an AP that supports USB wireless network cards, such as: (only for Jiuli use, not a recommended product) Can I use a wireless network card to access the Internet by assembling a desktop computer? Network cards are essential for modern computers. Without a network card, you cannot access the Internet, whether it is an onboard network card, an independent network card, or a wireless network card. When assembling a computer, a separate network card is generally not installed, because the current motherboards have integrated network cards, so there is no need to buy another one. However, the computers assembled now cannot use wireless Internet access like notebooks, because there is no wireless network card installed. Players can According to your own needs
