 Software Tutorial
 Office Software
 Tutorial on how to quickly automatically fill in the previous row of blank cells in Excel
Tutorial on how to quickly automatically fill in the previous row of blank cells in Excel
Are you troubled by blank cells in Excel? don’t worry! PHP editor Xinyi reveals the secret of quickly automatically filling in blank cells for you, allowing you to easily handle this tedious task. This tutorial will introduce the Excel auto-fill function in detail, teach you step by step to achieve seamless data connection, and say goodbye to the trouble of manual input.
First select the data area to be filled starting from the first cell.
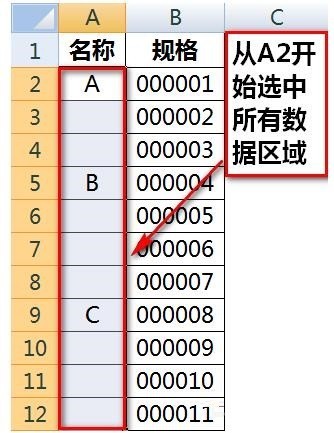
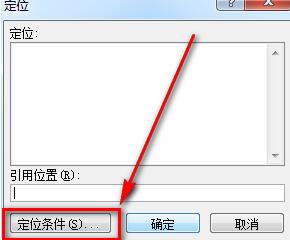
Press Ctrl G or F5 to bring up the positioning dialog box, and click [Positioning Conditions] in the lower left corner.
Select [Null Value] in [Positioning Conditions], and then click the [OK] button.
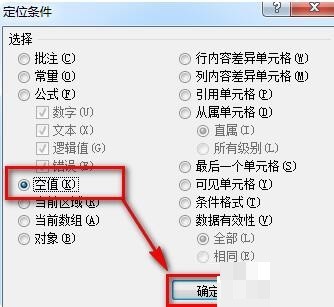
After completing the above operations, all blank cells will be selected.

Click the equal sign on your keyboard.
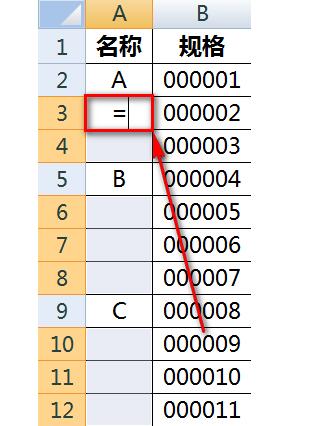
Then press the upward arrow key on the keyboard, which is ↑. A reference as shown below will be returned in the cell.
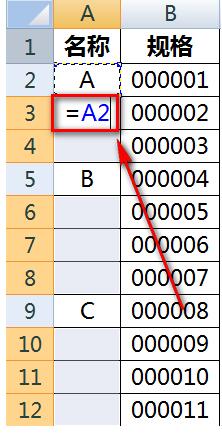
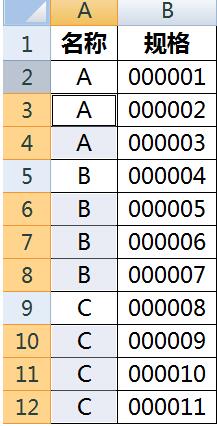
Hold Ctrl with your left hand and press Enter with your right hand to quickly complete all filling.
The above is the detailed content of Tutorial on how to quickly automatically fill in the previous row of blank cells in Excel. For more information, please follow other related articles on the PHP Chinese website!

Hot AI Tools

Undresser.AI Undress
AI-powered app for creating realistic nude photos

AI Clothes Remover
Online AI tool for removing clothes from photos.

Undress AI Tool
Undress images for free

Clothoff.io
AI clothes remover

AI Hentai Generator
Generate AI Hentai for free.

Hot Article

Hot Tools

Notepad++7.3.1
Easy-to-use and free code editor

SublimeText3 Chinese version
Chinese version, very easy to use

Zend Studio 13.0.1
Powerful PHP integrated development environment

Dreamweaver CS6
Visual web development tools

SublimeText3 Mac version
God-level code editing software (SublimeText3)

Hot Topics
 Your Calculator App Can Be Replaced By Microsoft Excel
Mar 06, 2025 am 06:01 AM
Ditch the Calculator: Why and How to Use Excel for All Your Calculations I haven't touched a calculator in ages. Why? Because Microsoft Excel handles all my calculations with ease, and it can do the same for you. Why Excel Trumps a Calculator While
 5 Things You Can Do in Excel for the Web Today That You Couldn't 12 Months Ago
Mar 22, 2025 am 03:03 AM
Excel web version features enhancements to improve efficiency! While Excel desktop version is more powerful, the web version has also been significantly improved over the past year. This article will focus on five key improvements: Easily insert rows and columns: In Excel web, just hover over the row or column header and click the " " sign that appears to insert a new row or column. There is no need to use the confusing right-click menu "insert" function anymore. This method is faster, and newly inserted rows or columns inherit the format of adjacent cells. Export as CSV files: Excel now supports exporting worksheets as CSV files for easy data transfer and compatibility with other software. Click "File" > "Export"
 Don't Create Tables in Word: Use Excel Instead
Mar 06, 2025 am 03:04 AM
Creating tables in Word, although improved, is still cumbersome and sometimes brings more problems. This is why you should always create tables in Microsoft Excel. Why is it better to create tables in Excel? In short, Word is a word processor, while Excel is a data processor. So Word is not built for the best table creation, but its similar product, Excel. Here are just some of the reasons why creating tables in Excel is better than using Microsoft Word: Although it is surprising that you can use many Excel-like features in Microsoft Word tables, in Excel you
 How to Reduce the Gaps Between Bars and Columns in Excel Charts (And Why You Should)
Mar 08, 2025 am 03:01 AM
Enhance Your Excel Charts: Reducing Gaps Between Bars and Columns Presenting data visually in charts significantly improves spreadsheet readability. Excel excels at chart creation, but its extensive menus can obscure simple yet powerful features, suc
 How to Use the AVERAGEIF and AVERAGEIFS Functions in Excel
Mar 07, 2025 am 06:03 AM
Quick View of AVERAGEIF and AVERAGEIFS Functions in Excel Excel's AVERAGEIF and AVERAGEIFS functions can be used to calculate the average value of a dataset. However, unlike simpler AVERAGE functions, they are able to include or exclude specific values in the calculation. How to use the AVERAGEIF function in Excel Excel's AVERAGEIF function allows you to calculate the average value of a filtered dataset based on a single condition set. AVERAGEIF function syntax The AVERAGEIF function contains three parameters: =AVERAGEIF(x,y,z)
 How to Use LAMBDA in Excel to Create Your Own Functions
Mar 21, 2025 am 03:08 AM
Excel's LAMBDA Functions: An easy guide to creating custom functions Before Excel introduced the LAMBDA function, creating a custom function requires VBA or macro. Now, with LAMBDA, you can easily implement it using the familiar Excel syntax. This guide will guide you step by step how to use the LAMBDA function. It is recommended that you read the parts of this guide in order, first understand the grammar and simple examples, and then learn practical applications. The LAMBDA function is available for Microsoft 365 (Windows and Mac), Excel 2024 (Windows and Mac), and Excel for the web. E
 Microsoft Excel Keyboard Shortcuts: Printable Cheat Sheet
Mar 14, 2025 am 12:06 AM
Master Microsoft Excel with these essential keyboard shortcuts! This cheat sheet provides quick access to the most frequently used commands, saving you valuable time and effort. It covers essential key combinations, Paste Special functions, workboo
 If You Don't Use Excel's Hidden Camera Tool, You're Missing a Trick
Mar 25, 2025 am 02:48 AM
Quick Links Why Use the Camera Tool?


