PS简单制作2008年奥运五环
这篇教程是向脚本之家的朋友介绍PS简单制作2008年奥运五环方法,教程制作出来的奥运五环方法非常简单,新手也可以学习,推荐过来,大家一起来学习吧
看到了桌上福娃贝贝,想起了2008年奥运五环,今天就教大家介绍PS简单制作2008年奥运五环方法,教程真的很不错,很简单,大家一起来学习吧!
下面是两张素材:


方法/步骤
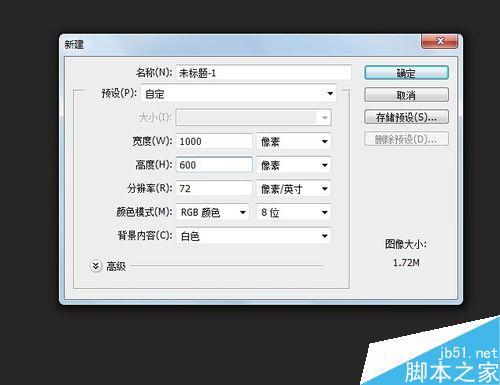
1、新建文件。参数如图所示。

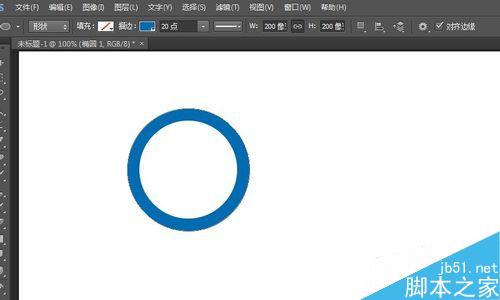
2、点击椭圆形状工具。
一般是利用选区来做,我这边是用了形状工具,环是用描边做出来的,圆内是不填充任何颜色。尺寸可以根据自己需要。也可参考我的 。
做环形有很多种办法,这只是个人觉得比较容易的一种。

3、点击画圆。尺寸都是设置好的,直接画就行,颜色待会会说到。

4、按住alt,点击鼠标左键,拖动,就可以出现一个一模一样的环,是不是觉得很神奇?
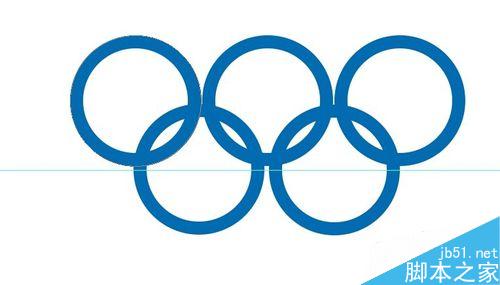
依次拖出4个,按照下面的格式摆好。
为什么呢?因为五环就是这个样子。(⊙o⊙)…

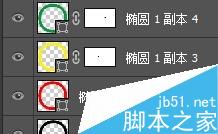
5、开始点击一个个图层进行填充描边的颜色。
下面有五环颜色的资料,但是我比较喜欢颜色饱和度较深的,所以我的五环颜色是我自己设定的。可以跟我一样,也可以用下面五环颜色的色值。
==================================================
网上搜了点资料:
奥运五环的五种颜色的色值:兰:c100 m30 黑:k100 红:m95 y65 黄:m35 y90 绿:c100 y90五环颜色:蓝色,代表欧洲;RGB:0/107/176,#006BB0;CMKY:92/60/9/1黄色:代表亚洲;RGB:239/169/13,#EFA90D;CMYK:9/37/99/0黑色:代表非洲;RGB:29/24/21,#1D1815;CMYK:68/67/68/80绿色:代表大洋洲;RGB:5/147/65,#059341;CMYK:85/20/100/6红色:代表美洲;RGB:220/47/31,#DC2F1F;CMYK:12/94/100/3“ 京”字阳面色值:RGB:230/0/0,#E60000;CMYK:9/100/100/1

6、五个换不相交,怎么叫奥运五环呢。所以这边给青色图层跟蓝色图层添加蒙版。前景色是黑色。

7、根据下图标出来的地方,用硬度为100的画笔工具擦拭掉。至于画笔大小看那个环的大小调整。

8、奥运五环做好了,有点单调,为他添加福娃。
先把福娃抠出来,因为北京是白色,所以我用了魔棒工具。

9、变换福娃图层,把福娃放在适合的位置上。

10、最后一步,添加2008年的奥运会徽。
下面上效果图。

以上就是PS简单制作2008年奥运五环方法介绍,大家学会了吗?方法很简单的,希望能对大家有所帮助!

Hot AI Tools

Undresser.AI Undress
AI-powered app for creating realistic nude photos

AI Clothes Remover
Online AI tool for removing clothes from photos.

Undress AI Tool
Undress images for free

Clothoff.io
AI clothes remover

Video Face Swap
Swap faces in any video effortlessly with our completely free AI face swap tool!

Hot Article

Hot Tools

Notepad++7.3.1
Easy-to-use and free code editor

SublimeText3 Chinese version
Chinese version, very easy to use

Zend Studio 13.0.1
Powerful PHP integrated development environment

Dreamweaver CS6
Visual web development tools

SublimeText3 Mac version
God-level code editing software (SublimeText3)

Hot Topics
 1390
1390
 52
52
 ps serial number cs5 permanently free 2020
Jul 13, 2023 am 10:06 AM
PS serial numbers cs5 permanent free 2020 include: 1. 1330-1384-7388-4265-2355-8589 (Chinese); 2. 1330-1409-7892-5799-0412-7680 (Chinese); 3. 1330-1616-1993 -8375-9492-6951 (Chinese); 4. 1330-1971-2669-5043-0398-7801 (Chinese), etc.
 What to do if ps installation cannot write registry value error 160
Mar 22, 2023 pm 02:33 PM
Solution to error 160 when ps installation cannot write registry value: 1. Check whether there is 2345 software on the computer, and if so, uninstall the software; 2. Press "Win+R" and enter "Regedit" to open the system registry, and then Find "Photoshop.exe" and delete the Photoshop item.
 How to delete selected area in ps
Aug 07, 2023 pm 01:46 PM
Steps to delete the selected area in PS: 1. Open the picture you want to edit; 2. Use the appropriate tool to create a selection; 3. You can use a variety of methods to delete the content in the selection, use the "Delete" key, use the "Healing Brush Tool" , use "Content-Aware Fill", use the "Stamp Tool", etc.; 4. Use tools to repair any obvious traces or defects to make the picture look more natural; 5. After completing editing, click "File" > in the menu bar "Save" to save the editing results.
 Introduction to the process of extracting line drawings in PS
Apr 01, 2024 pm 12:51 PM
1. Open the software and import a piece of material, as shown in the picture below. 2. Then ctrl+shift+u to remove color. 3. Then press ctrl+J to copy the layer. 4. Then reverse ctrl+I, and then set the layer blending mode to Color Dodge. 5. Click Filter--Others--Minimum. 6. In the pop-up dialog box, set the radius to 2 and click OK. 7. Finally, you can see the line draft extracted.
 How to automate tasks using PowerShell
Feb 20, 2024 pm 01:51 PM
If you are an IT administrator or technology expert, you must be aware of the importance of automation. Especially for Windows users, Microsoft PowerShell is one of the best automation tools. Microsoft offers a variety of tools for your automation needs, without the need to install third-party applications. This guide will detail how to leverage PowerShell to automate tasks. What is a PowerShell script? If you have experience using PowerShell, you may have used commands to configure your operating system. A script is a collection of these commands in a .ps1 file. .ps1 files contain scripts executed by PowerShell, such as basic Get-Help
 What should I do if the PS interface font is too small?
Dec 01, 2022 am 11:31 AM
How to fix the PS interface font that is too small: 1. Open PS, click the "Edit" button on the top menu bar of PS to expand the editing menu; 2. Click the "Preferences" button in the expanded editing menu, and then click "Interface. .." button; 3. In the interface settings, set the user interface font size to "Large", set the UI scaling to "200%" and save the settings, then restart PS to take effect.
 Complete list of ps shortcut keys
Mar 11, 2024 pm 04:31 PM
1. Ctrl + N: Create a new document. 2. Ctrl + O: Open a file. 3. Ctrl + S: Save the current file. 4. Ctrl + Shift + S: Save as. 5. Ctrl + W: Close the current document. 6. Ctrl + Q: Exit Photoshop. 7. Ctrl + Z: Undo. 8. Ctrl + Y: Redo. 9. Ctrl + X: Cut the selected content. 10. Ctrl + C: Copy the selected content.
 What is the ps curve shortcut key?
Aug 22, 2023 am 10:44 AM
The ps curve shortcut key is Ctrl+M. Other curve shortcut keys: 1. Convert to point control curve, Alt+Shift+Ctrl+T; 2. Automatically align the curve, Alt+Shift+Ctrl+O; 3. Restore the default curve, Ctrl+Alt+Shift+R; 4. Copy the curve, Ctrl+Alt+Shift+C; 5. Paste the curve, Ctrl+Alt+Shift+V; 6. Adjust the curve slope, Shift+up and down arrows; 7. Adjust the curve brightness, Shift+left and right arrows


