

Photoshop给人物加上逼真帅气的纹身

今天,小编为大家介绍Photoshop给人物加上逼真帅气的纹身方法,教程很不错,也很实用,非常适合新手来学习,推荐过来,一起来学习吧!
今天很多的影像作品都是“伪造”的,并且大多数时候我们不能将它们定义为假的。虽然那些曾经非常流行的Photoshop网站和竞赛,现在看起来似乎有些过时。
能够设计出任意能想象到的视觉画面是一项非常牛逼的能力。特别是当我们通过奇妙的方式来创造,比如创造尽量逼真的想象物,当然它们并不真实。构想的或者源于古老读物的人造纹身是其中一个例子。如果能做得好,PS纹身看起来就会像真纹身一样逼真。
正如我们所看到的,一个纹身可以在一个平庸到不能再平庸的图案上添加大量的趣味视觉元素,使得纹身变得特别美观。事实上,纹身有很久远的历史,但是在过去10年,纹身却没有像从前那样进入人们的视线。不过,如今纹身获得了更多媒体的报道,包括像Inked这样的电视台。
对于想要设计出具有视觉冲击感的图像,纹身是其中一个选择,并且不论性别,纹身都会令人觉得性感。在很多时候,我们将纹身添加到图片中,实际上就是一种“噱头”。笔者就非常擅长将许多具有视觉爆点的图片通过PS合成为具有纹身效果的图片,本期国外精品翻译教程就同大家分享一下如何通过PS来打造逼真的纹身。
一、为什么人造纹身容易?
看看图片中那些人物身上的纹身。你就会意识到大部分的纹身虽然看起来像假的,但事实上其中有一些是真的。
笔者的意思是纹身并不是人类身体与生俱来的一部分。所以纹身的本质是“假的”。当我们看到图片时,我们看到的是纹身艺术家创作的“假”纹身。而现在我们作为数码设计者要做的事情恰恰就是将纹身“贴”上去。在这两种情形下,纹身都是“假的”,我们的大脑也要理解好,接受两种情形下纹身的本质。这样将会有助于我们设计。
就如图01所示的,真正的纹身看起来都会有点像假的,因为很像手绘作品。
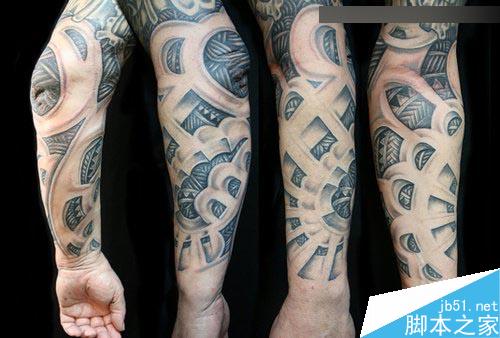
图01
另外一件让设计变得容易的事情就是:我们的大脑有足够大的空间去想象纹身是如何刺到身上的。并且,因为这本身是不真实的,正常的物理作用并不能起反应,至少并不是非常准确地表现出来。
举个例子,你将一张椅子的照片放到一个房间的照片中。大小、角度、遮掩程度和其他因素都必须跟真的一模一样,才能让椅子仿佛在房间中。而对于纹身而言,显然没有非常标准的规律可以执行,就算是真的纹身都是人为地以千奇百怪、创意十足地纹上去。因此在视觉上,我们已经学会了接收所看到的即真实。
二、怎么去设计纹身
这里有几种将纹身添加的方法。添加纹身的方法有简有易,视乎纹身图案以及需要达到的精度要求。下面我们将一一细看。但是每种方法的第一步都是选择和准备。
1.选择
选择纹身的图案取决于创意和你想达到的效果,或许你会自己设计纹身,或许你本身就是从事纹身设计,只是将它们付诸实践。
在这篇PS教程中,我们会从Google中设置好搜索路线和搜索标准,“标记为重用与修改”,我们从Pixabay 找到一个不错的选择,里面有很多很好的免费资源。
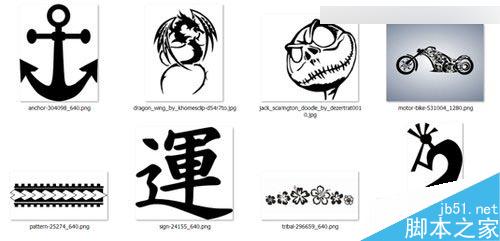
图02
2.准备
我们准备的图案都是非常简单的,即使是新手都会觉得可以处理好。同时我们还要保证这些图案的分辨率足够高,但当然有些会例外,因为很少纹身图案足够清晰。所以尺寸OK就可以,只要保证边缘没有锯齿就可以啦。如果图案自带阿尔法通道或者蒙版就最好,但我们都会对这些图案应用正片叠加的混合图层选项,所以这不是难事。
大多数图片都不是以黑白照片的形式打开。比如,需要将摩托车的灰色背景去掉,当然这也是很容易的。不要停下来,还有很多有趣的试验可以增强图案的艺术感。
3.示例:简单叠加
最简单的方法就是直接将正片叠加的图案放在皮肤表面。如果准备刺纹身的位置比较平坦,那么这样制作的效果应该还是不错的。
但这绝不是简单的叠加工作,我们需要做很多工作才能让纹身栩栩如生。纹身从来也没有完美的。纹身用的油墨往往会对皮肤有所损伤,看看下面的图片,油墨导致部分皮肤开始变色。除非油墨是新的,否则油墨会迅速褪掉。并且有些油墨也会浸入到纹身以外的皮肤中。
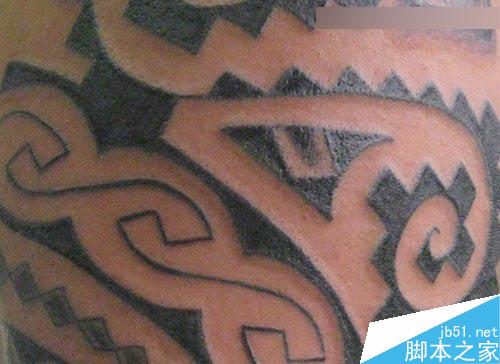
图03
要想获得漂亮的效果,就意味着要不断尝试一连串的PS滤镜,直到试出自己满意的效果。举个例子,想要令纹身的边缘不太完美,可以选择纹身的轮廓,然后保存为一个通道。应用“滤镜>滤镜库>飞溅滤镜”,用阿尔法通道创建新的纹身轮廓。
如下图所示,飞溅滤镜可以让边沿的花样更多。

图04
下图所示的可爱男孩是笔者的儿子,由于年轻,所以没有老人家的皮肤纹理。这里在纹身上增加一些纹理,通过复制图层,并且应用可以创建皮肤效果的网格滤镜。将这些放置在纹身主图层下面(设置为正常模式),设置色阶增强对比度,调整主图层的不透明度。
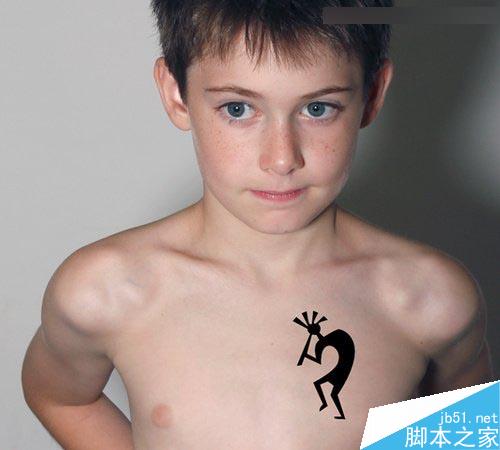
图05
通过复制图片对整个皮肤增加贴身的网状效果,应用滤镜,然后将其房子在原始图层上方,设置混合模式为柔光、不透明度30%。皮肤纹理的延续性将会有助于让图片和纹身融为一体。
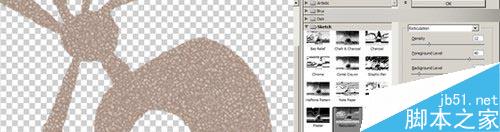
图06
纹身的边缘同样需要点涂抹效果,来显得更加真实。这里分为两步:首先应用半径为0.5像素的高斯模糊;然后设置较深的暖色外发光。
还有更加多可以做的。比如,纹身怎么滴都会有点光泽。所以纹身是有几率存在高光效果的。但在这个例子中,这样做不是很恰当,所以笔者没干这事。下图是还未完工的图像。
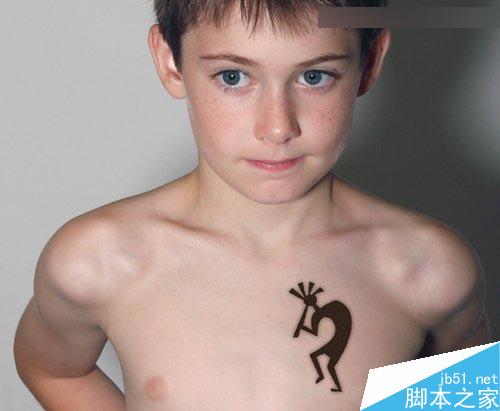
图07
4.示例:2D扭曲
如果每次纹身都是在平坦的批复,当然是最好的。但是不会每次都这么一帆风顺的。如果要在具有曲面的皮肤上设计纹身,自然就要“扭曲”纹身啦。
在几乎万能的Photoshop中,是有数种方法可以做到的。其中就有各种扭曲工具,像自由变换中扭曲、透视、变形等。如下图所示,就是纹身图案由原始到扭曲,再到最终定位的示意图。
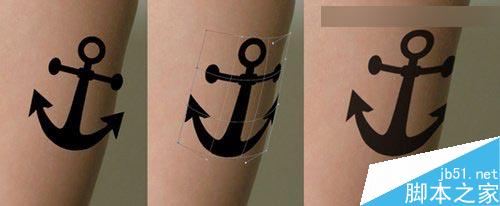
图08
PS图象处理软件也提供其他创造性的方式扭曲你的纹身艺术与人体解剖学。这包括涂抹(如手指)工具,液化,和非常强大的木偶经线组控件。
除了自由变化,Photoshop还有其他工具可以实现纹身变形,来适应人体皮肤的变化的。这里就包括有涂抹(又名手指)工具、液化工具和强大的操控变形设定。
5.示例:3D扭曲
想要找到2D完成并且可以创建3D效果是非常花时间并且难度不小。不过,我们可以通过3D设计软件来设计近乎立体结构的3D纹身。独立的3D设计软件可以提供最大限度的设计操作,而Photoshop可以提供一系列的3D工具来解决问题。
在这最后一个例子中,我增加了一个部落乐队的纹身图案,并将其转换为一个三维圆柱体形状,如下图所示用于生成三维网格的平面图像。
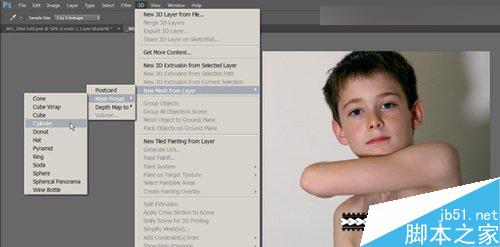
图09
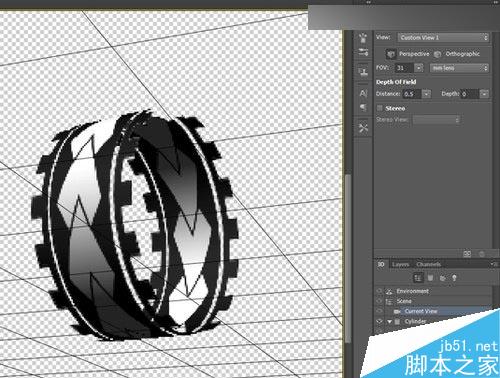
图10
就如我们设计所需的,任何的3D设计都需要不断的创作积累。但如果其他的设计方案行不通,那么前面的积累就会汇成3D设计的最后出路。(注意:这实际上是一个旧版本的PS设计。)最后,虽然教程附带的例子并不多,但其实对于一个纹身而言,我们可能更加关注与纹身搭配的图像本身。因为这些图像才是真正考验我们的难关。
教程结束,以上就是Photoshop给人物加上逼真帅气的纹身方法介绍,大家学会了吗?快快来学习吧!

Hot AI Tools

Undresser.AI Undress
AI-powered app for creating realistic nude photos

AI Clothes Remover
Online AI tool for removing clothes from photos.

Undress AI Tool
Undress images for free

Clothoff.io
AI clothes remover

AI Hentai Generator
Generate AI Hentai for free.

Hot Article
Hot Tools

Notepad++7.3.1
Easy-to-use and free code editor

SublimeText3 Chinese version
Chinese version, very easy to use

Zend Studio 13.0.1
Powerful PHP integrated development environment

Dreamweaver CS6
Visual web development tools

SublimeText3 Mac version
God-level code editing software (SublimeText3)
Hot Topics
 1386
1386
 52
52

 What is the reason why PS keeps showing loading?
Apr 06, 2025 pm 06:39 PM
What is the reason why PS keeps showing loading?
Apr 06, 2025 pm 06:39 PM
PS "Loading" problems are caused by resource access or processing problems: hard disk reading speed is slow or bad: Use CrystalDiskInfo to check the hard disk health and replace the problematic hard disk. Insufficient memory: Upgrade memory to meet PS's needs for high-resolution images and complex layer processing. Graphics card drivers are outdated or corrupted: Update the drivers to optimize communication between the PS and the graphics card. File paths are too long or file names have special characters: use short paths and avoid special characters. PS's own problem: Reinstall or repair the PS installer.
 What are the common questions about exporting PDF on PS
Apr 06, 2025 pm 04:51 PM
What are the common questions about exporting PDF on PS
Apr 06, 2025 pm 04:51 PM
Frequently Asked Questions and Solutions when Exporting PS as PDF: Font Embedding Problems: Check the "Font" option, select "Embed" or convert the font into a curve (path). Color deviation problem: convert the file into CMYK mode and adjust the color; directly exporting it with RGB requires psychological preparation for preview and color deviation. Resolution and file size issues: Choose resolution according to actual conditions, or use the compression option to optimize file size. Special effects issue: Merge (flatten) layers before exporting, or weigh the pros and cons.
 How to solve the problem of loading when PS is always showing that it is loading?
Apr 06, 2025 pm 06:30 PM
How to solve the problem of loading when PS is always showing that it is loading?
Apr 06, 2025 pm 06:30 PM
PS card is "Loading"? Solutions include: checking the computer configuration (memory, hard disk, processor), cleaning hard disk fragmentation, updating the graphics card driver, adjusting PS settings, reinstalling PS, and developing good programming habits.
 How to set password protection for export PDF on PS
Apr 06, 2025 pm 04:45 PM
How to set password protection for export PDF on PS
Apr 06, 2025 pm 04:45 PM
Export password-protected PDF in Photoshop: Open the image file. Click "File"> "Export"> "Export as PDF". Set the "Security" option and enter the same password twice. Click "Export" to generate a PDF file.
 How to speed up the loading speed of PS?
Apr 06, 2025 pm 06:27 PM
How to speed up the loading speed of PS?
Apr 06, 2025 pm 06:27 PM
Solving the problem of slow Photoshop startup requires a multi-pronged approach, including: upgrading hardware (memory, solid-state drive, CPU); uninstalling outdated or incompatible plug-ins; cleaning up system garbage and excessive background programs regularly; closing irrelevant programs with caution; avoiding opening a large number of files during startup.
 How to solve the problem of loading when the PS opens the file?
Apr 06, 2025 pm 06:33 PM
How to solve the problem of loading when the PS opens the file?
Apr 06, 2025 pm 06:33 PM
"Loading" stuttering occurs when opening a file on PS. The reasons may include: too large or corrupted file, insufficient memory, slow hard disk speed, graphics card driver problems, PS version or plug-in conflicts. The solutions are: check file size and integrity, increase memory, upgrade hard disk, update graphics card driver, uninstall or disable suspicious plug-ins, and reinstall PS. This problem can be effectively solved by gradually checking and making good use of PS performance settings and developing good file management habits.
 How to use PS Pen Tool
Apr 06, 2025 pm 10:15 PM
How to use PS Pen Tool
Apr 06, 2025 pm 10:15 PM
The Pen Tool is a tool that creates precise paths and shapes, and is used by: Select the Pen Tool (P). Sets Path, Fill, Stroke, and Shape options. Click Create anchor point, drag the curve to release the Create anchor point. Press Ctrl/Cmd Alt/Opt to delete the anchor point, drag and move the anchor point, and click Adjust curve. Click the first anchor to close the path to create a shape, and double-click the last anchor to create an open path.
 How does PS feathering control the softness of the transition?
Apr 06, 2025 pm 07:33 PM
How does PS feathering control the softness of the transition?
Apr 06, 2025 pm 07:33 PM
The key to feather control is to understand its gradual nature. PS itself does not provide the option to directly control the gradient curve, but you can flexibly adjust the radius and gradient softness by multiple feathering, matching masks, and fine selections to achieve a natural transition effect.
