

PS去黑头软管电商修图教程

这篇教程像脚本之家的PS照片处理学习者们详细介绍电商化妆品修图的流程和步骤,教程挺实用的,介绍的方法非常好,推荐过来和脚本之家的朋友们一起分享学习了,我们先来看看原图和最终的效果图吧:
教程结束,以上就是PS去黑头软管电商修图方法,希望能对大家有所帮助!

Hot AI Tools

Undresser.AI Undress
AI-powered app for creating realistic nude photos

AI Clothes Remover
Online AI tool for removing clothes from photos.

Undress AI Tool
Undress images for free

Clothoff.io
AI clothes remover

Video Face Swap
Swap faces in any video effortlessly with our completely free AI face swap tool!

Hot Article
Hot Tools

Notepad++7.3.1
Easy-to-use and free code editor

SublimeText3 Chinese version
Chinese version, very easy to use

Zend Studio 13.0.1
Powerful PHP integrated development environment

Dreamweaver CS6
Visual web development tools

SublimeText3 Mac version
God-level code editing software (SublimeText3)
Hot Topics
 1389
1389
 52
52

 Introduction to the process of extracting line drawings in PS
Apr 01, 2024 pm 12:51 PM
Introduction to the process of extracting line drawings in PS
Apr 01, 2024 pm 12:51 PM
1. Open the software and import a piece of material, as shown in the picture below. 2. Then ctrl+shift+u to remove color. 3. Then press ctrl+J to copy the layer. 4. Then reverse ctrl+I, and then set the layer blending mode to Color Dodge. 5. Click Filter--Others--Minimum. 6. In the pop-up dialog box, set the radius to 2 and click OK. 7. Finally, you can see the line draft extracted.
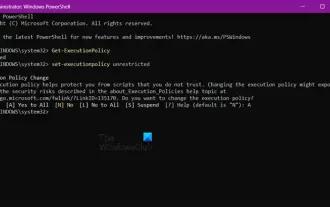 How to automate tasks using PowerShell
Feb 20, 2024 pm 01:51 PM
How to automate tasks using PowerShell
Feb 20, 2024 pm 01:51 PM
If you are an IT administrator or technology expert, you must be aware of the importance of automation. Especially for Windows users, Microsoft PowerShell is one of the best automation tools. Microsoft offers a variety of tools for your automation needs, without the need to install third-party applications. This guide will detail how to leverage PowerShell to automate tasks. What is a PowerShell script? If you have experience using PowerShell, you may have used commands to configure your operating system. A script is a collection of these commands in a .ps1 file. .ps1 files contain scripts executed by PowerShell, such as basic Get-Help
 Complete list of ps shortcut keys
Mar 11, 2024 pm 04:31 PM
Complete list of ps shortcut keys
Mar 11, 2024 pm 04:31 PM
1. Ctrl + N: Create a new document. 2. Ctrl + O: Open a file. 3. Ctrl + S: Save the current file. 4. Ctrl + Shift + S: Save as. 5. Ctrl + W: Close the current document. 6. Ctrl + Q: Exit Photoshop. 7. Ctrl + Z: Undo. 8. Ctrl + Y: Redo. 9. Ctrl + X: Cut the selected content. 10. Ctrl + C: Copy the selected content.
 What is the ps curve shortcut key?
Aug 22, 2023 am 10:44 AM
What is the ps curve shortcut key?
Aug 22, 2023 am 10:44 AM
The ps curve shortcut key is Ctrl+M. Other curve shortcut keys: 1. Convert to point control curve, Alt+Shift+Ctrl+T; 2. Automatically align the curve, Alt+Shift+Ctrl+O; 3. Restore the default curve, Ctrl+Alt+Shift+R; 4. Copy the curve, Ctrl+Alt+Shift+C; 5. Paste the curve, Ctrl+Alt+Shift+V; 6. Adjust the curve slope, Shift+up and down arrows; 7. Adjust the curve brightness, Shift+left and right arrows
 Cannot use PS shortcut keys to fill
Feb 19, 2024 am 09:18 AM
Cannot use PS shortcut keys to fill
Feb 19, 2024 am 09:18 AM
With the development of the digital age, image processing software has become an indispensable part of our life and work. Among them, Photoshop (PS for short) developed by Adobe is one of the most famous image processing software. It has powerful functions and flexible operation, and is deeply loved by users. However, when using PS, some users reported that the shortcut key "Fill" cannot be used normally, which brings troubles to the user experience. Shortcut keys are a quick operation method provided in the software to avoid tedious mouse click operations.
 PS copy layer shortcut key
Feb 23, 2024 pm 02:34 PM
PS copy layer shortcut key
Feb 23, 2024 pm 02:34 PM
In the PS copy layer shortcut keys, we can know that if you want to copy a layer when using PS, you can use the shortcut key [Ctrl+J] for quick copying. This introduction to the shortcut keys for copying layers can tell you the specific operation method. The following is the detailed content, so take a look. PS copy layer shortcut key answer: [Ctrl+J] Specific method: 1. Open the image in PS and select the layer that needs to be copied. 2. Press [Ctrl+J] on the keyboard at the same time to complete the copy of the layer. Other copying methods: 1. After opening the image, press and hold the layer and move the [New Layer] icon downwards. 2. After moving to the icon, let go. 3. The layer copy is completed.
 How to use ps vanishing point - how to use ps vanishing point
Mar 05, 2024 am 09:00 AM
How to use ps vanishing point - how to use ps vanishing point
Mar 05, 2024 am 09:00 AM
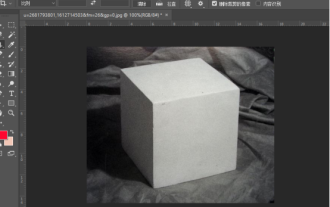
Recently, many friends have asked the editor how to use PS vanishing point. Next, let us learn how to use PS vanishing point. I hope it can help everyone. Step one: First open the ps software and import a picture with a three-dimensional perspective effect (as shown in the picture). Step 2: Then import a material picture, any picture can be used (as shown in the picture). Step 3: Then select the material picture, then ctrl+c to copy the material picture, hide the eyes in front, select the stereoscopic perspective effect picture, and then click the vanishing point option in the filter options (as shown in the picture). Step 4: Enter the editing window of the vanishing point filter and select the Create Plane tool on the left (as shown in the picture). Step 5: Click on the four corners of the object in the three-dimensional perspective rendering to form a closed circle
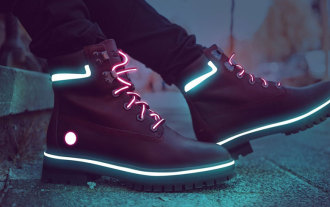 How to make blue fluorescent effect in PS
Feb 27, 2024 pm 12:55 PM
How to make blue fluorescent effect in PS
Feb 27, 2024 pm 12:55 PM
The editor of this website brings you this tutorial to take you into the wonderful world of Photoshop and learn how to create a charming blue fluorescent effect. Whether you are new to Photoshop or an experienced user, you can find inspiration and practical tips from this tutorial. So how to create the blue fluorescent effect in PS? This tutorial guide will give you a detailed introduction, I hope it can help you. PS blue fluorescence effect production method steps final effect: 1. Adjust the brightness of the picture. 2. Add curves to adjust the overall light and dark contrast of the picture. 3. Use a pen to hook out the "edge strips" of the shoes. 4. After cutting out, create a selection and fill it with white. 5. Select the blur tool and blur the hooked white part. 5. Use a pen to mark the shoelaces
