ps动态图片简单制作教程
这篇教程就为大家介绍ps动态图片简单制作方法,教程很不错,推荐到PHP中文网,喜欢的朋友一起来学习吧!
关键有几点
1) 活动要重复、循环、轻微
2) 静止留白的空间要占大比例 (最好有人做衬托)
3) 色调要有电影感 / 怀旧感 (黑白亦可)
(一) 拍摄工作U
1) 用脚架加上一部可以录像的相机,然后拍摄一段短片。
2) 拍摄前先要构思好什么地方静止,什么地方活动,而活动最好是可以循环而自然接驳。
3) 拍摄时使用M档,包括白平衡与对焦也要使用手动,减少无谓变化。
先来看两个简单的例子

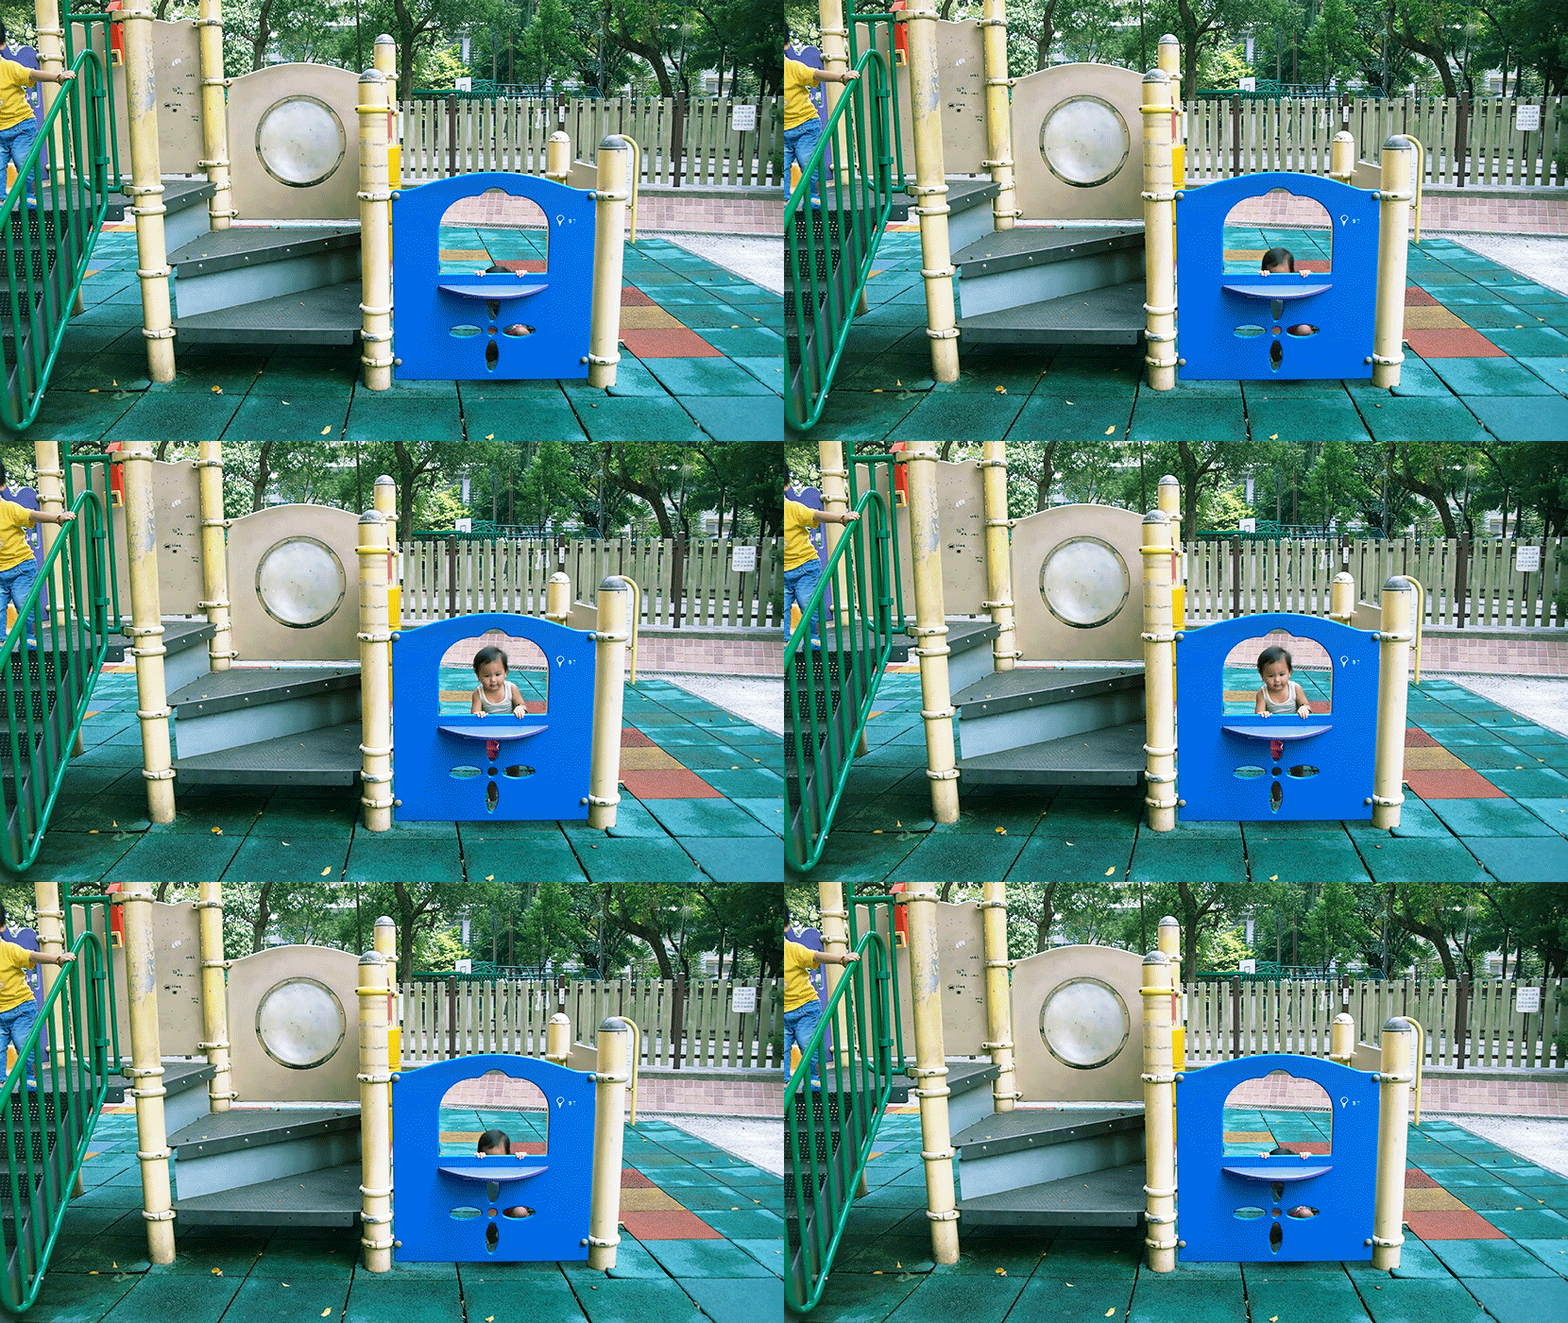
(二) 后期工作U
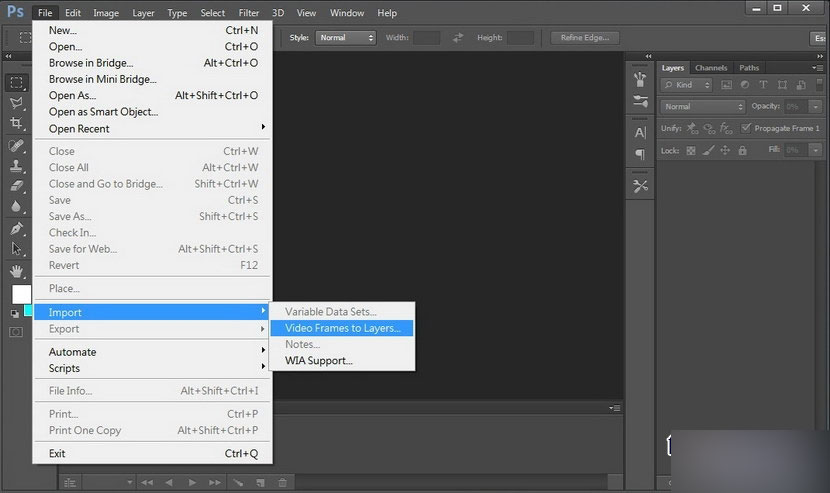
当你拍摄完成后,就可以用 Photoshop 编辑了 (示范图中是CS6),首先输入影片,到File Import Video Frames to Layers
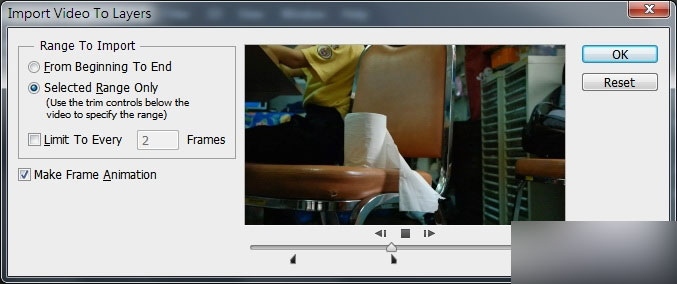
选择你需要的影片段落,但这个不太好用,如果你有其他影片制作软件,先用它们来剪裁会比方便。
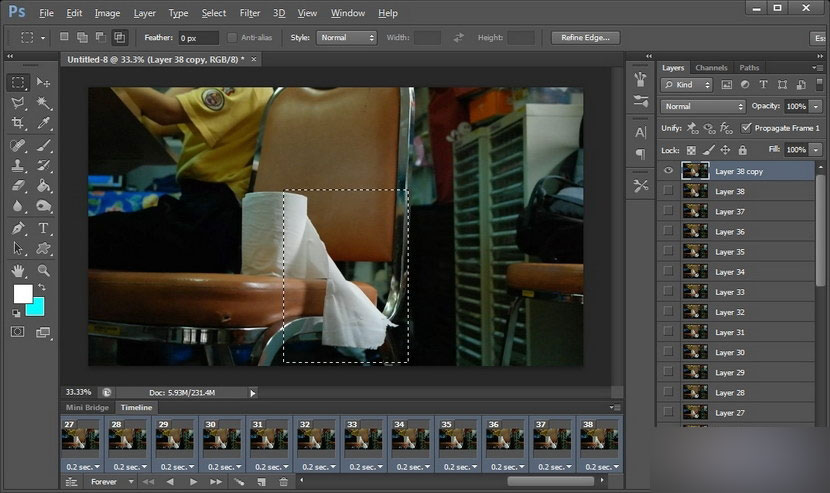
PS 会将影片的每一格变成图层,并且透过视窗「Timeline」显示,如果找不到的话,到 menu 找 Window Timeline,如下图。

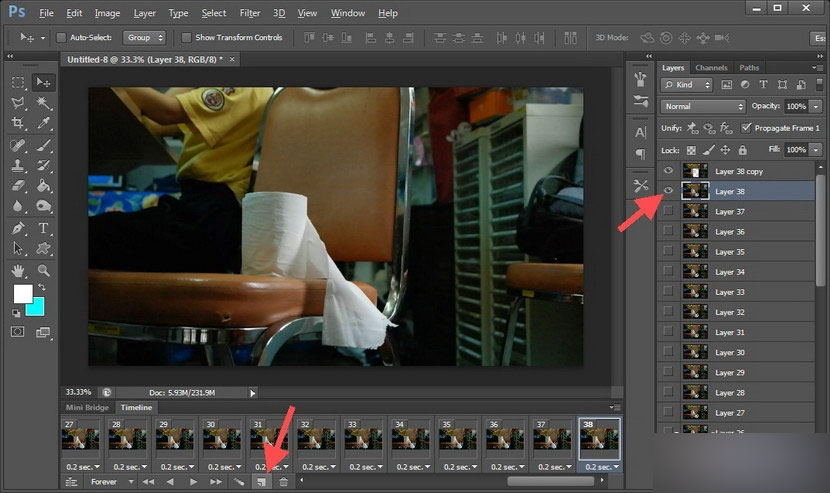
复制一张你认为适合做静止画面底图的layer,放到最顶。用选取工具,将你希望动起来的部份选取出来,然后删除,选取时要预留一点空间,尤其是遇上阴影 / 倒影部份。删除后你要选取全部的timeline,再到置顶图层点开「眼睛」(visible),这样才会成为所有影格的「背景图」。还有你选取全 timeline 后,可自行设定各影格的速度,例如这里设定是0.2 秒,稍慢的话会更有电影感。
理论上如果你的影片本身是完美地循环接驳的话,当你按左下角的 play 时,它就会不断播放然后变成一个原始的动态照片。但如果不行的话,你可以自行增加影格,方法就是按 timeline 下方的按钮增加一格,然后自行 visible 该影格的图层,如下图。
秘诀是将原本的影片,从最尾倒带再增加一次,这样就会很流畅。例如原本是 A B C,现在你变成 A B C B A 这样循环的话就自然会较流畅,当然也视乎你的影片而定。(例如单向行车的话,就不用这样做)
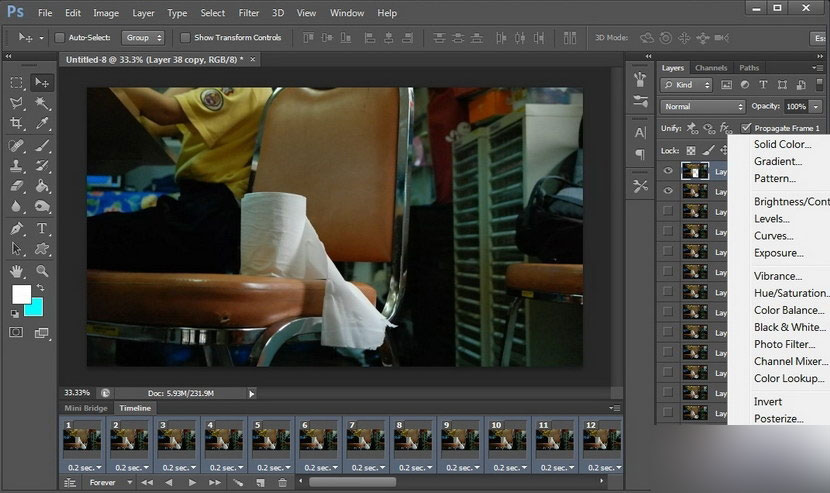
当影片循环流畅后,你就要替照片调色。首先谨记要先选取 timeline 所有影格,然后到右下角增加 adjustment layer,例如这里就用了 Curves 来调节亮度对比,也可以用Gradient Map 调出电影色调,记得每次都要选取所有影格。
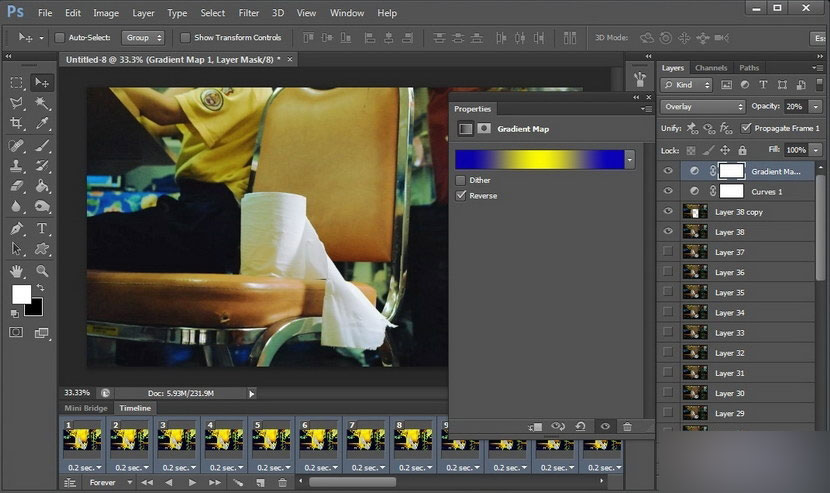
先选了蓝黄蓝 (reverse),再用 overlay 覆盖模式,及 opacity 只剩 20%,效果如下图。
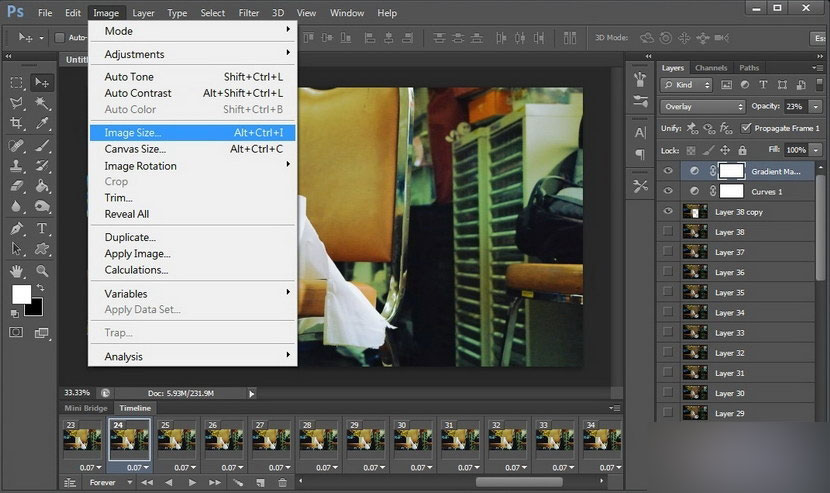
如果对效果满意的话,就可以到 Image Image size 调整动态照片的大小。
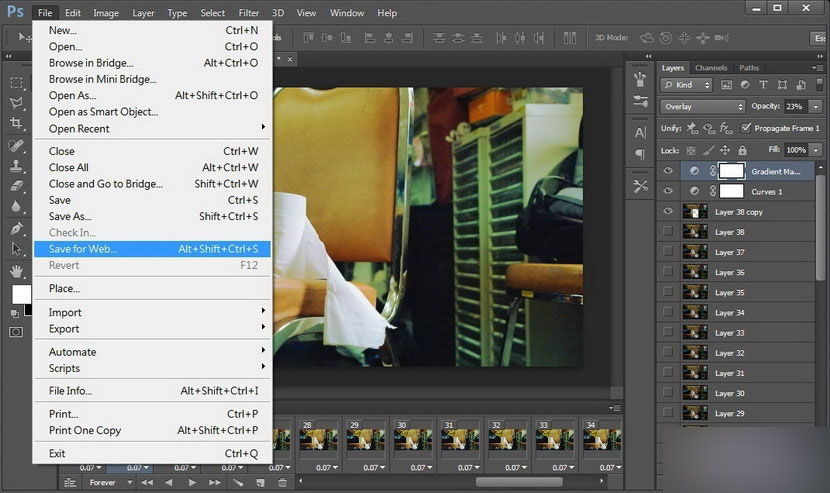
完成后就到 file save for web 输出动态照片为 GIF 档
(不是 save as)。
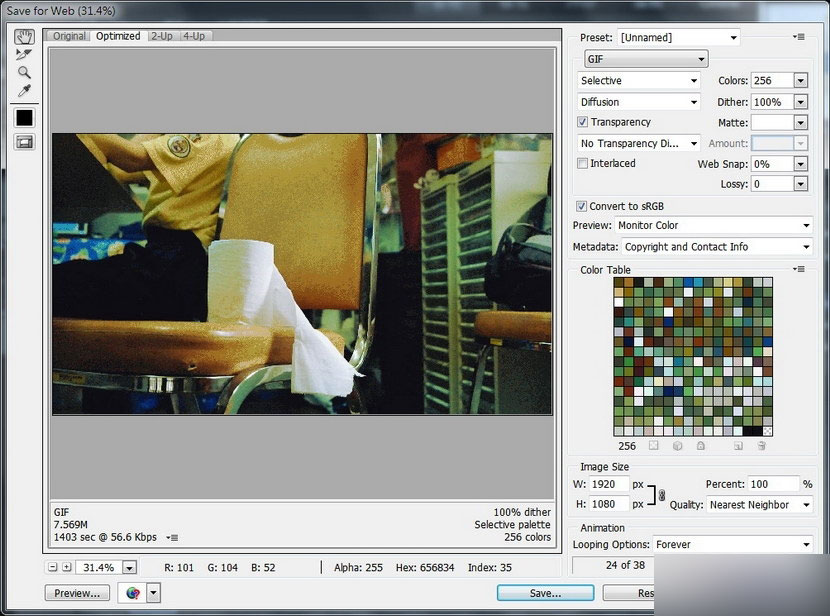
然后会弹出这个视窗,基本上都没太大问题,留意右下角,你还可以在这里缩小照片的,不过这里的压缩质量较差,但好处是文件小省空间;另外要留意一下 looping options 是不是 forever,没有问题就 save。
最后,如果要上传跟别人分享,要找一个能支持GIF 档的空间或页面
以上就是ps动态图片简单制作教程,希望能对大家有所帮助!

Hot AI Tools

Undresser.AI Undress
AI-powered app for creating realistic nude photos

AI Clothes Remover
Online AI tool for removing clothes from photos.

Undress AI Tool
Undress images for free

Clothoff.io
AI clothes remover

AI Hentai Generator
Generate AI Hentai for free.

Hot Article

Hot Tools

Notepad++7.3.1
Easy-to-use and free code editor

SublimeText3 Chinese version
Chinese version, very easy to use

Zend Studio 13.0.1
Powerful PHP integrated development environment

Dreamweaver CS6
Visual web development tools

SublimeText3 Mac version
God-level code editing software (SublimeText3)

Hot Topics
 1378
1378
 52
52
 Convert VirtualBox fixed disk to dynamic disk and vice versa
Mar 25, 2024 am 09:36 AM
When creating a virtual machine, you will be asked to select a disk type, you can select fixed disk or dynamic disk. What if you choose fixed disks and later realize you need dynamic disks, or vice versa? Good! You can convert one to the other. In this post, we will see how to convert VirtualBox fixed disk to dynamic disk and vice versa. A dynamic disk is a virtual hard disk that initially has a small size and grows in size as you store data in the virtual machine. Dynamic disks are very efficient at saving storage space because they only take up as much host storage space as needed. However, as disk capacity expands, your computer's performance may be slightly affected. Fixed disks and dynamic disks are commonly used in virtual machines
 How to convert dynamic disk to basic disk on Windows 11
Sep 23, 2023 pm 11:33 PM
If you want to convert a dynamic disk to a basic disk in Windows 11, you should create a backup first as the process will erase all data in it. Why should you convert dynamic disk to basic disk in Windows 11? According to Microsoft, dynamic disks have been deprecated from Windows and their use is no longer recommended. Additionally, Windows Home Edition does not support dynamic disks, so you will not be able to access these logical drives. If you want to combine more disks into a larger volume, it is recommended to use Basic Disks or Storage Spaces. In this article, we will show you how to convert dynamic disk to basic disk on Windows 11 How to convert dynamic disk to basic disk in Windows 11? In the beginning
 Introduction to the process of extracting line drawings in PS
Apr 01, 2024 pm 12:51 PM
1. Open the software and import a piece of material, as shown in the picture below. 2. Then ctrl+shift+u to remove color. 3. Then press ctrl+J to copy the layer. 4. Then reverse ctrl+I, and then set the layer blending mode to Color Dodge. 5. Click Filter--Others--Minimum. 6. In the pop-up dialog box, set the radius to 2 and click OK. 7. Finally, you can see the line draft extracted.
 How to automate tasks using PowerShell
Feb 20, 2024 pm 01:51 PM
If you are an IT administrator or technology expert, you must be aware of the importance of automation. Especially for Windows users, Microsoft PowerShell is one of the best automation tools. Microsoft offers a variety of tools for your automation needs, without the need to install third-party applications. This guide will detail how to leverage PowerShell to automate tasks. What is a PowerShell script? If you have experience using PowerShell, you may have used commands to configure your operating system. A script is a collection of these commands in a .ps1 file. .ps1 files contain scripts executed by PowerShell, such as basic Get-Help
 Complete list of ps shortcut keys
Mar 11, 2024 pm 04:31 PM
1. Ctrl + N: Create a new document. 2. Ctrl + O: Open a file. 3. Ctrl + S: Save the current file. 4. Ctrl + Shift + S: Save as. 5. Ctrl + W: Close the current document. 6. Ctrl + Q: Exit Photoshop. 7. Ctrl + Z: Undo. 8. Ctrl + Y: Redo. 9. Ctrl + X: Cut the selected content. 10. Ctrl + C: Copy the selected content.
 What is the ps curve shortcut key?
Aug 22, 2023 am 10:44 AM
The ps curve shortcut key is Ctrl+M. Other curve shortcut keys: 1. Convert to point control curve, Alt+Shift+Ctrl+T; 2. Automatically align the curve, Alt+Shift+Ctrl+O; 3. Restore the default curve, Ctrl+Alt+Shift+R; 4. Copy the curve, Ctrl+Alt+Shift+C; 5. Paste the curve, Ctrl+Alt+Shift+V; 6. Adjust the curve slope, Shift+up and down arrows; 7. Adjust the curve brightness, Shift+left and right arrows
 Cannot use PS shortcut keys to fill
Feb 19, 2024 am 09:18 AM
With the development of the digital age, image processing software has become an indispensable part of our life and work. Among them, Photoshop (PS for short) developed by Adobe is one of the most famous image processing software. It has powerful functions and flexible operation, and is deeply loved by users. However, when using PS, some users reported that the shortcut key "Fill" cannot be used normally, which brings troubles to the user experience. Shortcut keys are a quick operation method provided in the software to avoid tedious mouse click operations.
 PS copy layer shortcut key
Feb 23, 2024 pm 02:34 PM
In the PS copy layer shortcut keys, we can know that if you want to copy a layer when using PS, you can use the shortcut key [Ctrl+J] for quick copying. This introduction to the shortcut keys for copying layers can tell you the specific operation method. The following is the detailed content, so take a look. PS copy layer shortcut key answer: [Ctrl+J] Specific method: 1. Open the image in PS and select the layer that needs to be copied. 2. Press [Ctrl+J] on the keyboard at the same time to complete the copy of the layer. Other copying methods: 1. After opening the image, press and hold the layer and move the [New Layer] icon downwards. 2. After moving to the icon, let go. 3. The layer copy is completed.


