

PS教程之教你让每一个像素都清晰可辨的方法

下面教大家怎么让放大变模糊的图片变的清晰

大家在设计界面和网页时,是不是经常碰到PS里绘制的图标虽然是矢量的,但还是会有许多虚边,在放大、缩小、旋转后虚边变的更严重了,或者是在AI里绘制的精美矢量图标粘到PS里就变虚了,我们辛苦设计的作品就这样变”糊了”,这是我们双眼所不允许的,我们要让每一个像素都清晰可辨。要解决这些问题就要理解PS像素组成的原理,了解一些设置选项和使用技巧,下面和大家一块分享。(PS=Photoshop, AI=Illustrator)
一、绘制边缘清晰的「 形状图层 」
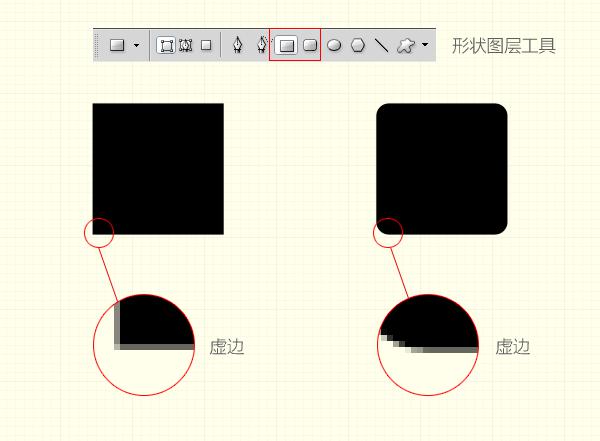
我们通常在PS里绘制矩形时会用 「矩形工具」,这样产生的是矢量的形状图层,它的好处是我们无论放大缩小时都保持矢量属性,但当我们放大视图看时还是有虚边(上图),这些虚边虽然在绘制大的图形时影响不太大,但当我们绘制很小的像素级图标时,就会很明显了。
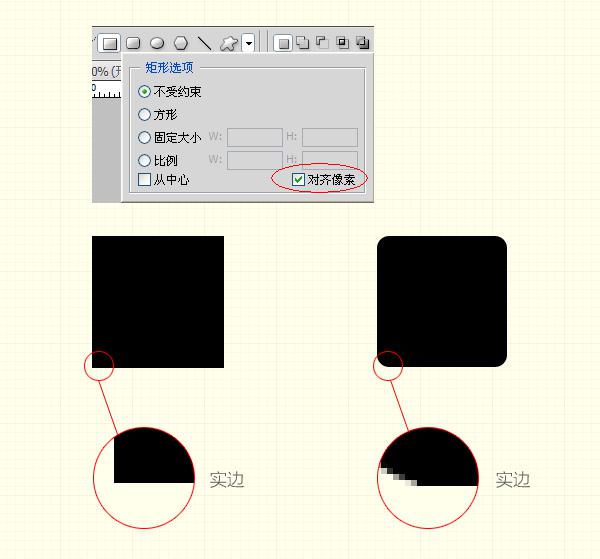
解决方法是选中下图列出的 「对齐像素」选项,当我们再绘制同样的矩形时,放大视图看边缘就清晰可辨了(下图)。其中的原理是:我们屏幕显示的图像是由无数个像素组成的,也就是说像素是图形的最小单位,通常当我们绘制的图形不是整数像素时,比如宽是20.5像素,那0.5的像素小于1像素,PS就会以虚边显示。当选中[对齐像素]选项时,我们绘制的宽、高将都是整数了。
二、旋转图形时保持边缘清晰

当我们以矩形的中心点90度旋转时,得到的矩形缺失了两个边。这是什么原因呢?得知这个矩形的长是奇数、宽是偶数。当以中心点旋转时像素不能整分,所以得到这种结果。解决办法是,可以选矩形的四个角的任一顶点为中心点旋转,或者使矩形的长宽都为奇数或偶数值。如果我们的操作是旋转并缩放图形,最好是旋转完按确定,再进行缩放。不要连续操作完再确定,这样得到的结果会比较清晰。
三、AI粘入PS时保持边缘清晰
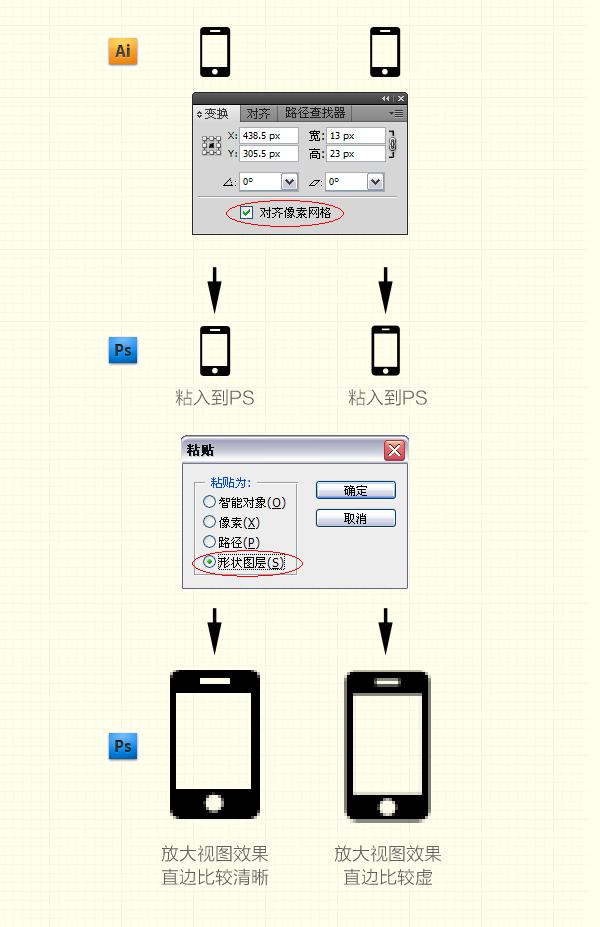
有时当我们在AI里绘制了图标后,粘到PS里就会出现如下图的虚边,这是有两种原因造成的,一是在AI里新建文件时没有选中[对齐像素网格]选项(只有AI CS5以上版本有这个选项),这样绘制的图标的各个数值不为整数的情况,粘到PS里就会出现虚边。再一个是选中了 「对齐像素网格」选项粘到PS中依然出现虚边,这是要在粘之前在PS中建一个与图标大小相同的选区,再粘进来就OK了,因为PS中粘贴板中的图标粘入到视图时,图标是以被粘入视图的中心点定位粘贴的,这样粘贴的位置可能不是整数值,所以会出现虚边,这时我们要建一个同样大小的选区,再粘就没问题了。还有粘贴时选 「形状图层 」,这样以后的可编辑性会比较强。

Hot AI Tools

Undresser.AI Undress
AI-powered app for creating realistic nude photos

AI Clothes Remover
Online AI tool for removing clothes from photos.

Undress AI Tool
Undress images for free

Clothoff.io
AI clothes remover

AI Hentai Generator
Generate AI Hentai for free.

Hot Article
Hot Tools

Notepad++7.3.1
Easy-to-use and free code editor

SublimeText3 Chinese version
Chinese version, very easy to use

Zend Studio 13.0.1
Powerful PHP integrated development environment

Dreamweaver CS6
Visual web development tools

SublimeText3 Mac version
God-level code editing software (SublimeText3)
Hot Topics
 1376
1376
 52
52

 How to create pixel art in GIMP
Feb 19, 2024 pm 03:24 PM
How to create pixel art in GIMP
Feb 19, 2024 pm 03:24 PM
This article will interest you if you are interested in using GIMP for pixel art creation on Windows. GIMP is a well-known graphics editing software that is not only free and open source, but also helps users create beautiful images and designs easily. In addition to being suitable for beginners and professional designers alike, GIMP can also be used to create pixel art, a form of digital art that utilizes pixels as the only building blocks for drawing and creating. How to Create Pixel Art in GIMP Here are the main steps to create pixel pictures using GIMP on a Windows PC: Download and install GIMP, then launch the application. Create a new image. Resize width and height. Select the pencil tool. Set the brush type to pixels. set up
 How many megapixels is 8k?
Mar 30, 2023 pm 06:21 PM
How many megapixels is 8k?
Mar 30, 2023 pm 06:21 PM
The resolution of 8k reaches 7680*4320, which is about 33 million pixels. 8K resolution is an experimental digital video standard, promoted by organizations such as the Japan Broadcasting Corporation (NHK), the British Broadcasting Corporation (BBC), and the Italian Radio and Television Corporation (RAI); the ultra-high resolution of 8K is the ultra-high resolution of 4K 4 times that of HD and 16 times that of Full HD.
 How to change pixels on Meitu Xiuxiu How to change pixels on Meitu Xiuxiu
Mar 12, 2024 pm 02:50 PM
How to change pixels on Meitu Xiuxiu How to change pixels on Meitu Xiuxiu
Mar 12, 2024 pm 02:50 PM
How to change the pixels of Meitu Xiuxiu? Meitu Xiuxiu is a mobile photo editing software with many functions, dedicated to providing users with an excellent photo editing experience. In the software, we can perform many operations on our photos, such as portrait beauty, skin whitening, facial reshaping, face slimming, etc. If we are not satisfied, we can just click on it to create perfect proportions easily. For the repaired photos, we can also adjust their size and pixels before saving. So, do you know how to pixel? For those who don’t know yet, let’s take a look at the method shared by the editor below. How to change the pixels of MeituXiuXiu 1. Double-click to open MeituXiuXiu, click to select the "Beautify Picture" option; 2. In the beautify picture, click "Size"
 How to set the pixel height of Meitu Xiuxiu
Mar 27, 2024 am 11:00 AM
How to set the pixel height of Meitu Xiuxiu
Mar 27, 2024 am 11:00 AM
In the digital age, pictures have become an integral part of our daily lives and work. Whether it is sharing on social media or presenting in a work report, high-quality pictures can add a lot of points to us. However, many times the pixels of the pictures in our hands are not satisfactory. In this case, we need to use some tools to adjust the pixel height to meet the needs of different scenes. So this tutorial guide will introduce in detail how to use Meitu Xiuxiu to adjust the pixels of pictures. I hope it can help you! First of all, please find the [Meitu Xiu Xiu] icon on your mobile phone, click to enter the main interface, and then click on the [Beautify Pictures] item. 2. The second step, next, we come to the [Camera Roll] page as shown in the picture, please click on yourself
 Detailed explanation of PHP Class usage: Make your code clearer and easier to read
Mar 10, 2024 pm 12:03 PM
Detailed explanation of PHP Class usage: Make your code clearer and easier to read
Mar 10, 2024 pm 12:03 PM
When writing PHP code, using classes is a very common practice. By using classes, we can encapsulate related functions and data in a single unit, making the code clearer, easier to read, and easier to maintain. This article will introduce the usage of PHPClass in detail and provide specific code examples to help readers better understand how to apply classes to optimize code in actual projects. 1. Create and use classes In PHP, you can use the keyword class to define a class and define properties and methods in the class.
 Where is the clear picture quality of the wake-up picture?
Feb 23, 2024 pm 04:31 PM
Where is the clear picture quality of the wake-up picture?
Feb 23, 2024 pm 04:31 PM
The wake-up image can have high-definition image quality, so where is the function of clear image quality? Users need to click on the three horizontal icons on the upper left, then find HD quality in the settings, and turn it on to get HD quality. This clear image quality function location introduction can tell you the specific content. The following is a detailed introduction, come and take a look. Tutorial on how to use the wake-up image. Where is the clear image quality of the wake-up image? Answer: Click on the three horizontal icons and turn on the high-definition image quality in the settings. Specific introduction: 1. First, you need to open this software. 2. Then click the settings button in the upper left corner of the app. 3. Click Settings, then click HD Quality, and turn it on.
 What is the concept of 12 million pixels?
Nov 29, 2022 am 10:31 AM
What is the concept of 12 million pixels?
Nov 29, 2022 am 10:31 AM
12 million pixels refers to 12 million pixel units, about 4,000 in a row, and about 3,000 in a column. If you count them all, it is about 12 million. A pixel is the smallest unit that makes up a picture. It is a single color, and the picture is made up of such different colors. Colorful little things are arranged in rows and columns.
 What to do if the font is not clear in Windows 7 system
Jun 29, 2023 pm 01:56 PM
What to do if the font is not clear in Windows 7 system
Jun 29, 2023 pm 01:56 PM
What should I do if the fonts in win7 system are not clear? Recently, a win7 system user found that the system fonts became blurry and unclear when using the computer. The user did not know how to solve it, and was very distressed by this. So what should I do if the win7 system fonts are not clear? The editor will explain to you below. Let’s take a look at the solutions to unclear fonts in win7 system! Solution to unclear fonts in win7 system 1. Right-click the desktop and click Screen Resolution in the shortcut menu. As shown in the figure: 2. Then set the desktop resolution to the recommended resolution and click Apply. As shown in the picture: 3. Then click to enlarge or reduce text and other items. As shown in the figure: 4. Click to adjust the ClearType text. as the picture shows
