How to use edius to record time using tape
Troubled by edius' clever use of tape shooting time? As a powerful video editing software, edius can greatly improve editing efficiency by cleverly using its tape shooting time function. This article is written by PHP editor Youzi, who introduces how Edius uses tapes to record time. Come and find out!
First of all, you can automatically divide the material files when uploading materials to Edius based on changes in the camera shooting date and time.
Specific operation:
In Edius, select [Settings] → [Application Settings] → [Video Recorder Settings] → Check [When the recording time changes] under [Automatically divide files] ], uncheck other options → [OK]
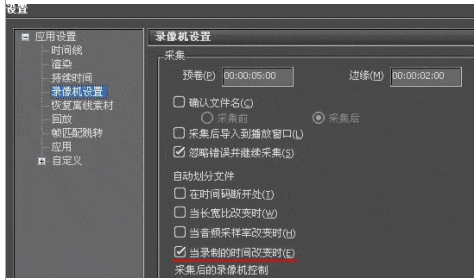
Through the above settings, during the material collection process, edius can automatically classify the collected material files according to the shooting date and shooting time. Different from each other, automatic division into multiple files is equivalent to automatically dividing the scenes shot in the early stage into several paragraphs according to the concept of scene notes. It is also equivalent to a preliminary cutting of the shooting materials, which greatly reduces the workload. The workload of searching for materials and shooting content during post-editing and other tedious aspects also greatly facilitates the management of material files and shooting content.
At the same time, through corresponding settings, the time and date of shooting can be displayed in the editing window during the EDIUS editing process.
Specific operation:
In [Settings]-[Application Settings], select [Custom]-[Overlay Display]-check [Show Source File Information] under [General Editing] and [Show Status], check [Show Source File Information] under [Crop] and [Output], select [Bottom Right] under [View], select [Medium] under [Size], remove the [Background] check, and [Source file information to be displayed] In the drop-down menu, select [Recording Date (2 lines)], select [Apply] and press [OK] to return, so that the date and time of shooting can be displayed.
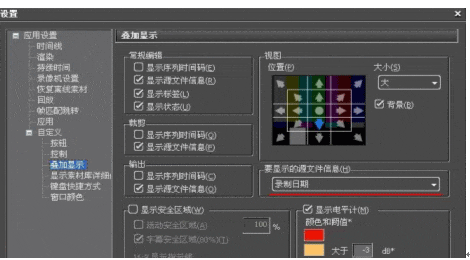
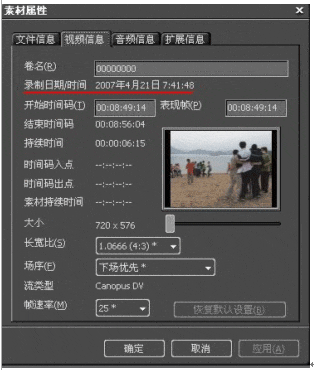
Through the above settings, the original shooting date and time of the material on the timeline can be displayed in the material window and editing window, so that it is easy to edit by date and time Edited. If you also select [Show timeline timecode] in the [Information] option, the timeline timecode will also be displayed below the original timecode of the material in the recording window.
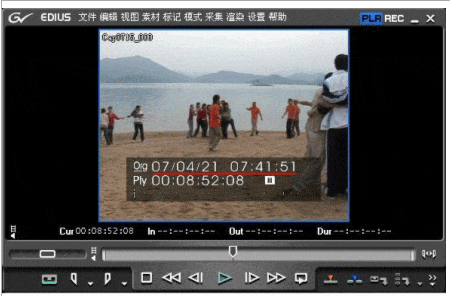
In addition, in edius, you can also output files with shooting date and time through settings.
Specific operation:
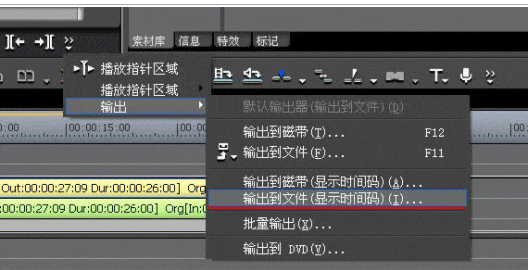
Select [Output] → [Output to file (display time code)]. Note: If the original video file does not contain time and date information, the corresponding information cannot be output.
This option can overlay the date and time information set when the camera is shooting into the generated file. If you select [Output to tape (display time code)] EDIUS can also output time information and video signals directly to tape through the DV interface.
The wonderful use in the multi-camera editing process
edius has advanced multi-camera editing capabilities, and when performing multi-camera editing, if you can The content shot by different cameras is automatically aligned, so that the voice synchronization problem between multiple cameras can be realized, which brings great convenience to multi-camera editing. In fact, in the multi-camera settings of EDIUS editing software, it has been A variety of synchronization methods are provided, among which synchronization according to [recording time] provides us with a way to accurately align according to the shooting time of the material.
Specific operation:
Select [Mode] → [Multiple Cameras] → [Synchronization Mode] → [Recording Time]
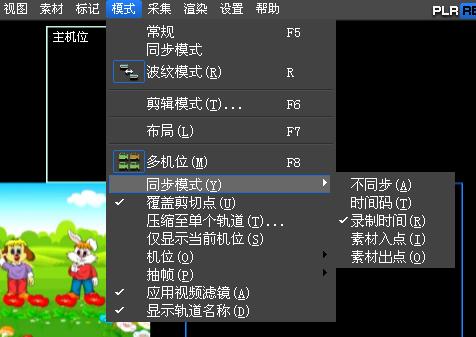
In multiple cameras During the bit editing process, by setting the synchronization point, the materials on different tracks can be automatically arranged in the order of shooting date and shooting time, so that the shooting screen forms a unified layout based on time, ensuring that all images are shot at the same time. The unity of different screens on the screen makes it clearer for editors to perform multi-camera editing.
The above is the detailed content of How to use edius to record time using tape. For more information, please follow other related articles on the PHP Chinese website!

Hot AI Tools

Undresser.AI Undress
AI-powered app for creating realistic nude photos

AI Clothes Remover
Online AI tool for removing clothes from photos.

Undress AI Tool
Undress images for free

Clothoff.io
AI clothes remover

AI Hentai Generator
Generate AI Hentai for free.

Hot Article

Hot Tools

Notepad++7.3.1
Easy-to-use and free code editor

SublimeText3 Chinese version
Chinese version, very easy to use

Zend Studio 13.0.1
Powerful PHP integrated development environment

Dreamweaver CS6
Visual web development tools

SublimeText3 Mac version
God-level code editing software (SublimeText3)

Hot Topics
 How to switch language in Adobe After Effects cs6 (Ae cs6) Detailed steps for switching between Chinese and English in Ae cs6 - ZOL download
May 09, 2024 pm 02:00 PM
1. First find the AMTLanguages folder. We found some documentation in the AMTLanguages folder. If you install Simplified Chinese, there will be a zh_CN.txt text document (the text content is: zh_CN). If you installed it in English, there will be a text document en_US.txt (the text content is: en_US). 3. Therefore, if we want to switch to Chinese, we need to create a new text document of zh_CN.txt (the text content is: zh_CN) under the AdobeAfterEffectsCCSupportFilesAMTLanguages path. 4. On the contrary, if we want to switch to English,
 How to check traffic on Apple mobile phone
May 09, 2024 pm 06:00 PM
How to check data usage on Apple 1. The specific steps to check data usage on Apple mobile phone are as follows: Open the settings of the phone. Click the Cellular button. Scroll down on the cellular network page to see the specific data usage of each application. Click Apply to also set allowed networks. 2. Turn on the phone, find the settings option on the phone desktop, and click to enter. In the settings interface, find "Cellular Network" in the taskbar below and click to enter. In the cellular network interface, find the "Usage" option on the page and click to enter. 3. Another way is to check the traffic by yourself through the mobile phone, but the mobile phone can only see the total usage and will not display the remaining traffic: turn on the iPhone, find the "Settings" option and open it. Select "Bee"
 How to shoot videos on Douyin? How to turn on the microphone for video shooting?
May 09, 2024 pm 02:40 PM
As one of the most popular short video platforms today, the quality and effect of Douyin’s videos directly affect the user’s viewing experience. So, how to shoot high-quality videos on Douyin? 1. How to shoot videos on Douyin? 1. Open the Douyin APP and click the "+" button in the middle at the bottom to enter the video shooting page. 2. Douyin provides a variety of shooting modes, including normal shooting, slow motion, short video, etc. Choose the appropriate shooting mode according to your needs. 3. On the shooting page, click the "Filter" button at the bottom of the screen to choose different filter effects to make the video more personalized. 4. If you need to adjust parameters such as exposure and contrast, you can click the "Parameters" button in the lower left corner of the screen to set it. 5. During shooting, you can click on the left side of the screen
 How to cut video with FastStone Capture. Introduction to how to cut video.
May 09, 2024 pm 01:01 PM
First, open FastStoneCapture, click the icon as shown below, then click Edit, select the video file to be edited, then click Cut on the upper left to pop up a dialog box, after setting the duration, click OK to appear above [This part will was deleted when saving the file], click the big save as last in the upper left corner, a dialog box will pop up, after saving, click OK, play the video and you will find that the video time has been cut. The editor has shared here the method of cutting videos with FastStoneCapture. Don’t miss this article.
 How to view layer properties in Ae How to view layer properties in Ae
May 09, 2024 pm 03:13 PM
1. First, after opening the interface, click the mouse to select the layer and find the location of the attribute bar. 2. Then, hold down the shift key on the keyboard, and then press the T key on the keyboard to open the opacity attribute. 3. Finally, press P respectively. , S, A, and R keys to display all layer properties such as position, anchor point, scale, rotation, and opacity.
 How to export audio files separately from EDIUS Tutorial on exporting audio files separately from EDIUS
May 09, 2024 pm 01:10 PM
First, after importing the video material, drag and drop it onto the audio and video track. Then, open the sound waveform display of the track, click the unlock button in the connection group column, and then edit the anchor point for the detached audio track and set the starting point of playback. and the end position. Then, right-click the Output to File button. Finally, find the audio option in the format settings window that opens, click to select PCMWAVE format output and save it.
 Detailed steps for creating camera lens zoom-in effect in AE
May 09, 2024 pm 01:00 PM
1. Open AE, [New Synthesis]. 2. Select the text tool, create a text layer, and enter a few words. 3. Convert the text layer to a 3D layer and click the 3D icon. 4. Right-click in the blank area of the layer panel and select [New]-[Camera]. 5. Set the parameters of the camera to whatever you want. After setting, click [OK]. 6. Select [Camera Tool] on the toolbar, and use the camera tool to adjust the lens effect of the material. 7. Zoom in effect: Just right-click the video preview window and move the mouse upward. 8. Of course, the right click only previews the zoom-in effect. If you want to achieve the zoom-in effect of the material, you need to add keyframes. Press the shortcut key [P] to bring up the [Position] option. The last parameter is to adjust the distance of the lens.
 How to download deepseek
Feb 19, 2025 pm 05:45 PM
Make sure to access official website downloads and carefully check the domain name and website design. After downloading, scan the file. Read the protocol during installation and avoid the system disk when installing. Test the function and contact customer service to solve the problem. Update the version regularly to ensure the security and stability of the software.


