
 Computer Tutorials
Troubleshooting
How to configure bluetooth when assembling a computer? How to choose the power supply for assembling a computer?
Computer Tutorials
Troubleshooting
How to configure bluetooth when assembling a computer? How to choose the power supply for assembling a computer?
How to configure bluetooth when assembling a computer? How to choose the power supply for assembling a computer?

Commonly encountered problems when assembling computers, how to match Bluetooth and choose a power supply? Bluetooth connection is a common requirement in assembling computers, but how to correctly match Bluetooth devices confuses many people. In addition, the choice of power supply is also key to assembling a computer. A suitable power supply can ensure stable operation of the system. PHP editor Strawberry will give you a detailed introduction to the relevant knowledge of Bluetooth adaptation and power supply selection for assembling computers to help you solve these problems. Please continue reading below for details.

How to configure Bluetooth on the assembled computer?
Just buy an external Bluetooth device.
Desktop computers generally do not come with Bluetooth, so you need to purchase a Bluetooth device that is matched and powered through the USB port:
Then install the driver, and when needed, open the application software , you can connect the Bluetooth device to the desktop computer.
The connected devices are first connected to the mobile phone in the same way as the Bluetooth headset. They need to be paired before they can be connected to each other for data exchange.
How to choose the power supply for assembling a computer?
1. Power, first look at the power of your power supply hardware, and look at the rated power of your graphics card and CPU.
The simplest algorithm is to add the graphics card and CPU, plus 200W. If the power is not enough, no matter how good the brand is, it will pale in comparison.
Excessive performance will feel like a waste.
2. Check the size of the chassis to see if it can fit. If it can’t fit, replace the power supply and chassis, which is a bit troublesome!
3. For wires, you can choose full modules, straight-out cables, or semi-modules. Full-module assembly is simpler.
4. Power supply efficiency and quality. Nowadays, power supplies have various solutions, such as DC-DC, EMI filters, capacitors, etc.
Solid capacitors in power supplies are better, and single-channel 12V current is better. A friend who doesn't install the computer often can't understand many parameters. Simply buy a good power supply with confidence. Look at the brand. Taiwanese and American Corsair products are not very cost-effective. In fact, they are a bit exaggerated. Domestic power supplies include Great Wall, Huntkey, Cooler, etc. to choose from.
My friends around me use Great Wall power supplies the most. Domestic power supplies from Great Wall are used in civilian, military, aerospace, supercomputers, servers, etc., which shows that they are of excellent quality. A 400W bronze power supply for home and office use is sufficient. Games, etc. require more than 500W, and both bronze and gold medals are acceptable. The efficiency and quality of gold medals will be better than bronze medals.
How to choose the power supply for assembling a computer?
The power supply for assembling the computer should be a national standard brand product with a power that is at least 1/3 greater. If the power consumption of the host is 350 watts, then a nominal power supply of 450 watts or more should be used
How long is the lifespan of an assembled computer power supply?
If we talk about the life span after use, this is not necessarily true. It may break in one year, or it may not break in ten years. But if we talk about performance life, the longest is estimated to be 5 years. After 5 years, even the current mid-to-high-end configurations may even have web pages and QQ stuck by then
In fact, many computers are being operated The system was eliminated. The new operating system has high hardware requirements, and old computers are too slow to run the new operating system. Just be eliminated. This is the trend and law, and it is also the need of software and hardware manufacturers and dealers.
How to connect the power cord of the assembled computer?
When assembling the computer power cord, you need to connect the power cord to the power supply and the computer host. The following are general steps:
1. Disconnect the power supply: Make sure the power supply and computer host are powered off, and unplug the power plug.
2. Connect the power supply: Insert the plug of the power cord into the corresponding socket of the power supply. The socket on the power supply is usually located on the back of the power supply and has a specially shaped slot to ensure that the plug is connected correctly.
3. Connect to the host: Look for the power interface on the back of the computer host, usually located on the top or bottom of the host. Plug the other end of the power cord into the power socket of the computer host.
4. Fix cables: Use cable ties or wire bundles to fix the power cord around the host to ensure that the cables are neat and safe.
5. Check the connection: Make sure the power cord is tightly connected to the power supply and computer host socket without looseness.
6. Repower the computer: Insert the power plug into the power socket and turn on the power switch to power the computer.
When connecting the power cord, please make sure to choose a power supply that meets the hardware requirements of your computer, and ensure that the power cord is properly installed and assembled to ensure a secure and safe connection. If you encounter any problems during connection, it is recommended to refer to the manual of the power supply or computer host, or seek professional help. Also, be careful when assembling the power cord and make sure to follow relevant safety operating procedures to protect your own safety.
Assembling the computer power supply is not on?
It may be a power problem! It's very simple. Unplug everything that's plugged into the motherboard from the power supply. Then use a paper clip on the 20 4-pin end to connect the green wire to any black wire. If the power supply fan is spinning, then The power supply is good and can be ruled out.
After confirming that the power supply is good, connect the motherboard power supply and CPU power supply. If the independent graphics card needs power supply, also connect it. However, if there is an integrated display or core display, it is recommended to unplug the independent display first (if it lights up, Shown above). Then unplug the hard drive indicator light, power indicator light, and restart button (leave only the power-on cable), and then turn on the computer. If it cannot be turned on, it means that the connection between the indicator lights, the reset button, and the power-on button is wrong. !
When assembling a computer, how do you generally choose a power supply?
The following aspects need to be considered when selecting a power supply:
1. Power: The power of the power supply must be sufficient to meet the needs of the entire computer system. It is generally recommended to choose a power slightly higher than the actual demand. Ensure the stable operation of the computer. Generally speaking, ordinary office computers require a power supply of 300W-500W, and gaming computers require a power supply of 500W-750W.
2. Brand and quality: Choosing a well-known brand and high-quality power supply can ensure the stability and life of the power supply and avoid failures or safety issues. Common brands include Corsair, Antec, Cooler Master, Zhenhua, etc.
3. Interfaces and cables: Choose appropriate interfaces and cables according to your own needs, such as SATA interface, PCI-E interface, etc. At the same time, the cable length should also take into account the chassis size and wiring conditions.
4. Efficiency: A high-efficiency power supply can improve energy utilization, reduce energy waste and heat generation, and also extend the life of the power supply. It is generally recommended to choose high-efficiency power supplies with 80PLUS certification and above.
5. Noise: Choosing a low-noise power supply can improve the stability and user experience of the entire system. It is generally recommended to choose a power supply with a larger fan diameter and lower rotation speed.
In short, when choosing a power supply, you need to consider comprehensively based on your own needs and budget, and choose a power supply with an appropriate brand, power, interface, efficiency, noise, etc. At the same time, attention should also be paid to the safety and stability of the power supply to avoid failures or safety issues.
After assembling the computer, there is no response when pressing the power button?
First of all, we need to confirm what kind of unresponsiveness this is.
1. The power fan does not spin when the computer is turned on.
Solution
Check the power cord Is there any problem? Have you connected the power strip? Is it firmly plugged in?
Check whether the cpu motherboard power supply interface is plugged in correctly! Even though it's facing the wrong way, it won't turn on even though it's plugged in.
Check whether the power supply is normal. Use a wire to plug in the green and black wires of the motherboard's power supply cable. If the fan rotates, it proves it's normal.
2. When the power supply fan is turned on, the screen does not display.
Troubleshooting: When the computer is turned on normally, the screen does not display. Press the key on the 7 keypad a few more times. If the light on the keypad turns off and on, it means the computer is running normally. It's just that the screen doesn't display. Now check to see if the display output line is connected to the graphics card normally! Graphics card graphics card! superior!
The keypad light on the top does not go out when pressed. It is usually because the memory module is not inserted securely. Re-insert it repeatedly. If it still doesn't work, there is something wrong with the motherboard or CPU.
Assemble the computer. After the assembly is completed, there is no response when pressing the power button?
Solution:
1. Plug in the power cord tightly, check the plug on the plug board, and confirm that the plug board is powered on.
2. Confirm that the wire from the host power supply to the plug-in board is good, then take the power supply and connect it to the 24P plug of the motherboard. Short-circuit the green and any black wires. If the power fan turns on, it means there is no problem with the power supply and the power fan does not work. It means the power supply is broken, replace it with a new one.
3. After confirming that there is no problem in the above 2 steps, unplug the switch wire connecting the motherboard and the front panel of the chassis, and use a screwdriver to short-circuit the two pins of the switch. If the fan rotates, it means there is no problem with the motherboard. If the fan If it doesn't turn on, it's probably a motherboard problem, so contact professional maintenance personnel to handle it.
4. Short-circuit the motherboard pins and the fan will rotate, but there is no response when pressing the switch button on the front panel. This means that the switch button is broken or stuck. Replace with a new switch button, or remove the stuck button.
How to plug in the power cord when assembling a computer?
1. Take out the motherboard, remove the CPU and install it, fix the fan, plug in the memory and put it away.
2. Remove the covers on both sides of the chassis, install the power supply, and screw the motherboard tray screws in the chassis to the designated position.
3. Handle the motherboard baffle according to the interface position, snap it into the chassis back bezel, put the motherboard correctly into the chassis, and gently tighten the screws. For independent graphics, break off the small PCI-E baffle, insert the graphics card and secure it with screws.
4. Plug in the 24 4-pin power cord. If the 4-pin cord is too long, tie it into a knot.
5. Separate the front USB and audio jack cables with USB and AUDIO letters on the back from the chassis, and insert them into the USB pin slot and AUDIO pin slot of the motherboard respectively. Both are to prevent mis-insertion. The USB pin slot is usually in the lower right corner of the motherboard, and there is a USB mark under the pin slot. The AUDIO pin slot is generally located in the middle and lower left side of the motherboard.
6. Knot the switch, restart, hard disk indicator light and other wires on the chassis. Generally, this type of plug on the motherboard is adjacent to the USB. In the lower right corner of the motherboard, there are letters indicating the corresponding plugs, such as HDLED. is the hard disk indicator light, RST is the cold start, POW-SW is the startup, SPEAKER is the alarm horn, and POW-LED is the power indicator light. Just plug them in one by one.
7. Remove the baffle at the optical drive position of the chassis (the card head can be pushed out from the back and removed). Put the optical drive in and secure it with screws.
8. Take out the optical drive and hard disk data cable. If it is a parallel port data cable, please confirm that there is an IDE interface on the motherboard. The serial port cable is generally longer. After forming a spiral shape with your fingers, you can insert it into the motherboard serial port port in sequence, and then plug in the optical drive and hard disk power cables.
9. Use tying thread to gather and fix the messy threads appropriately. Install the side covers in sequence. You're done, the next step is to partition the hard drive and create a system.
Purely personal experience, let’s discuss the shortcomings together. Reproduction is prohibited.
The above is the detailed content of How to configure bluetooth when assembling a computer? How to choose the power supply for assembling a computer?. For more information, please follow other related articles on the PHP Chinese website!

Hot AI Tools

Undresser.AI Undress
AI-powered app for creating realistic nude photos

AI Clothes Remover
Online AI tool for removing clothes from photos.

Undress AI Tool
Undress images for free

Clothoff.io
AI clothes remover

AI Hentai Generator
Generate AI Hentai for free.

Hot Article
Hot Tools

Notepad++7.3.1
Easy-to-use and free code editor

SublimeText3 Chinese version
Chinese version, very easy to use

Zend Studio 13.0.1
Powerful PHP integrated development environment

Dreamweaver CS6
Visual web development tools

SublimeText3 Mac version
God-level code editing software (SublimeText3)
Hot Topics
 1384
1384
 52
52

 How to connect Xiaomi Bluetooth headset to Apple phone_Introduction to tutorial on pairing Xiaomi Bluetooth headset to iPhone
Mar 23, 2024 pm 03:01 PM
How to connect Xiaomi Bluetooth headset to Apple phone_Introduction to tutorial on pairing Xiaomi Bluetooth headset to iPhone
Mar 23, 2024 pm 03:01 PM
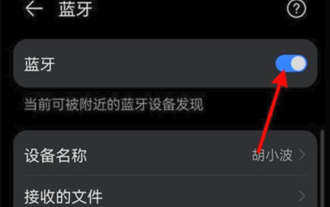
1. Place the earphones in the charging box and press and hold the button under the charging box for ten seconds. 2. Select Bluetooth in the phone settings menu. 3. Turn on the button on the right side of Bluetooth and connect the Xiaomi headphones.
 How to recover lost earphones from oppo_Steps to recover lost earphones from oppo
Apr 19, 2024 pm 04:25 PM
How to recover lost earphones from oppo_Steps to recover lost earphones from oppo
Apr 19, 2024 pm 04:25 PM
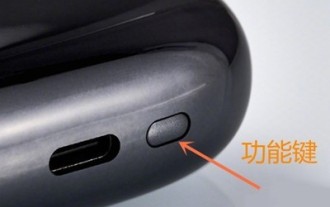
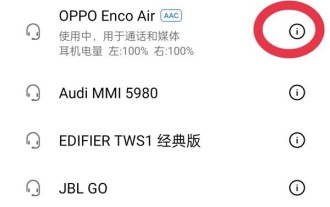
1. Enter the Bluetooth device of your mobile phone and click the [i] icon after the name of the Bluetooth headset to enter the pairing setting interface. 2. Click [Headphone Function]. 3. Click [Find OPPO Wireless Headphones]. When the headphones are nearby, you can play the sound to determine the location. When the headphones are not nearby, you can view the last location. Editor's tip: To use the "Search OPPO Wireless Headphones" function, you must meet the following conditions: 1. If you want to search for: EncoX, EncoW51, EncoFree, Encofree2, you need to use an OPPO mobile phone with ColorOS7 or above system version to search. 2. If you want to find: EncoPlay, EncoAir, you need to use an OPPO mobile phone with ColorOS11 or above system version to search. 3
 Why is there no sound in the Amap navigation?
Apr 02, 2024 am 05:09 AM
Why is there no sound in the Amap navigation?
Apr 02, 2024 am 05:09 AM
The reasons why there is no sound in Amap navigation include improper speaker connection, lowering the device volume, incorrect Amap settings, background application interference, mobile phone silent or vibration mode, and system permission issues. The solutions are as follows: check the speaker connection; adjust the volume; check the Amap map settings; close background applications; check the phone mode; grant permissions; restart the device; update the Amap map; and contact customer service.
 How to connect Bluetooth headset to computer win10_How to connect bluetooth headset to computer win10
Mar 27, 2024 pm 03:00 PM
How to connect Bluetooth headset to computer win10_How to connect bluetooth headset to computer win10
Mar 27, 2024 pm 03:00 PM
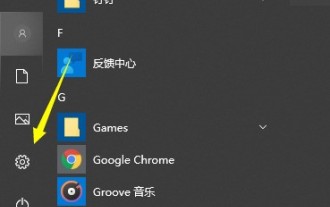
1. Click the Windows logo in the lower left corner of the computer, and then click the Settings logo on the left. 2. Select device options to enter. 3. Select Bluetooth and its devices in the device bar on the left, and click to add Bluetooth or other devices. 4. In the pop-up Add Device option, click Bluetooth. 5. Enter the search process. After the search is completed, select the Bluetooth device you want to connect to. 6. After selecting the Bluetooth device to be connected, click Connect. 7. After the connection is successful, the connected device will be displayed on the Bluetooth and other devices page. At this time, you can use the Bluetooth device to perform transmission tasks.
 How to pair Huawei Bluetooth headsets with new devices
Mar 29, 2024 am 10:06 AM
How to pair Huawei Bluetooth headsets with new devices
Mar 29, 2024 am 10:06 AM
How to pair Huawei Bluetooth headsets with new devices 1. With the headset in the box, with the cover open, press and hold the button for more than 10 seconds until the indicator light in the box flashes white, entering re-pairing mode. 2. Turn on Bluetooth on your phone, search for the pairable device, and click on the Bluetooth name of the headset, FreeBuds3, to pair it. When connecting to a Huawei phone, after turning on the phone's Bluetooth, a proximity auto-discovery pop-up box with the name and picture of the headset will appear on the phone. Click Connect and the headset will be connected. 4. Or open the Smart Life APP, click the "+" button in the upper right corner, scan the device and add it. How to pair Huawei wireless headphones? This article uses Huawei P40 (connected to Huawei FreeBuds3); EMUI11 as a case to explain. 1. Place the Huawei wireless headset body into the charging box and open it.
 Why do Bluetooth headsets always sound intermittent and how to deal with them. Detailed introduction: Introduction to the reasons why Bluetooth headsets sound intermittent.
Mar 10, 2024 am 10:31 AM
Why do Bluetooth headsets always sound intermittent and how to deal with them. Detailed introduction: Introduction to the reasons why Bluetooth headsets sound intermittent.
Mar 10, 2024 am 10:31 AM
It's very annoying when Bluetooth headsets or speakers are intermittent. Let me troubleshoot them one by one. 1. Troubleshoot hardware problems: First, try to connect the mobile phone to the headset or stereo via Bluetooth to ensure that the sound transmission is normal. Then, switch the phone from Wi-Fi to mobile network to check the sound performance. If the Bluetooth device does not have intermittent sound on the mobile network but does on Wi-Fi, it may be due to interference between Wi-Fi and Bluetooth. If the sound from your Bluetooth headset or speaker is still interrupted after connecting to your phone and using the mobile network, it may be due to a problem with the Bluetooth device itself. It is recommended to try another device for testing. If the problem persists, it is likely that the device itself is faulty. 3. There is another strange situation that few people notice.
 What should I do if win11 Bluetooth cannot connect? Analysis of the problem that win11 Bluetooth cannot connect and can only pair
Mar 16, 2024 pm 06:30 PM
What should I do if win11 Bluetooth cannot connect? Analysis of the problem that win11 Bluetooth cannot connect and can only pair
Mar 16, 2024 pm 06:30 PM
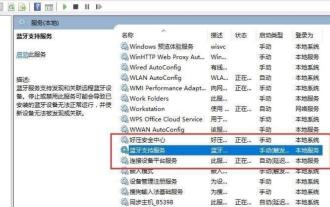
When we use the computer, we will find that win11 cannot connect to Bluetooth. So what should we do if win11 cannot connect to Bluetooth? Users can turn on the Bluetooth support service option or enter the network adapter under the device manager to operate. Let this site carefully introduce to users the analysis of the problem that Win11 Bluetooth cannot connect and can only pair. Win11 Bluetooth cannot connect and can only pair. Step 1: 1. Run (Win R), enter the [services.msc] command, and press [OK or Enter] to quickly open the service. 2. In the service window, find the name [Bluetooth Support Service]. 3. Double-click to open [Bluetooth Support Service], if the service status is stopped
 Apple 14 wired headphone link usage tutorial
Mar 22, 2024 pm 08:30 PM
Apple 14 wired headphone link usage tutorial
Mar 22, 2024 pm 08:30 PM
The Apple 14 is not equipped with a 3.5mm headphone jack in the traditional sense, so it cannot be directly plugged into ordinary headphones. If you need to listen to audio, you can only connect it with the help of an adapter or accessories using a dedicated interface. Apple 14 wired headset link usage tutorial A: Use a dedicated interface headset or adapter 1. Please note that the entire iPhone 14 series no longer provides direct support for wired headsets. 2. Since the release of iPhone7, Apple has not provided a 3.5mm headphone jack on new models. 3. If you want to use wired headphones on iPhone 14, it is recommended to choose a headset equipped with a dedicated adapter cable and thunderbolt interface. 4. Purchase at Apple’s official online accessories store, which is also launched by many third-party manufacturers.
