

Want to assemble a server computer to play games?

Want to assemble a server computer to play games? Building your own server computer is an attractive option for players who seek the ultimate in performance and a customized experience. However, this is a complex and carefully considered process that involves selecting the right components, configuring and optimizing the system, and more. PHP editor Baicao will provide you with a comprehensive guide to help you assemble a powerful game server computer step by step. Read on to learn more about the assembly process, component selection, and optimization tips to immerse yourself in an unparalleled gaming experience.

Want to assemble a server computer to play games?
The main difference in playing games on the server is the graphics card and memory. The CPU and hard disk of the server machine are very high configuration
It is not recommended to use the server host to play games, the price/performance ratio is not high
Is it okay to assemble a personal computer with a server CPU?
This is not recommended.
1. Although the performance of the server CPU is very strong, it is not suitable for playing games in home scenarios.
2. Because the server CPU is mainly designed to run complex computing tasks, its optimization focus is not on single-thread performance, but on multi-core concurrent processing.
3. Compared with the CPU of a home computer, its clock frequency is lower and its cache capacity is relatively small, which will cause its performance in single-threaded applications to be inferior to the CPU of a home computer.
4. In addition, server CPUs usually need to be used with specialized server motherboards, memory and other hardware, and the power consumption is higher than that of ordinary home computer CPUs, so use in a home environment may cause some discomfort. necessary questions.
If you want a better gaming experience, it is recommended to purchase a home computer CPU designed for gaming applications.
How to assemble the server?
1 Method 2 of assembling the server First, clarify the required hardware configuration, including processor, memory, hard disk, network card, etc. Choose appropriate hardware components based on your needs. 3 Secondly, install the motherboard into the chassis and connect the corresponding power cables and data cables. 4 Then, install the processor and memory module to the motherboard and make sure the connections are secure. 5 Next, install the hard drive and optical drive into the chassis, and connect the corresponding data cables and power cables. 6 Further, install the network card and other expansion cards to the motherboard, and connect the corresponding data cables and power cables. 7 Finally, connect external devices such as monitors, keyboards, mice, etc., and turn on the power. 8 After the server starts, perform the corresponding operating system installation and configuration as needed. 9 After completing the above steps, the server can run normally. 10 When assembling the server, you also need to pay attention to the following points: - Ensure the compatibility of the hardware you choose, such as the interfaces of the motherboard and processor match. - Pay attention to the installation of heat dissipation and fans to ensure that the server maintains an appropriate temperature when running. - When connecting the data cable and power cable, carefully check whether the connection is firm to avoid failure caused by looseness or poor contact. - Before installing the operating system, you can perform BIOS settings and hardware detection to ensure the normal operation of the server. To sum up, assembling a server requires clarifying the hardware configuration, following certain steps for installation and connection, and paying attention to hardware compatibility, heat dissipation, and connection stability. This can ensure the normal operation and stability of the server.
How to assemble the server?
The process of assembling the server is divided into several steps:
1. Prepare tools and materials: Prepare the required server hardware, screwdrivers, tweezers and other assembly tools, as well as rubber gloves and cables , power supply and other auxiliary materials.
2. Open the server packaging box: slowly open it along the edge of the box and take out the server main body.
3. Disassemble the power supply: Take the power supply out of the server chassis.
4. Install the power supply back into the server chassis: Connect the power cord to the power interface on the server motherboard, making sure the connection is correct.
5. Install the CPU, fan and memory:
a. Take out the CPU and insert it into the CPU slot of the motherboard. Pay attention to the corresponding relationship between the slot direction and the CPU pins.
b. Install the fan and connect the fan power cable to the connector on the motherboard.
c. Take out the memory and insert it into the memory slot of the motherboard. Pay attention to the corresponding relationship between the slot direction and the memory module.
6. Connect the motherboard and other hardware:
a. Connect the power cable, hard disk cable, restart cable, etc. on the motherboard to the corresponding interface.
b. Connect the graphics card (if any), pay attention to the interface between the graphics card power cord and the motherboard.
7. Connect the hard drive: Fix the hard drive on the server chassis and connect its data cable to the SATA interface on the motherboard.
8. Install the chassis cover: Fix the chassis cover on the server chassis.
9. Connect the power cord and chassis cable: Connect the power cord to the power interface, and connect the chassis cable (including boot cable, restart cable, etc.) to the corresponding interface on the motherboard.
10. Test: Connect the power supply and turn on the server to check whether it can run normally. If you encounter problems, check your hardware connections and configuration.
11. Install the operating system: Install a suitable server operating system as needed, and configure network, IP and other information.
After completing the above steps, the server can be used normally. During actual operation, corresponding adjustments may be required based on the specific configuration and needs of the server. If you are unsure, you can refer to relevant tutorials or seek professional help.
How much does it cost to assemble a computer?
Graphics card rtx2060 2500 yuan (supports ray tracing)
cpu R5 3600 1400 yuan
Motherboard: B450 600 yuan
m.2 Solid state drive 500G 600 Yuan
4T mechanical hard drive 600 yuan
Main case with fan + power supply 600w 500 yuan
Memory stick 8G two, 500 yuan
Keyboard and mouse 100 Yuan
List for assembling a computer?
Assembling a computer does require a checklist, because when we assemble the computer, after determining the configuration and operation requirements of the computer, we can purchase some suitable motherboards online, and then determine the power supply, graphics card and other configurations based on the motherboard. If you ask, just make a list and ask the computer factory or dealer directly to buy it
Assemble the computer, okay?
Assembling a computer can have some benefits, such as:
1. Customized configuration: Assembling a computer can choose the appropriate hardware configuration according to personal needs, and you can choose more based on your own purpose and budget. Suitable components.
2. Cost-effectiveness: Assembling a computer is more cost-effective than purchasing a brand-name machine. You can save costs by choosing hardware with higher cost-effectiveness.
3. Upgradeability: Assembling a computer is usually easier to upgrade the hardware. The hardware can be upgraded or replaced at any time as needed to improve the performance of the computer.
4. High degree of freedom: When assembling a computer, you can choose the appearance design, color matching, etc. according to your personal preferences, and you can create a unique computer.
However, there are also some challenges and risks in assembling a computer, such as requiring certain professional knowledge and skills, choosing inappropriate hardware that may cause compatibility issues or poor performance, possible risks during the assembly process, etc. . Therefore, if you do not have enough experience and skills, or do not know much about computer hardware, it may be more suitable to buy a branded machine.
Computer bed assembly?
There are drawings when you buy a computer desk, just assemble it according to the drawings
How to assemble a computer?
1. First connect the VGA cable to the monitor, and then fix the two screws at the back. The main reason for fixing is to worry about the connecting wire falling off when moving.
2. Then connect the other end of the VGA cable to the computer host.
3. Next, connect the power cord to the monitor. (Note that you are only connecting to the monitor. Do not connect the other end of the power cord to the socket. Wait until all connections are completed before turning on the power.)
4. Next, connect the mouse to the host.
5. Connect the keyboard as well. (The green one is the mouse, and the purple one is the keyboard. Also note that the internal pins of the mouse and keyboard plugs must be aligned with the pinholes in the interface before they can be inserted.) Connect one end of the network cable to the RJ45 interface of the computer host, and then connect the other end to the switch or router or modem.
6. Next, connect the power cord of the host.
7. Next, you can connect the power plugs of the host and monitor to the sockets to power on the host and monitor. You can start and use it normally.
Assemble computer configuration?
CPU Memory Motherboard Solid State Drive Power Supply and Chassis
The above is the detailed content of Want to assemble a server computer to play games?. For more information, please follow other related articles on the PHP Chinese website!

Hot AI Tools

Undresser.AI Undress
AI-powered app for creating realistic nude photos

AI Clothes Remover
Online AI tool for removing clothes from photos.

Undress AI Tool
Undress images for free

Clothoff.io
AI clothes remover

Video Face Swap
Swap faces in any video effortlessly with our completely free AI face swap tool!

Hot Article
Hot Tools

Notepad++7.3.1
Easy-to-use and free code editor

SublimeText3 Chinese version
Chinese version, very easy to use

Zend Studio 13.0.1
Powerful PHP integrated development environment

Dreamweaver CS6
Visual web development tools

SublimeText3 Mac version
God-level code editing software (SublimeText3)
Hot Topics
 1387
1387
 52
52

 How to install WinNTSetup into Win11 system_How to install WinNTSetup into Win11 system
May 08, 2024 am 11:19 AM
How to install WinNTSetup into Win11 system_How to install WinNTSetup into Win11 system
May 08, 2024 am 11:19 AM
First download the latest Win11 system ISO image, and then in Win10 system, you can directly right-click on the downloaded ISO image file and select [Load]; if it is under WinPE, WinXP, or Win7 system, you need to use the virtual optical drive tool to load the ISO Image; or you can directly decompress the ISO image file without using a virtual optical drive. Then run WinNTSetup. The software interface is as shown in the figure: First locate the location of the install.wim file. You can find the install.wim file in the sources directory of the Win11 ISO image loaded or decompressed by the virtual optical drive. Then set the location of the boot disk and installation disk. Generally, you are going to put W
 How to enter bios on hp motherboard
May 04, 2024 pm 09:01 PM
How to enter bios on hp motherboard
May 04, 2024 pm 09:01 PM
How to set up the U disk boot in the HP notebook bios (how to enter the HP computer bios) and then insert the U disk to be booted first into the USB port of the notebook. If you want to install the system, the system program must have been prepared in the U disk. First, open the laptop. Make sure the laptop is turned off. Setting the bios must be done with the computer turned off. Then insert the U disk that you want to boot first into the USB port of the notebook. If you want to install the system, the prerequisite is that the system program has been prepared in the U disk. Take the HP ProDesk400G5SFF desktop computer as an example. Set the BIOS disk startup method: First, restart the computer and wait for the startup screen to appear. There are two ways to set up USB disk startup on HP notebooks. One is to directly press the shortcut key to select
 How to install Windows system on tablet computer
May 03, 2024 pm 01:04 PM
How to install Windows system on tablet computer
May 03, 2024 pm 01:04 PM
How to flash the Windows system on BBK tablet? The first way is to install the system on the hard disk. As long as the computer system does not crash, you can enter the system and download things, you can use the computer hard drive to install the system. The method is as follows: Depending on your computer configuration, you can install the WIN7 operating system. We choose to download Xiaobai's one-click reinstallation system in vivopad to install it. First, select the system version suitable for your computer, and click "Install this system" to next step. Then we wait patiently for the installation resources to be downloaded, and then wait for the environment to be deployed and restarted. The steps to install win11 on vivopad are: first use the software to check whether win11 can be installed. After passing the system detection, enter the system settings. Select the Update & Security option there. Click
 How to enter bios after assembling a computer? How to enter bios when assembling a computer?
May 07, 2024 am 09:13 AM
How to enter bios after assembling a computer? How to enter bios when assembling a computer?
May 07, 2024 am 09:13 AM
How to enter bios after assembling a computer? Before entering the BIOS, you need to make sure that the computer is completely shut down and powered off. Here are several common ways to enter the BIOS: 1. Use shortcut keys: Most computer manufacturers will display a prompt message at startup telling you which key to press to enter the BIOS settings. Usually the F2, F10, F12 or Delete key. After pressing the appropriate keys, you should be able to see a screen with information about your computer's hardware and BIOS settings. 2. Use the button on the motherboard: Some computer motherboards have a dedicated button for entering BIOS settings. This button is usually labeled "BIOS" or "UEFI". After pressing the button you should be able to see
 MSI motherboard boot logo
May 08, 2024 pm 02:20 PM
MSI motherboard boot logo
May 08, 2024 pm 02:20 PM
How to cancel the MSI motherboard icon when booting 1. Press the DEL key when booting to enter the BIOS. Generally, in the "Advanced Features" item, you can find the words MSI motherboard LOGO screen. Select DISABLED, save and exit. There will no longer be this MSI motherboard LOGO screen when you turn on the computer in the future. MSI motherboard refers to the motherboard brand developed by MSI (MSI Technology Company). 2. The logo displayed when the computer is turned on is basically that of the motherboard manufacturer. You can set QUICKPOST to DISENABLE in the BIOS, so that the logo will generally no longer be displayed. It will display computer configuration-related information and give you more details. 3. First, teach you how to flash the BIOS in Windows environment. First: Go online
 How to upgrade Win11 system on old computers_Tutorial on upgrading Win11 system on old computers
May 07, 2024 pm 08:07 PM
How to upgrade Win11 system on old computers_Tutorial on upgrading Win11 system on old computers
May 07, 2024 pm 08:07 PM
1. First we need to download the win11 image file. 2. Put the downloaded win11 image into another disk. 3. Then we find the win11 image file among the searched image files. 4. Then when we come to this interface, we select install.wim to proceed to the next step. 5. Then select the Windows 11 system and click OK to restore the image file. 6. Then we wait for pe to download and install. Wait patiently. After the download is completed, click restart according to the prompts. 7. Then come to this interface, we select the second xiaobaiPE. After selecting, the win11 system will be automatically installed for us. After the installation is completed, click to restart the computer immediately according to the prompts. 8. Finally, the system installation is completed, and we come to
 How to upgrade Gigabyte motherboard to Win11_How to upgrade Gigabyte motherboard to Win11
May 06, 2024 pm 12:04 PM
How to upgrade Gigabyte motherboard to Win11_How to upgrade Gigabyte motherboard to Win11
May 06, 2024 pm 12:04 PM
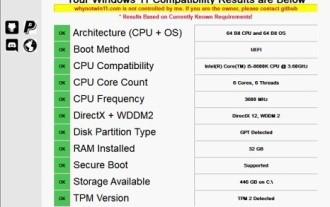
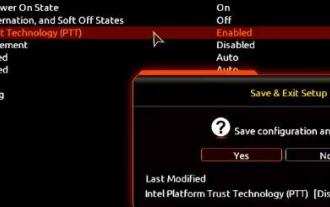
1. Win11 does not have very high requirements for the motherboard. You can first download healthcheck or whynotwin11 to check whether your other hardware devices support it (you can download it from this site). 2. If other conditions are met and only tpm does not meet the requirements, you can enable tpm in the bios settings. 3. Restart the system, and then press [DEL] on the keyboard to enter the BIOS settings when the logo pops up. 4. Enter the [Settings] option and [Miscellaneous] option in sequence. 5. Find [Intel Platform Trust Technology (PTT)] below and set it to [Start]. 6. If it is an AMD platform, then
 How to enable tpm2.0 in win11_How to enable tpm2.0 in win11
May 08, 2024 pm 06:10 PM
How to enable tpm2.0 in win11_How to enable tpm2.0 in win11
May 08, 2024 pm 06:10 PM
1. Gigabyte motherboard 1. First, we restart the computer and use the keyboard [DEL] to enter the BIOS settings when restarting. 2. Find and enter the [Settings] tab above. 3. Then find and enter [Miscellaneous] under settings. 4. Set [Intel Platform Trust Technology (PTT)] to [Enabled]. 5. After the settings are completed, use the keyboard [F10] to save, and then click [YES] to exit. 2. ASUS motherboard 1. First restart the computer and continuously tap [del] on the keyboard to enter the bios settings when booting. 2. Click [AdvancedMode] or press [F7] to find [A
