Tutorial on setting page numbers in word
Apr 25, 2024 pm 01:49 PMMicrosoft Word is a powerful word processing software, and page number setting is one of its basic functions. However, many users encounter difficulties when using it and do not know how to set page numbers. To this end, PHP editor Youzi brings you a tutorial on setting up Word page numbers, explaining in detail various methods of setting up page numbers, including page number insertion, page layout, headers and footers, etc., to help you easily solve this problem. Please continue reading the following article to learn how to set page numbers in Word to make your documents more standardized and easier to manage.
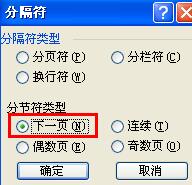
1. Place the mouse in front of the first character of [Second Page], click [Separator] in [Insert] on the menu bar, and in the pop-up [Separator] window we Check the box next to [Next Page].

2. Similarly, place the mouse in front of the first word at the beginning of [Page 3] and insert the –> separator –> next page.
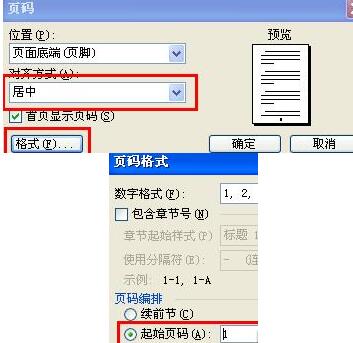
After inserting the [Separator] on the third page, do not move the mouse, select [Insert] on the menu bar, select [Page Number] in the drop-down menu, and then set [Alignment] to [Centered]. Click the [Format] button, a [Page Format] window will pop up, select [Start Page Number], enter [1] in it, and then confirm.

4. Double-click the page number of [Page 3]. At this time, you will enter the header and footer editing state. In the toolbar of [Header and Footer] , we click to close [Link to previous] (that is, close the link relationship with the previous page), as shown in the red area in the figure.

5. It is almost completed at this point. The first page number is 1, the second page number is 2, the third page number is 1, and the fourth page number is 2. Wait, this is how it is displayed. Next, you only need to manually delete the page numbers of [First Page] and [Second Page].
The above is the detailed content of Tutorial on setting page numbers in word. For more information, please follow other related articles on the PHP Chinese website!

Hot Article

Hot tools Tags

Hot Article

Hot Article Tags

Notepad++7.3.1
Easy-to-use and free code editor

SublimeText3 Chinese version
Chinese version, very easy to use

Zend Studio 13.0.1
Powerful PHP integrated development environment

Dreamweaver CS6
Visual web development tools

SublimeText3 Mac version
God-level code editing software (SublimeText3)

Hot Topics
 Your Calculator App Can Be Replaced By Microsoft Excel
Mar 06, 2025 am 06:01 AM
Your Calculator App Can Be Replaced By Microsoft Excel
 Don't Create Tables in Word: Use Excel Instead
Mar 06, 2025 am 03:04 AM
Don't Create Tables in Word: Use Excel Instead
 How to Reduce the Gaps Between Bars and Columns in Excel Charts (And Why You Should)
Mar 08, 2025 am 03:01 AM
How to Reduce the Gaps Between Bars and Columns in Excel Charts (And Why You Should)
 How to Use the AVERAGEIF and AVERAGEIFS Functions in Excel
Mar 07, 2025 am 06:03 AM
How to Use the AVERAGEIF and AVERAGEIFS Functions in Excel
 Microsoft Excel Keyboard Shortcuts: Printable Cheat Sheet
Mar 14, 2025 am 12:06 AM
Microsoft Excel Keyboard Shortcuts: Printable Cheat Sheet
 5 Things You Can Do in Excel for the Web Today That You Couldn't 12 Months Ago
Mar 22, 2025 am 03:03 AM
5 Things You Can Do in Excel for the Web Today That You Couldn't 12 Months Ago
 How to Use LAMBDA in Excel to Create Your Own Functions
Mar 21, 2025 am 03:08 AM
How to Use LAMBDA in Excel to Create Your Own Functions
 If You Don't Use Excel's Hidden Camera Tool, You're Missing a Trick
Mar 25, 2025 am 02:48 AM
If You Don't Use Excel's Hidden Camera Tool, You're Missing a Trick


