Photoshop制作精彩的自动翻页相册动画
制作动画之前,自己先要设计好喜欢的相册版面,可以直接找现成的素材,再把照片放到相册里面;然后根据平时翻页效果设定相册单个页面翻动动画即可。
最终效果
1、新建画布,设置如下图。 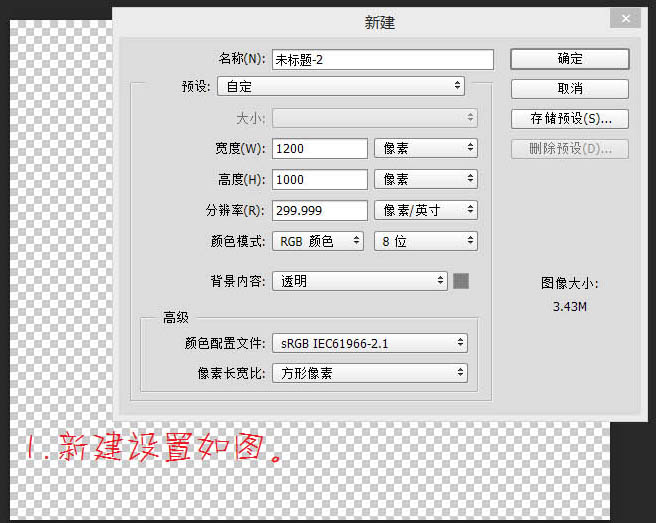
2、导入素材,调整好大小及位置,Ctrl + 鼠标左键单击素材图层获得选区,新建一层,执行:编辑 > 描边,设置如下图。 
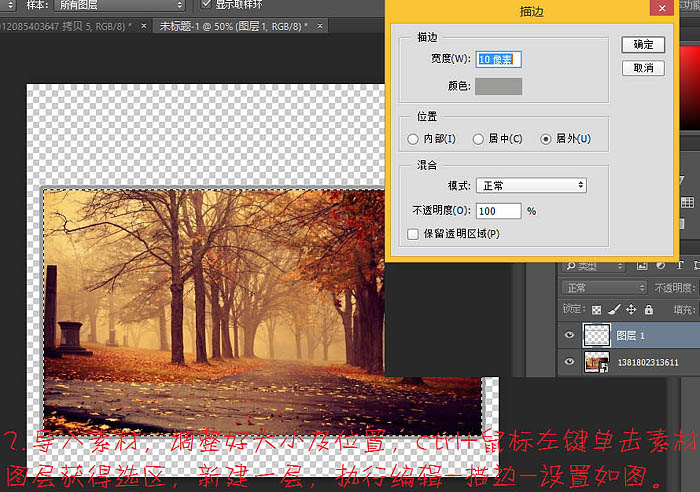
3、双击描边层,给描边层添加图层样式,如下图。 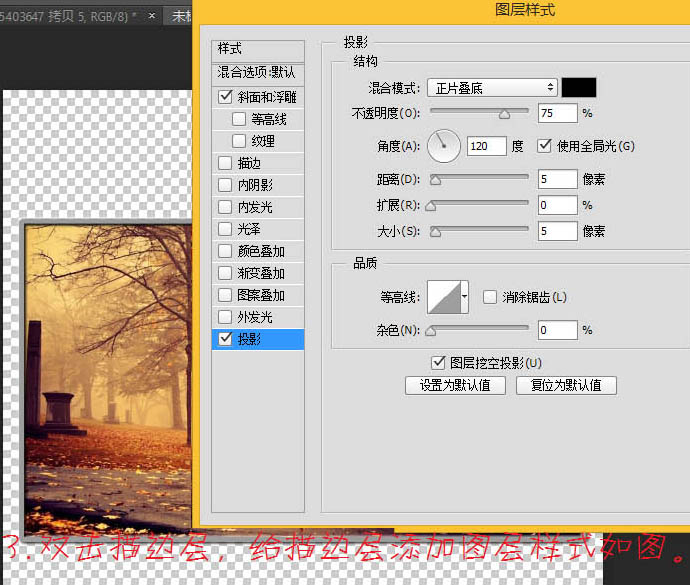
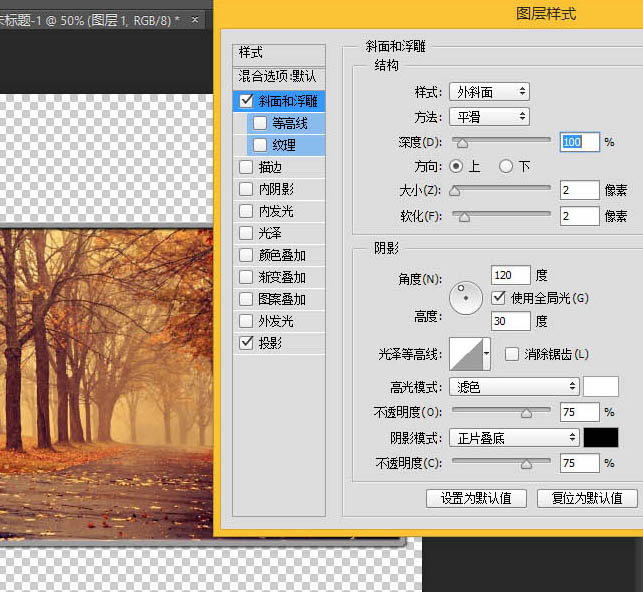
5、为了精确的水平分割图层,我们选择切片工具,右击选择划分切片设置如下图。 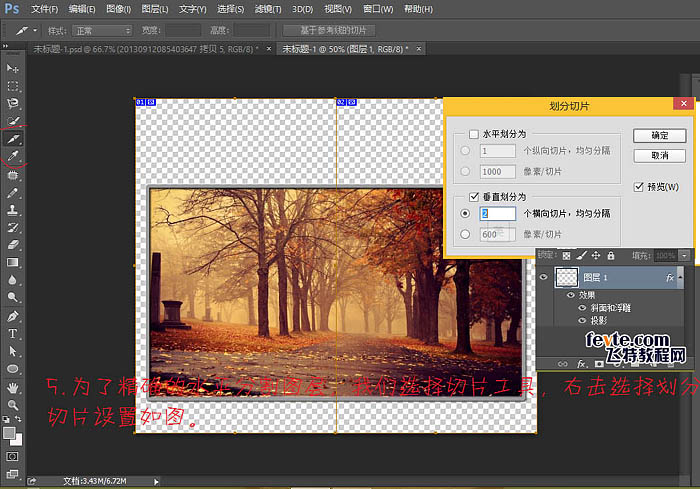
6、执行:视图 > 新建参考线,设置如图,选择移动工具将参考线移到与中间线重合。 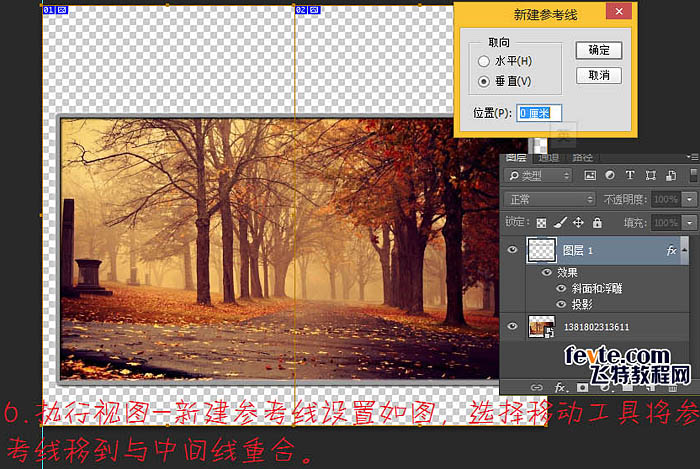
7、新建一层命名为“圆孔”,选择铅笔工具设置如下图。 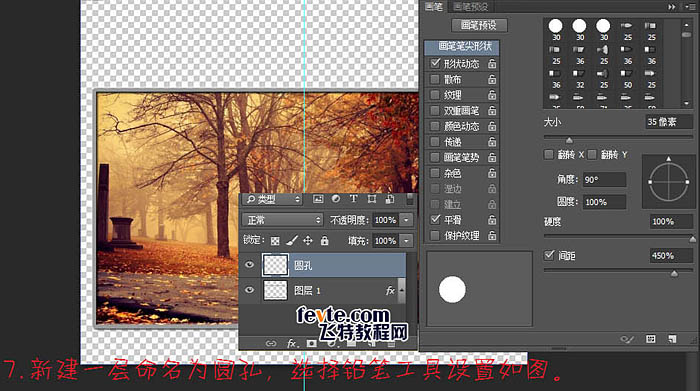
8、新建参考线移到如图,按住Shift用铅笔工具等距画出圆孔,复制一层,移到右边。 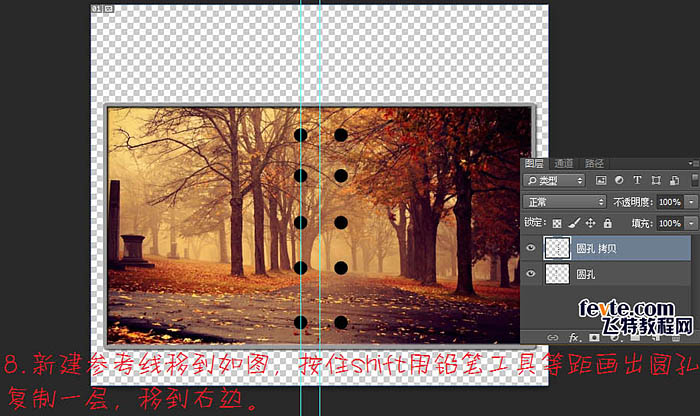
9、新建组命名为“页”,导入素材,调整大小及位置,复制一层,按Ctrl + T 右键水平翻转,调整至如图所示。 
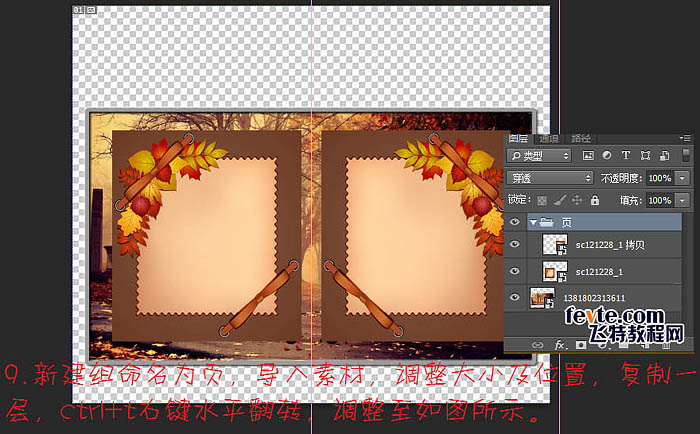
10、将圆孔图层合并,Ctrl + 鼠标左键单击该图层获得选区,选中组中的图层,分别栅格化图层,并按Delete删除。 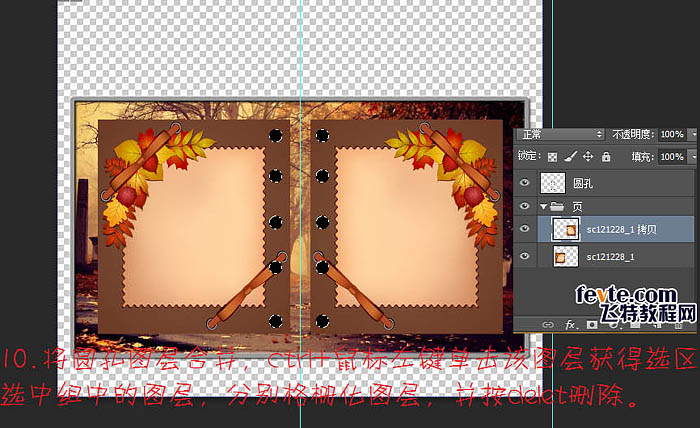

Hot AI Tools

Undresser.AI Undress
AI-powered app for creating realistic nude photos

AI Clothes Remover
Online AI tool for removing clothes from photos.

Undress AI Tool
Undress images for free

Clothoff.io
AI clothes remover

AI Hentai Generator
Generate AI Hentai for free.

Hot Article

Hot Tools

Notepad++7.3.1
Easy-to-use and free code editor

SublimeText3 Chinese version
Chinese version, very easy to use

Zend Studio 13.0.1
Powerful PHP integrated development environment

Dreamweaver CS6
Visual web development tools

SublimeText3 Mac version
God-level code editing software (SublimeText3)

Hot Topics
 How to speed up animation effects in Windows 11: 2 methods explained
Apr 24, 2023 pm 04:55 PM
When Microsoft launched Windows 11, it brought a lot of changes. One of the changes is an increase in the number of user interface animations. Some users want to change the way things appear, and they have to find a way to do it. Having animations makes it feel better and more user-friendly. Animation uses visual effects to make the computer look more attractive and responsive. Some of them include sliding menus after a few seconds or minutes. There are many animations on your computer that can affect PC performance, slow it down, and interfere with your work. In this case you have to turn off animation. This article will introduce several ways that users can improve the speed of their animations on PC. You can apply the changes using Registry Editor or a custom file you run. How to improve animations in Windows 11
 CSS Animation: How to Achieve the Flash Effect of Elements
Nov 21, 2023 am 10:56 AM
CSS animation: How to achieve the flash effect of elements, specific code examples are needed. In web design, animation effects can sometimes bring a good user experience to the page. The glitter effect is a common animation effect that can make elements more eye-catching. The following will introduce how to use CSS to achieve the flash effect of elements. 1. Basic implementation of flash First, we need to use the animation property of CSS to achieve the flash effect. The value of the animation attribute needs to specify the animation name, animation execution time, and animation delay time
![Animation not working in PowerPoint [Fixed]](https://img.php.cn/upload/article/000/887/227/170831232982910.jpg?x-oss-process=image/resize,m_fill,h_207,w_330) Animation not working in PowerPoint [Fixed]
Feb 19, 2024 am 11:12 AM
Animation not working in PowerPoint [Fixed]
Feb 19, 2024 am 11:12 AM
Are you trying to create a presentation but can't add animation? If animations are not working in PowerPoint on your Windows PC, then this article will help you. This is a common problem that many people complain about. For example, animations may stop working during presentations in Microsoft Teams or during screen recordings. In this guide, we will explore various troubleshooting techniques to help you fix animations not working in PowerPoint on Windows. Why aren't my PowerPoint animations working? We have noticed that some possible reasons that may cause the animation in PowerPoint not working issue on Windows are as follows: Due to personal
 How to set up ppt animation to enter first and then exit
Mar 20, 2024 am 09:30 AM
We often use ppt in our daily work, so are you familiar with every operating function in ppt? For example: How to set animation effects in ppt, how to set switching effects, and what is the effect duration of each animation? Can each slide play automatically, enter and then exit the ppt animation, etc. In this issue, I will first share with you the specific steps of entering and then exiting the ppt animation. It is below. Friends, come and take a look. Look! 1. First, we open ppt on the computer, click outside the text box to select the text box (as shown in the red circle in the figure below). 2. Then, click [Animation] in the menu bar and select the [Erase] effect (as shown in the red circle in the figure). 3. Next, click [
 How to use Vue to implement typewriter animation effects
Sep 19, 2023 am 09:33 AM
How to use Vue to implement typewriter animation special effects Typewriter animation is a common and eye-catching special effect that is often used in website titles, slogans and other text displays. In Vue, we can achieve typewriter animation effects by using Vue custom instructions. This article will introduce in detail how to use Vue to achieve this special effect and provide specific code examples. Step 1: Create a Vue project First, we need to create a Vue project. You can use VueCLI to quickly create a new Vue project, or manually
 After a two-year delay, the domestic 3D animated film 'Er Lang Shen: The Deep Sea Dragon' is scheduled to be released on July 13
Jan 26, 2024 am 09:42 AM
This website reported on January 26 that the domestic 3D animated film "Er Lang Shen: The Deep Sea Dragon" released a set of latest stills and officially announced that it will be released on July 13. It is understood that "Er Lang Shen: The Deep Sea Dragon" is produced by Mihuxing (Beijing) Animation Co., Ltd., Horgos Zhonghe Qiancheng Film Co., Ltd., Zhejiang Hengdian Film Co., Ltd., Zhejiang Gongying Film Co., Ltd., Chengdu The animated film produced by Tianhuo Technology Co., Ltd. and Huawen Image (Beijing) Film Co., Ltd. and directed by Wang Jun was originally scheduled to be released in mainland China on July 22, 2022. Synopsis of the plot of this site: After the Battle of the Conferred Gods, Jiang Ziya took the "Conferred Gods List" to divide the gods, and then the Conferred Gods List was sealed by the Heavenly Court under the deep sea of Kyushu Secret Realm. In fact, in addition to conferring divine positions, there are also many powerful evil spirits sealed in the Conferred Gods List.
 How to disable animations in Windows 11
Apr 16, 2023 pm 11:34 PM
Microsoft Windows 11 includes many new features and functions. The user interface has been updated and the company has also introduced some new effects. By default, animation effects are applied to controls and other objects. Should I disable these animations? Although Windows 11 features visually appealing animations and fade effects, they can cause your computer to feel sluggish to some users as they add a bit of lag to certain tasks. It's easy to turn off animations for a more responsive user experience. After we see what other changes have been made to the operating system, we'll walk you through how to turn animation effects on or off in Windows 11. We also have an article on how to
 Where to set the permission to open Douyin album? What should I do if the photos in its album are not displayed?
Mar 23, 2024 am 10:36 AM
Douyin is a popular short video application that allows users to easily capture and share the highlights of life. However, some users may encounter problems with album permissions when using Douyin. They are not clear about how to set album permissions, resulting in the inability to view or use photos in the album in Douyin. This article will explain in detail how to set the album permissions of Douyin and how to deal with the situation where Douyin cannot display the album photos. 1. Where to set the permission to open Douyin album? Setting album permissions in Douyin allows you to use the photos in the album more conveniently. The following are the steps to set album permissions: 1. Open the Douyin App and click the "Me" or "Personal Center" button. 2. On the personal center page, find the "Settings" or "Privacy Settings" button and click to enter. 3. in


